
We’ll begin with understanding different parts of application development, and then backend development, then towards backend development in the java ecosystem, then some main points prior to learning spring framework, then we bring back to spring framework, then we discuss the different componements of spring framework.
WHY SPRING WAS NEEDED?
Application development is the process of building software solutions which could be used by someone. For example, your application could be a social media app used by a human or an api which is getting consumed by another machine. An application could be either a web based app, a mobile based app, or an API.
Whenever there is any interaction required by the human user or there is a need for some sort of interface, then we need to implement those user interfaces. Say hi, to frontend development.
On very high level, frontend development is responsible for presenting the data to the end users in a readable and initiative format. It’s also responsible to access the interaction triggers. For example, submission of a form and doing something about it.
So, frontend development acts as a intermediary between the end user and some sort of black box. That black box is the backend component of the application. If front-end is all about presentation, the backend is all about what to present.
Essentially, backend systems are responsible for interpreting all the requests which are coming from the frontend and reply back with some sort of response.
In order to do so, the backend system has to do a lot of things. For example, process the request from the UI, authenticate if the user making the request is allowed to perform the required action or not, interact with some sort of storage layer if there is a need, facilitate the processing of business logic, and the list goes on... Along with that backend has to ensure that business logic works flawlessly.
Thankfully, all the backend handling other then the business logic follow a common pattern for both the front-end and back-end development. This common patterns have been extracted out as frameworks.
Java is no exception and has plenty of frameworks aimed for the backend development. To name a few, we have EJB, STRUTS, QUARKUS, MICRONAUT, SPRING etc.
These frameworks in java were not easy to work with, and were highly complicated. Java backend development started back to the year 1999 when J2EE 1.2 was launched and had several versions. J2EE is a branch in Java that was responsible for introducing the backend development.
Thanks to the enterprise edition J2EE, we also had a standard edition Java SE, and J2ME which is a mobile edition, which had more apis than standard edition to facilitate the backend development. Note that, J2EE and its later additions such as Java EE, Jakarta EE etc. which is a specification and not the actual framework itself.
Enterprise edition introduced the specifications for what we know as Servlet, JSPs, EJB, JMS etc. Two most common frameworks prior to SPRING were EJB and STRUTS.
SPRING was released in 2004. First version was written by Rod Johnson. Spring came into existence to simplicity involved with enterprise edition specifications. Some consider spring to be competitior to enterprise edition. However, this is not the case. It is complimentary to EE.
Spring took some good parts of the EE aspect, and carefully crafted to help with the complexities introduced by the EE.
Dependency injection although not a concept exclusive to J2EE. It was explicit in J2EE through EJB Components. Spring made DI a first class citizen providing a more explicit and flexible approach to manage object life cycle and dependency.
Aspect-oriented programming. AOP concepts were also present in J2EE. However, in a less explicit manner. For example, interceptors in EJB. Spring adopted AOP to offer a declarative way of programming around crosscutting concerts such as transactions and security, making the splits easier to manage and apply.
Data Access Objects. Spring borrowed the DAO pattern from J2EE to abstract and encapsulate all access to the data source. Spring implementation simplified for users by removing boilerplate JDBC code providing a more straightforward and productive approach to data access.
MVC (Model-view-controller) architecture, Spring MVC provided an alternative to J2EE servlets and JSK for building web applications. While the concept of MVC was not new, spring’s approach was mroe flexible and configurable compared to the J2EE model.
Here’s what Spring Introduced,
Simplified Configuration: Spring introduced a more simplified and flexible way of configuration. First with XML, and later with annotations and Java config. This was a departure form the heavy and verbos XML deployment descriptors used in J2EE.
Spring boot: Spring boot a project within the wider ecosystem introduced a convention over configuration approach making it possible to set up standalone production grid applications with minimal setup. This approach significantly reduced the complexity and boiler plate code required to start new projects.
Spring data: To further simplify data access. Spring introduced spring data. A comprehensive data access abstraction that supports NoSql databases, relational databases, map reduce frameworks, and even more. This was beyond J2EE approach which focused mainly on the relational databases.
Spring cloud: Spring cloud offers a suite of tools for building some of the common patterns in distributed systems. These were areas which were not covered in the J2EE specifications, but became increasingly important with the rise of cloud computing and microservices architecture.
The list is not exhaustive and the spring does offer more sweet stuff.
Spring boot: Takes an opinionated view of building spring applications and gets you up and running as quickly as possible.
Spring Framework: Provides core support for dependency injection, transaction management, web apps, data access, messaging, and more.
Spring data: Provides a consistent approach to data access - relational, non-relational, map-redice, and beyond.
Spring Cloud: Provides a set of tools for common patterns in distributed systems. useful fo building and deploying microservices.
Spring Security: Protects your application with comprehensive and extensible authentication and authorization support.
Spring Batch: Simplifies and optimizes the work of processing high-volume batch operations.
Spring for Apache Kafka: Provides familiar spring abstractions for Apache Kafka,
“From configuration to security, web apps to big data - whatever the infrastructure needs of your application may be, there is a spring project to help you build it. Start small and use just what you need - spring is modular by design.”
INVERSION OF CONTROL AND DEPENDENCY INJECTION
They are generic design patterns, not something only present in the spring framework.
Inversion of Control (IoC) is a design principle ( although some people refer to it as a pattern ). As the name suggests, it is used to invert differrent kinds of controls in object-oriented design to achieve loose coupling. Here, controls refer to any additional responsibilities a class has, other than its main responsibility, This includes control over the flow of an application, and control onver the flow of an object creation or dependent object creation and binding.
Let’s imagine you’re planning a birthday party for your friend. Think of IoC as deciding not to organize every detail of the party by yourself but instead you decide on hiring a partner planner. This planner takes over the organizing responsibilities for you. For example, booking the venue, ordering the cake, arranging the DJ, and so on.. You’re not controlling it direfctly, you handled over the control to the planner. This is like IoC, where later your framework manages parts of your application.
Imagine that for the party to be successful, the planner needs several things from you. For example, a list of guests, your friend’s favourite cake flavour, and th ebudget instead of planner. Figuring these out details on their own, you provide or inject this information directly, This ensures that the plan has everything needed to organize the party without having to guess the details. In software development, this is like dependency injection where the framework supplies the components a class needs rather than the class creating them itself.
In this party, IoC is like the decision to not micromanage every aspect of the party yourself but instead let the party planner take over you. You inverted the control of party planning from yourself to the planner. DI is a technique within this setup, where you ensure the planner has all the necessary information and resources they need to make the party a success.
IoC Container
In spring, we create objects in a different approach. Here, we create objects using some sort of configuration instead of just using the new keyword. On surface, it may seem as unnecessary and complex thing to do. However, this has lots of benefits when compared to the approach of creating objects using the new keyword.
Beans
When objects are created in the spring suggested way, they are tagged somehow. Imagine framework placing some sort of marker on such objects. So, spring does have a clear and precise control over such objects. Such objects could be thought of being managed by spring once they have been created. So beans are nothing but spring managed objects.
Where are beans kept
Where do you keep a bunch of objects, which you want to manage in some way in your day-to-day life, some container I guess. Spring does the same and it keeps them in some sort of container and it’s called as IoC or bean container. These containers are created based on some configuration which you provide.
Types of IoC containers
There are two types of containers: Bean factory and application context.
Bean factory provides the configuration framework and basic functionality whille the application context adds enhanced capabilities to it. Some of which are perhaps more J2EE and enterprise centric. In general, application context is a complete superset of bean factory. For most of th practical use case, you’d be used some class of the application context interface for your implementation.
Roles of IoC Container
Instantiating the classes, configuring objects and assembling dependencies between objects is the bare minimum which the IoC container does. However, the container managed classes are available for plethora of more such benefits, such as contralized configuration, decoupling, simplified testing, lifecycle management, aspect oriented programming, transaction management, environment abstraction, and many more.
Ways of Supplying configuration
The configuration metadata is supplied via XML, Java Annotation, or Java code. Please note that XML approach is legacy and is rarely used. So, we may not cover the same.
Your application classes are combined with configuration metadata so that after the context, object is created and initialized. You have a fully configured and executable system or application in place.
How To Create Beans In Spring Using @Bean Annotation
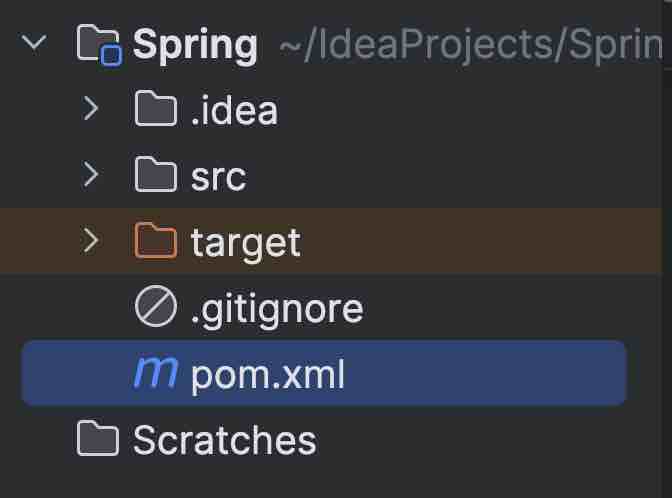
We’ll use Maven Build System And Java Langauge as selected for the IntelliJ Project.
Maven will give you a pom.xml file as default, where you’d be adding dependencies onto it.
Get the dependency link of the spring context from maven repository.

Create some packages on IntelliJ, such as beans, runner and configuration package.
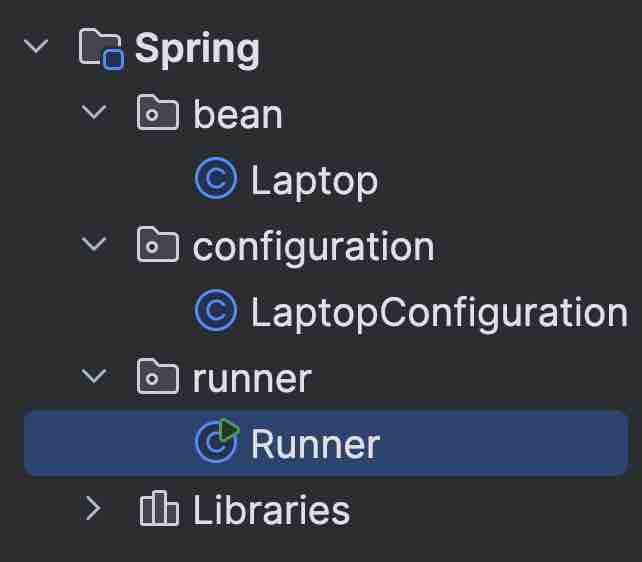
The bean package will contain all the posers that we want to be tagged as a bean by the spring framework, and configuration will contain the configuration classes, and runner is where we’ll be writing the code to test whatever we have implemented.
Let’s create a pojo inside a bean. A simple class Laptop with getters and setters.
package bean;
public class Laptop {
String brand;
public Laptop(){
brand = "Macbook";
}
public Laptop(String brandName){
this.brand = brandName;
}
public String getBrand(){
return brand;
}
}
Let’s go to the configuration, where we’d be creating the configuration using which we’ll be creating the bean.
When you start the program, spring’ll look for all the classes that are tagged as Configuration.
The idea behind @Configuration annotation is that it is a guideline to the spring framework to consider this class in somewhat special manner and when the spring framework starts looking inside this class, it would search for certain definition or certain configuration with respect to creating a bean.
In this case, we’ll be creating beans using the @Beans annotations.
Spring framework begins with configuration package, it sees @Configuration annotation then it goes inside, then it finds out a bean configuration because it has been annotated with @Bean annotation, Then it goes inside this particular method and it says that an object has been created and then it’s getting returned back. @Bean annotation gives spring framework the idea that it has to create baen out of it.
We can create anything, whether a function of return type object, or a string, or integer. So we’re creating certain objects and returning it with @Bean annotations.
package configuration;
import bean.Laptop;
import org.springframework.context.annotation.Bean;
import org.springframework.context.annotation.Configuration;
@Configuration
public class LaptopConfiguration {
@Bean
Laptop lappy(){
Laptop lappy = new Laptop("Lenovo");
lappy.getBrand();
return lappy;
}
@Bean
String text(){
return "HelloWorld";
}
}
We’ll now go to the runner package, and create an object that we defined in the bean package.
We know that we have two types of bean containers, one is bean factory and another is application context. So whenever we start the application, then spring will go inside the configuration and create three @Beans out of the functions that are returning something within the @Configuration annotation, then spring will keep it inside this application context, which is essentially the Bean container.
Now, we have to fetch the beans which has been created and kept in the container. In order to do so, we’ll create a handle for the object and maybe call it a context. Here; we’ll be using AnnotationConfigApplicationContext() and we’ll pass Cofiguration class to its parameter.’’ This class we used accepts more than one configuration classes. In our use case, we have only created one configuration.
In the context handle, we can call getBean(). So, getBean() is an overloaded method which is going to accept different kind of signatures but we wll be using the one where we need to supply the class type.
package runner;
import bean.Laptop;
import configuration.LaptopConfiguration;
import org.springframework.context.annotation.AnnotationConfigApplicationContext;
public class LaptopDemo {
public static void main(String[] args) {
// non-spring class
Laptop l = new Laptop("Apple");
System.out.print("Non Spring Objects: ");
System.out.println(l.getBrand());
// context handler of that container
var context = new AnnotationConfigApplicationContext(LaptopConfiguration.class);
System.out.print("Spring Objects: ");
// bean objects
var lappy = context.getBean(Laptop.class);
System.out.print(lappy.getBrand());
var text = context.getBean(String.class);
System.out.print(" " + text);
}
}
Non Spring Objects: Apple
Spring Objects: Lenovo HelloWorld
Process finished with exit code 0
So, the first object in the example is coming from a non-spring context. This is the object that we have created in the usual way. And this is the reason that we are getting it. Then we are going to access the bean which has been cerated and stored in the bean container. In order to do so, we created the context first. So, basically, we got the handle for the bean container first and after we have the handle for the bean container. We said that, get me the bean, which is of this particular return type and it said, all right. So, basically, you have the context handle and you used getBena() method on it.
Summary
- Application Starts
- Scanning for configuration classes
- Beans are created and registered and kept in the container
- We fetch the bean from the container and make good use of it
How To Resolve NoUniqueBeanDefinitionException In Spring
Let’s create a bean class of name Car with its getters and setters. Now, let’s also create a CarConfiguration and initialize two bean classes of type Car. Now, let’s create a new runner class CarDemo.
package bean;
public class Car {
String car;
public Car(){
car = "Ferrari";
}
public Car(String carName){
car = carName;
}
String getCar(){
return "I love " + car;
}
}
package configuration;
import bean.Car;
import org.springframework.context.annotation.Bean;
import org.springframework.context.annotation.Configuration;
@Configuration
public class CarConfiguration {
@Bean
Car one(){
return new Car();
}
@Bean
Car two(){
return new Car("Flying Cars");
}
}
package runner;
import bean.Car;
import configuration.CarConfiguration;
import org.springframework.context.annotation.AnnotationConfigApplicationContext;
public class CarDemo {
public static void main(String[] args) {
var context = new AnnotationConfigApplicationContext(CarConfiguration.class);
var carOne = context.getBean(Car.class);
System.out.println(carOne.getClass());
}
}
When you’ll get the context handler using AnnotationConfigAppliactionContext(). and when you’d have used getBean() method on the Car class. Then an error’ll be thrown.

“NoUniqueBeanDefinitionException: No qualifying bean of type ‘beans.Car’ available: expected single matching bean but found 2”
Spring is getting confused when it sees that I need to fetch the bean of type Car, but I have two of them, so which one do you want. So, let’s use another variation of .getBean() method.
Remember that getBean() method is overloaded and has lots of variations. One such variation is where we provide the bean name followed by the bean type.
package runner;
import bean.Car;
import configuration.CarConfiguration;
import org.springframework.context.annotation.AnnotationConfigApplicationContext;
public class CarDemo {
public static void main(String[] args) {
var context = new AnnotationConfigApplicationContext(CarConfiguration.class);
var carOne = context.getBean("one", Car.class);
System.out.println(carOne.getCar());
var carTwo = context.getBean("two", Car.class);
System.out.println(carTwo.getCar());
}
}
I love Ferrari
I love Flying Cars
Process finished with exit code 0
So, we have resolved the issue by providing the bean name along with the return type, So, the idea is whenever you have more than one matching beans then in that case, you cannot use getMethod() as it is But you’ll have to supply the bean name as well so that you don’t get into the error of no unique bean exception.
How To Give CUSTOM Name To a Bean In Spring
As we saw earlier, that the bean name is the method name that we provide, which is the default bean name. What if we want to change the bean name itself. Well, then are there three ways in which we could do the same.
You could use the name property of @Bean annotation, or the value property of @Bean annotation, or you could directly pass the string to the annotation.
package bean;
public class Phone {
String phone;
public Phone(String phoneName){
this.phone = phoneName;
}
public String getPhone() {
return phone;
}
}
package configuration;
import bean.Phone;
import org.springframework.context.annotation.Bean;
import org.springframework.context.annotation.Configuration;
@Configuration
public class MobilePhoneConfiguration {
@Bean(name = "apple")
Phone phone1(){
return new Phone("Apple ipad 13 Pro Max");
}
@Bean(value = "samsung")
Phone phone2(){
return new Phone("Samsung Galaxy S8 Ultra Pro");
}
@Bean("oppo")
Phone phone3(){
return new Phone("Oppo Super Ultra Camera Clarity Mobile");
}
}
package runner;
import bean.Phone;
import configuration.MobilePhoneConfiguration;
import org.springframework.context.annotation.AnnotationConfigApplicationContext;
public class PhoneDemo {
public static void main(String[] args) {
var context = new AnnotationConfigApplicationContext(MobilePhoneConfiguration.class);
var mob1 = context.getBean("apple", Phone.class);
var mob2 = context.getBean("samsung", Phone.class);
var mob3 = context.getBean("oppo", Phone.class);
System.out.println(mob1 + " " + mob2 + " " + mob3);
System.out.println(mob1.getPhone());
System.out.println(mob2.getPhone());
System.out.println(mob3.getPhone());
}
}
bean.Phone@662ac478 bean.Phone@6743e411 bean.Phone@3eb25e1a
Apple ipad 13 Pro Max
Samsung Galaxy S8 Ultra Pro
Oppo Super Ultra Camera Clarity Mobile
Process finished with exit code 0
@PrimaryAnnotation in Spring
When we have multiple beans returning the same type of object, then using @Primary annotation with one of those @Bean annotations will take that bean as the default bean when no name has been given.
In that case, we can directly use the default getBean() method with the return type of object that all beans share, and then the bean with the @Primary annotation will be called.
package bean;
public class Reservation {
String mode;
public String getMode() {
return mode;
}
public Reservation setMode(String mode) {
this.mode = mode;
return this;
}
}
package configuration;
import bean.Reservation;
import org.springframework.context.annotation.Bean;
import org.springframework.context.annotation.Configuration;
import org.springframework.context.annotation.Primary;
@Configuration
public class ReservationConfiguration {
@Bean
@Primary
Reservation Classic(){
return new Reservation().setMode("Clasic");
}
@Bean
Reservation Economy(){
return new Reservation().setMode("Economy");
}
@Bean
Reservation Premium(){
return new Reservation().setMode("Premium");
}
}
package runner;
import bean.Reservation;
import configuration.ReservationConfiguration;
import org.springframework.context.annotation.AnnotationConfigApplicationContext;
public class ReservationDemo {
public static void main(String[] args) {
var context = new AnnotationConfigApplicationContext(ReservationConfiguration.class);
var defaultReservation = context.getBean(Reservation.class);
System.out.println(defaultReservation.getMode());
}
}
Stereotype
Stereotype is a fixed simplified and generalized perception about anything, So whenever any stereotype is attached with anything, you expect a fixed set of property or expect it to behave in a certain way.
What are Stereotype annotations in spring?
In spring, stereotype annotations refer to a set of annotations which provide metadata about how a particular class should be treated by the framework. These annotations are stereotype because they generalize the role of notated classes within the application context.
Main Stereotype Annotations In Spring
@Component
It indicates that a class is a spring managed component and it is the most generic stereotype for any spring component. Spring will detect and register beans automatically for the annotated classes during the class path scanning. So, the idea is that you put this annotation above a class and provide some sort of configuration then spring should be able to scan the configuration and have this class as a managed component or a bean in its spring container.
@Service
Specifies that a class is service component in the busines layer.
@Repository
Specifies that a class is repository.
It is a mechanism for encapsulating all data access related.
@Controller
Marks a class as a web controller, which can handle HTTP requests.
While using the stereotype annotations, we need to add the annotation above the class for which we need to have an instance created in the spring context.
We also need to instruct the spring on where to find the classes which have been marked with stereotype annotations. We use @ComponentScan for this.
How To Use @Component Annotation To Create Bean In Spring
Now, the bean class will be annotated with the @Component, which means that spring will automatically detect it and register it in the configuration container once @ComponentScan is used for the same package where @Component of your bean is kept.
So,@ComponentScan does expect us to pass base packages. It is a list of the packages where your beans will be kept. So, for now just have it the same name as package where your bean component is kept.
So essentially, you have created the component class and now you need to tell the spring framework that hey, I have a configuration and your task is to go and scan all these packages, reason is that my component would be placed in this package.
package bean;
import org.springframework.stereotype.Component;
@Component
public class Hotel {
String name;
String location;
public String getName() {
return name;
}
public String getLocation() {
return location;
}
public void setName(String name) {
this.name = name;
}
public void setLocation(String location) {
this.location = location;
}
public String welcomeMessage(){
return "Hello, welcome to the hotel";
}
}
package configuration;
import org.springframework.context.annotation.ComponentScan;
import org.springframework.context.annotation.Configuration;
@Configuration
@ComponentScan(basePackages = "bean")
public class HotelConfiguration {
}
package runner;
import bean.Hotel;
import configuration.HotelConfiguration;
import org.springframework.context.annotation.AnnotationConfigApplicationContext;
public class HotelDemo {
public static void main(String[] args) {
var context = new AnnotationConfigApplicationContext(HotelConfiguration.class);
var hotel = context.getBean(Hotel.class);
System.out.println(hotel.getName());
System.out.println(hotel.getName());
System.out.println(hotel.welcomeMessage());
}
}
Please note that unlike the approach where we were using the annotation to create the bean. We were able to change the object state by using its getters and setters. But here when we use the component. There is no direct way to do so, and that is the reason that these fields are not initialized, and we are getting them as null. However, the methods which has nothing to return will work flawlessly as expected.
In summary, what’s happening is whenever the application is getting started, spring is going and is checking for the configuration. It’s going to the base package, and it’s going to get this definition for the bean and it’ll create this object and place this in its bean container. But other than that, it has no idea regarding what exactly is going to be the value of object fields.
Autowiring
It is essentially a powerful feature which allows us for doing automatic dependency injection. In simple terms, its the spring way of automatically wiring together the dependencies in your application.
How do we make any backend application in Java? The common pattern is that there would be different classes and each of the classes would need to interact with each other somehow. So, how do we compose components of an application.
Essentially, your application in Java would consist of different classes and those classes need to interact with each other. One way is to do it manually, as in you use the new keyword, create the object and carry on with your business implementation. Other way is make use of auto wiring with the spring framework.
So, auto wiring takes care of all the heavy lifting for you. You simply annotate the dependencies and the spring will automatically detect and inject them whenever it is needed.
This will not only save oyu time, but it will also keep track of all the beans and objects which are involved in a much more cleaner and maintainable way.
How do we enable autowiring in spring?
If you were to use an XML configuration method. In that case, you would have to put this particular text inside your xml configuration file, which is <context:annotation-config/>. However, with the annotation based configuration, all we need to do is create the bean using either of the approaches that we discussed earlier, and once those beans are available for being used in the application, they are also available for autowiring.
The only prerequisite of enabling auto wiring in the spring is have the beans in the spring context and they are available for auto wiring. And what are the different ways in which we can do autowiring. Well, there are three different ways in which we can do auto wiring.
One way is bu using the auto wiring properties.
The other way is by using the setter methods.
And finally, the last method is by using constructors.
package bean;
import org.springframework.stereotype.Component;
@Component
public class Address {
public Address(){
System.out.println("Hey, we got the address!");
}
}
package bean;
import org.springframework.beans.factory.annotation.Autowired;
import org.springframework.stereotype.Component;
@Component
public class Person {
private String name;
@Autowired
private Address address;
public Person setName(String name){
this.name = name;
return this;
}
public String getName() {
return name;
}
}
package runner;
import bean.Person;
import configuration.HotelConfiguration;
import org.springframework.context.annotation.AnnotationConfigApplicationContext;
public class PersonDemo {
public static void main(String[] args) {
var context = new AnnotationConfigApplicationContext(HotelConfiguration.class);
var p = context.getBean(Person.class).setName("Hero");
System.out.println(p.getName());
}
}
Hey, we got the address!
Hero
Process finished with exit code 0
First way by using the autowired property
@Autowired
private Address address;
Other way by using on the setters
@Autowired
public void setAddress(Address address){
this.address = address;
}
The last way is by using the constructors
@Autowired
public Person(Address address){
this.address = address;
}
Now, with respect to constructor based autowiring. There are a few things that we may wish to focus on. First is whenever we are doing a constructor based autowiring, it is a way of enforcing that these dependencies are kind of non-optional as they are mandatory. So, even if you don’t put this autowired annotation on top of it. It’ll work as expected. So, let’s remove the @Autowired annotation and see that it’s working the same.
So, the way it happens is that you’re going to call the constructor and then set this. So, spring does understand it implicitly that when you are providing a bean dependency and you are setting it up in the constructor, then you wish to do an auto wiring, but it’s a good idea to have this autowired placed on top of it that works implicitly anyway. Surely, improves your readability.
Out of all the ways of autowiring, the setter based one is the least preferred one because it’s not very intuitive or readable. So, although it is there. It is very rarely used. And then we have the field based injection and then the constructor based injection.
We can use field based injection whenever particular dependency is kind of an optional dependency and whenever we have to enforce a very mandatory kind of dependency, it’s good to have that in the constructor based injection.
Please note that it’s not that you cannot have a non-mandatory dependency when you do constructor injection, and it’s not that you cannot have a sort of very mandatory dependency if you do field based injection. You can surely do it.
Autowiring and optional dependencies
What happens if the Address was not a bean. Let’s remove @Component annotation from the Address class. And run the above code from the PersonDemo.

“No qualifying bean of type 'bean.Address' available:
Expected at least 1 bean which qualifies as autowire candidate.”
So basically what happened is it was expecting a bean of this particular type rather. And then it could not find it because we removed the component annotation here. The spring could not create this bean and this we ran into this particular error.
It signifies that whenever you’re trying to dependency, there are two ways, one is where you surely need a dependency, and this is the way to implement it that you provide a auto wiring constructor. The other thing is, in certain cases, you may not need that dependency. That dependency could come or may not come. So, in that case, somehow you need to hint that all right, this is an optional dependency.
So, when we are doing auto wiring, we have another property called as required and we can mark that as false. So, when we do it as false. It should help us with marking this as a non-mandatory dependency or an optional dependency
@Autowired(required = false)
public Person(Address address){
this.address = address;
}
But it may still not work in some cases for constructor based injection. What we need to do is, instead of having it here on the top of the constructor method, we should have it inside the parameter itself.
public Person( @Autowired(requried = false) Address address) {
this.address = address;
}
So, whenever injection is being done for this use case. Spring will take care and it will understand that this thing could be optional. In the cases, where it’s not getting the bean for this particular address. It’ll not create any issue by throwing an exception. Rather, it’ll continue with it’s own execution.
This time, on deleting the @Component annotation of address. It’ll not throw an error using the Auto wiring. Rather, it’ll be created as expected but it’ll not call the constructor of address.
It’ll have the same behaviour for the field based optional dependency.
@Autowired(required = false)
private Address address;
Autowiring disambiguation (@Qualifier)
By default, spring does autowiring by type. If there are more than one beans of the same type, spring throws exception. Ways to resolve this ambiguity is through @Qualifier and Autowiring by name.
We’ll create a interface AuthenticationService { void auth(); } And we’ll have few implementations of this interface. First, we’ll create a class VanillaAuthentication that implements AuthenticationService {} and create a @Component of it. Then, we’ll create another class OAuthAuthentication which implements the same interface.
package bean;
public interface Authentication {
void auth();
}
package bean;
import org.springframework.stereotype.Component;
@Component
public class VanillaAuthentication implements Authentication{
public VanillaAuthentication(){
System.out.println("Vanilla Authentication executed !");
}
@Override
public void auth() {
System.out.println("Authenticated using Vanilla !");
}
}
package bean;
import org.springframework.stereotype.Component;
@Component
public class OAuthAuthentication implements Authentication {
public OAuthAuthentication(){
System.out.println("OAuthAuthentication executed !");
}
@Override
public void auth() {
System.out.println("Authenticated using OAuthAuthentication !");
}
}
package bean;
import org.springframework.beans.factory.annotation.Autowired;
import org.springframework.stereotype.Component;
@Component
public class AuthVerifier {
@Autowired
private Authentication auth;
public AuthVerifier(){
System.out.println("Authentication Verified !");
}
}
package runner;
import bean.AuthVerifier;
import bean.Authentication;
import configuration.HotelConfiguration;
import org.springframework.context.annotation.AnnotationConfigApplicationContext;
public class AuthDemo {
public static void main(String[] args) {
var context = new AnnotationConfigApplicationContext(HotelConfiguration.class);
var auth = context.getBean(AuthVerifier.class);
System.out.println(auth.getClass());
}
}
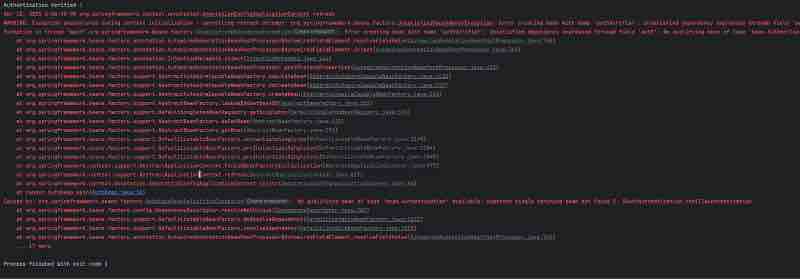
You’ll get this output with the ambiguity error saying,
“No qualifying bean of type 'bean.Authentication' available: expected single matching bean but found 2: OAuthAuthentication, vanillaAuthentication”
To resolve this ambiguity while using interfaces, we’re implementing, @Qualifier annotation, which qualifies the class that matches with its name to be implemented using interfaces.
package bean;
import org.springframework.beans.factory.annotation.Autowired;
import org.springframework.beans.factory.annotation.Qualifier;
import org.springframework.stereotype.Component;
@Component
public class AuthVerifier {
@Autowired
@Qualifier("vanillaAuthentication")
private Authentication auth;
public AuthVerifier(){
System.out.println("Authentication Verified !");
}
}
Authentication Verified !
Vanilla Authentication executed !
OAuthAuthentication executed !
class bean.AuthVerifier
Process finished with exit code 0
The Qualifier resolves this ambiguity by mentioning the specific class name it needs to implement. Also note that the first letter of the class name here is in small letters.
We can also provide an explicit name to the Qualifier by mentioning a name where Component has been created such that,
@Component(“BetterAuth”);
The default autowiring
The default autowiring in spring is by type. So, essentially, whenever you’re doing an autowiring then spring will try to find out the bean of this particular type. So, when we placed autowired on the interface object. It will check how many beans are there for that type, and if there is only one, it will go and hotwire the same. However, if there is more than one then in that case, it will go and autowire the one which you provide that is the qualifier.
Advantages of Autowiring
It promotes loose coupling between components, improves code readability, enhances testability by making it easier to mock dependencies during testing.
Summary
Whenever you’re creating a real world application, you’ll have certain components and then you’ll need to provide some sort of wiring so that they could interact with each other.
One way to do is like using the new keyword. But it’ll not lead to a clean code, and spring will not know tht what are the beans that has been created using the new keyword. And essentially, you lose all the benefits of creating a bean and placing it in the spring context.
And the other way is where you have this auto wiring concept. So, you first create the beans and once you have created the beans, all you need to do is just make use of it whatever place you may wish to have. It can be used anywhere as long as it’s available in the bean context, or you could autowire as needed.
Aspect Oriented Programming
What is an aspect
An aspect is a simple piece of code which you want to be executed by the spring framework. Whenever you call some specific methods inside your application, your application code consists of two types: one category falls under the business logic and the other one falls under the non-functional requirements.
Examples of non-functional requirements could be logging security auditing tec. Such code related to non-functional requirements could be written along with the actual business logic code but it becomes a maze as the code base grows.
So, instead of plumbing the code related to auditing logging and security into our actual business logic methods. We can maintain them in a separate place with the help of an aspect and we can configure the spring framework which is a smart enough to execute the logic which we mentioned inside the aspect.
With this approach, we separate out the business logic code and the code related ot non-functional requirements. It makes our code base more maintainable.
Imagine, a scenario where we have implemented logging and security inside all of our methods in the application. Let’s say, in a thousand or hundreds of methods, what happens if there is a requirement change with respect to the non-functional requirements. Then, we’ll have to change all the code sections related to non-functional requirements in all the places. This does not seem correct right, Moreover, it would be a cumbersome task to do so,
So, with the help of AOP, we can build applications by separating the crosscutting concerns, also known as the non-functional requirements, totally separate from the business logic. The way to do this, is to build the non-functional requirement logic in a separate place with the help of aspects and configure those aspects to be executed on teh basis of business requirements.
So, even if there is a scenario where you have to change how you handle the non-functional requirements. The change will be in a single place and that will get reflected to all the methods present inside your application. This is a major advantage of using AOP.
How is it different from writing these aspects in some file and then invoking them by creating their object. This AOP way doesn’t really seem anything special. However, this aspect oriented programming dynamically injects the logic present inside an aspect whenever a particular method is executing inside your application, so you don’t have to call the logic present inside the aspect manually. That way, this is always pluggable into your application. Whenever you want, just supply the configuration and you should be good to go.
AOP is a module inside the spring core framework and all your configurations and housekeeping are taken care of by this module. AOP concepts for a spring developer are very essential. Spring itself uses this concept in most of the spring projects such as spring security, spring data jpa etc. Without knowing AOP, you’d be confused about what’s happening inside your application.
This general sense of cluelessness of not knowing AOP arises due to the nature of abstract configurations of AOP and lack of typical method invocation. Java method invocations are intuitive to navigate and debug configurations. However, they may feel mysterious if we don’t understand them well.
Aspect Oriented Programming
Aspect - What | Advice - When | Pointcut - Which
A really good example of aspect could be a code blog which prints log statements of the code block or the method which you want to probe on saying it. Simply, which tells around the method which you want to intercept for some event, Point cut is the jargon for this.
A real world example of point cut could be a method which, for example, is calculating interest on a loan amount. Any method you want to be intercepted by the spring aop is a point cut, when the time during the flow of the method when you want to aspect to be executed.
Advice is the when for this. A real world example could be before the method invocation or after a method invocation, so to repeat it one more time point cut in any code block in your application which you want ot be intercepted or proved.
ASPECT is the code which is typically your non-functional requirement related which you want to get executed and ADVICE is a time snapshot during the execution of the point cut when you want the aspect to be executed.
THREE MAIN TYPES OF ADVICE
BEFORE ADVICE | AFTER ADVICE
AROUND ADVICE ( AFTER THROWING ADVICE | AFTER RETURING ADVICE )
An example of before advice could be this. Before a method is called, the logging aspect may write a message to a log file indicating the method being executed.
An example of after advice could be a security related task after a successful login attempt. The security aspect might record the successful login in an audit file and in case of a non-successful login attempt. The system could record the reason for failure in an audit file.
An example of the around advice could be an aspect could handle a database transactions before a data update method to ensure everything goes smoothly and commit the changes or roll back if there is an error.
WEAVING IN AOP
Weaving is the general process of integrating aspects into the existing code.
Dynamic interception of method calls is done by the proxy object creation and beinging creates proxy objects that stand in for the actual target objects.
These proxy objects intercept method calls and perform additional actions defined in the aspects before or after delegating the call to the real object.
When you invoke a method inside a bean, spring creates a proxy object for that bean.
Instead of making use of the reference for the bean itself, it invokes the reference for the proxy object.
Imagine you are a chef in a busy restaurant kitchen, you have different stations where you prepare food, one for cutting vegges, one for grilling meat and so one.
Let’s say, restaurant owner wants all the dishes living the kitchen to have a special garnish. let’s say, sprinkle of magic seasoning but adding the seasoning to every dish individually would take a lot of time and effort slowing down the kitchen.
So, here is how weaving helps by using the proxy objects in aop could help think of each station in the kitchen as different parts of your code like functions or methods that do specific tasks.
The special seasoning is like the extra functionality, you want to add to every dish. In coding terms, it could be something like logging or security checks.
Seasoning is basically your non-functional requirement for the proxy chef. Imagine a helper chef, who stands at the pass and sprinkles the magic seasoning on every dish as it leaves the kitchen.
This helper chef is your proxy object. It’s not the main chef or the actual code in your class rather it’s there to add something extra to each dish without you having to do it yourself.
So, Weaving is what the proxy chef does. It goes around adding the magic seasoning to every dish that comes out of the kitchen in coding. It’s like injecting the extra functionality in your code without changing the original code itself.
Summary
In summary, aop is like a set of instructions for the proxy chef. It tells them exactly when and where to add the magic seasoning. It helps them know which dishes need the seasoning and how to add it consistently.
AOP Program
Let’s look at example code for a restaurant service.
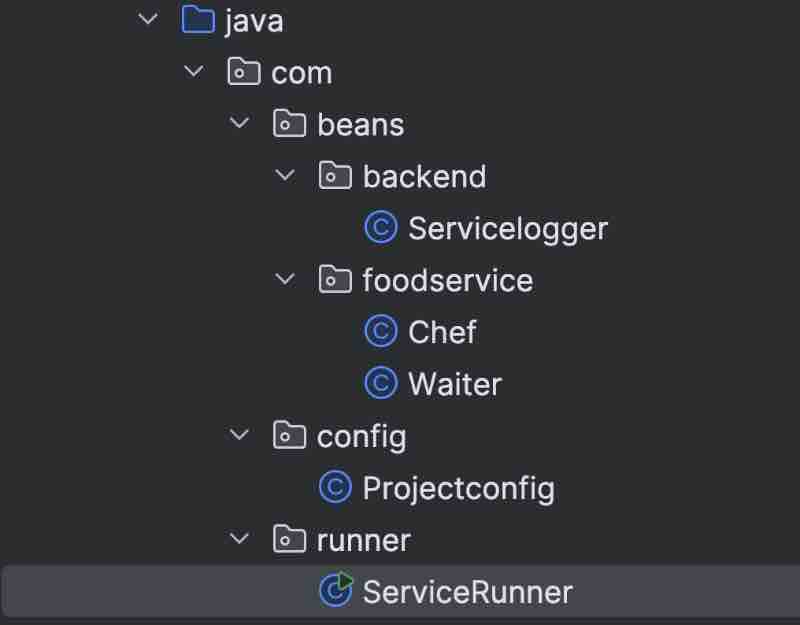
package com.beans.foodservice;
import org.springframework.stereotype.Component;
@Component
public class Chef {
public void cook(){
System.out.println("Food has been cooked !");
}
}
package com.beans.foodservice;
import org.springframework.stereotype.Component;
@Component
public class Waiter {
public void serve(){
System.out.println("Food has been served !");
}
}
‘package com.beans.backend;
import com.beans.foodservice.*;
import org.springframework.beans.factory.annotation.Autowired;
import org.springframework.stereotype.Component;
import java.time.Duration;
import java.time.Instant;
import java.util.logging.Logger;
@Component
public class Servicelogger {
@Autowired
private Chef c;
@Autowired
private Waiter w;
public Logger log = Logger.getLogger(Servicelogger.class.getName());
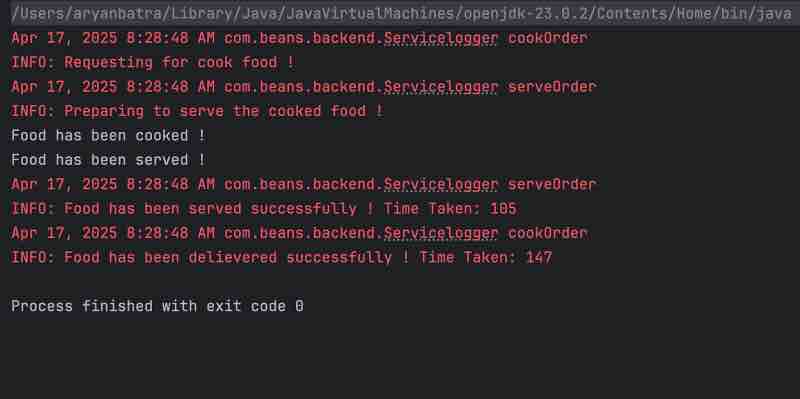
public void cookOrder(boolean FoodOrdered) throws InterruptedException {
Instant s = Instant.now();
log.info("Requesting for cook food !");
if(FoodOrdered){
c.cook();
serveOrder();
} else {
System.out.println("Food ordering cancelled !");
}
Instant e = Instant.now();
long d = Duration.between(s,e).toMillis();
log.info("Food has been delievered successfully ! Time Taken: " + d);
}
public void serveOrder() throws InterruptedException {
Instant s = Instant.now();
log.info("Preparing to serve the cooked food !");
Thread.sleep(100);
w.serve();
Instant e = Instant.now();
long d = Duration.between(s,e).toMillis();
log.info("Food has been served successfully ! Time Taken: " + d);
}
}
package com.config;
import org.springframework.context.annotation.ComponentScan;
import org.springframework.context.annotation.Configuration;
@Configuration
@ComponentScan(basePackages = {"com.beans.foodservice", "com.beans.backend"})
public class Projectconfig {
}
package com.runner;
import com.beans.backend.Servicelogger;
import com.config.Projectconfig;
import org.springframework.context.annotation.AnnotationConfigApplicationContext;
public class ServiceRunner {
public static void main(String[] args) throws InterruptedException {
var context = new AnnotationConfigApplicationContext(Projectconfig.class);
var service = context.getBean(Servicelogger.class);
service.cookOrder(true);
}
}
What we want is this to be managed by the spring framework, we can do this using @Aspect annotation and we’ll have to mark this as a bean for the same. Now, we’ll create the logger object in the similar way as above.
Let’s create a method which logs a situation where the food has not been ordered.
In order to guide the spring framework AOP that where exactly I want this particular piece of code to be executed. I’ll have to give it some advice. So, advice is, I want to do it before execution of a method. I’l use @Before annotation. However, I have not told spring AOP that which method exactly is this right to do so. So, we’re defining something called as a point cut.
So, what exactly is a point cut?
Imagine we have started executing the RestaurentService. In that class, where we have implemented the cookOrder() and serveOrder() functions. Here, each and every instruction in the code is a point, right. So, everything is a point. Essentially, when you put a debug point or a break point, that’s also a point, right.
So, if you imagine the execution flow as a straight line. All these things are certain points. So, point cut is essentially a particular spot during the execution of the program. And the expression that we design which will be used along with the advice that is going to be the point cut expression.
Which will be telling the spring aop framework that hey, before jumping from one point to another point (the point of executing a method), begin the execution for another method beforehand.
We have certain advice @Before, which tells that for certain particular point in the code execution flow, you have to do this, right.
Let’s understand a few things about the the concept of point cut.
POINT CUT
For understanding the expression in the point cut, we should first have a good understanding of what is a point cut designators. So, there are quite a few Point Cut Designators (PCDs). The main ones are execution, within, and arg.
So, execution signifies that whatever regex is being provided, that will identify a method and when that regular expression is being used with execution, it means that whatever advice I have created, that should be evaluated during the execution of that method.
execution(* com.beans.foodservice.*.*(..))
So, let’s understand what exactly is this regular expression.
First thing is the return type, and when we have a star, it means, our method could return anything, it could be any return type, and then we have the package. So, inside the package, we used star, so it could be any class inside the package and then it could be any method inside the any class, and this thing (..) signifies the number of arguments.
So, essentially, if we look at the entire regular expression, what it signifies is that any method inside any class inside this particular package with any number of arguments for that method.
When such method is executed then I have to execute the logic that I have written in the advice.
within(com.beans.*)
This expression is very similar to execution, the only difference is that when we say within, it signifies that any class any method that is inside this particular package. So, basically all the packages, classes and methods inside those classes. Everything is covered with this kind of designator which is within the next one.
args(FoodOrdered, ..)
Argos is used to specify a method. When we say, FoodOrdered, then there is a parameter for a method. Other than this parameter, it could have any parameters. So, essentially, find a method which is going to accept one parameter of this type, and it could have any number of other parameters.
Type binding happens when we have the method signature.
We can combine these designators with the boolean operators.
&&, ||, !
execution(* com.beans.foodservice.*.*(..)) && args(FoodOrdered, ..)
Basically, you can combine more than one point cut designators and they should be able to uniquely identify the methods where you want to apply some sort of aspect.
The example could be this, go and check the execution of this particular methods, and out of those methods, accept only those who are honoring this criteria.
Let’s write the point cut expression for the same.
@Before(“execution(* com.beans.foodservice.*.*(..) ) && args(FoodOrdered, ..) ”)
We have completed the point cut expression for this advice.
How Arguments are mapped?
Spring AOP relies on Arg positioning and Arg type for mapping.
Suppose we need to accept more than one boolean types.
execution(* com.beans.foodservice.*.*(boolean, boolean, ..))
So, the mapping will be done on the basis of relative positioning.
void cookFood(boolean isFoodOrderPlaced, ..., boolean isUrgent, ..)
So, you don’t need to pass the exact variable name.
Using Aspects
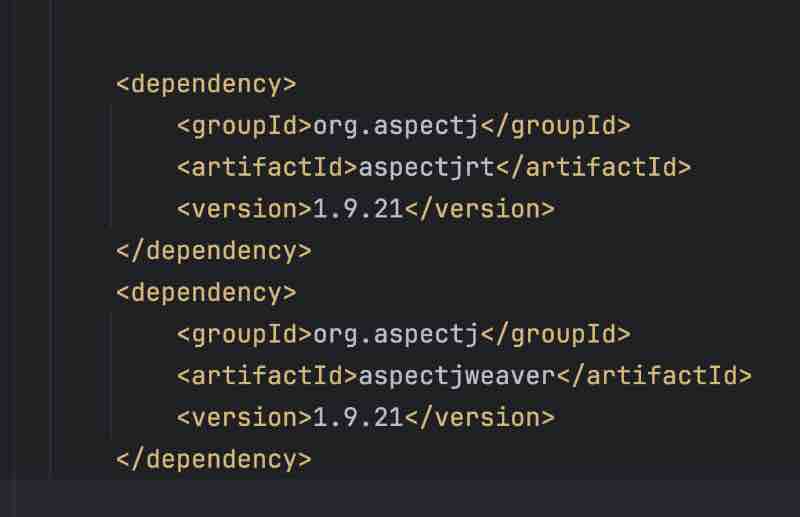
First, we added the Maven dependency using the aspectj.
Then we use the aspect in a new package and a new class.
We used the point cut on our advices for these functions.
package com.aspect;
import org.aspectj.lang.annotation.After;
import org.aspectj.lang.annotation.Aspect;
import org.aspectj.lang.annotation.Before;
import org.springframework.stereotype.Component;
@Aspect
@Component
public class FoodStatus {
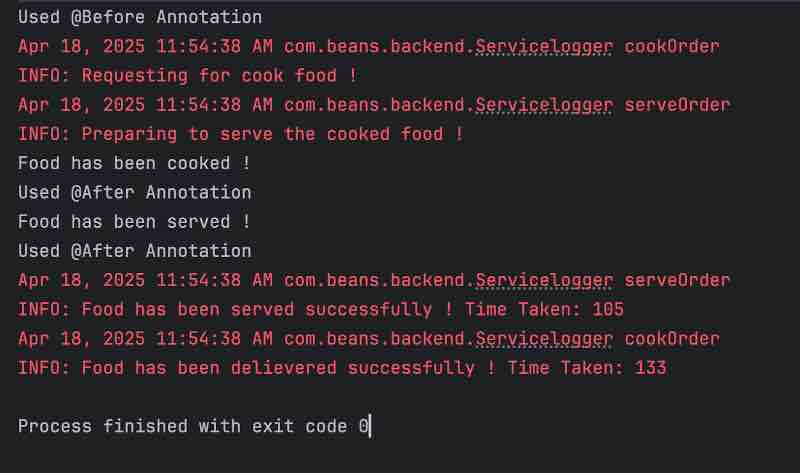
@Before("execution(* com.beans.backend.*.*(..) )")
public void status(){
System.out.println("Used @Before Annotation");
}
@After("execution(* com.beans.foodservice.*.*() )")
public void statuscheck(){
System.out.println("Used @After Annotation");
}
}
Don’t forget to add this package into our configuration.
And also enable aspects through @EnableAspectJAutoproxy.
package com.config;
import org.springframework.context.annotation.ComponentScan;
import org.springframework.context.annotation.Configuration;
import org.springframework.context.annotation.EnableAspectJAutoProxy;
@Configuration
@ComponentScan(basePackages = {"com.beans.foodservice", "com.beans.backend", "com.aspect"})
@EnableAspectJAutoProxy
public class Projectconfig {
}
@After Advice
For after, we have two types, one is after throwing and other is after returning. Though we have an after advice as well, which is a mixture of both of these two, but let’s see them too.
JoinPoint
In this implementation, we’ll be using JoinPoint. What is it?
JoinPoint is something which is going to us two information, one is the location. It pinpoints a particular event in the program flow. And the second thing is, it holds some information details. And the details are regarding the method signature and the arguments. In order to understand this, let’s write the after throwing annotation.
@Afterthrowing accepts two arguments, one is value, and other is throwing.
So, what throwing does is, it signifies that this thing is going to throw an exception and using this handle, we can capture it and we can make use of that exception. So, either you could handle the exception or you could just trably log it or do whatever you want.
JoinPoint is having certain information, the first thing is the location, that we are at this particular method and the other information regarding the details, is like it has the method signature, and the other things with respeoct to the number of arguments.
So, we are extracting the method signature from the JoinPoint, and we are going to capture the exception of that method, and make use of that exception, to fix the message details and then from the joinPoint, we are fetching the signature and we are using this two information to print this log statement.
package com.aspect;
import org.aspectj.lang.JoinPoint;
import org.aspectj.lang.annotation.AfterThrowing;
import org.aspectj.lang.annotation.Aspect;
import org.springframework.stereotype.Component;
@Aspect
@Component
public class FoodStatus {
@AfterThrowing(value = "execution(* com.beans.foodservice.*.*())", throwing = "ex")
public void status(JoinPoint j, Exception e){
System.out.println(j.getSignature() + " Exception occured due to " + e.getMessage());
}
}
Don’t forget to throw an exception on the functions from where you are doing point cut.
package com.beans.foodservice;
import org.springframework.stereotype.Component;
@Component
public class Chef {
public void cook(){
System.out.println("Food has been cooked !");
throw new RuntimeException("Restaurent has been closed !");
}
}
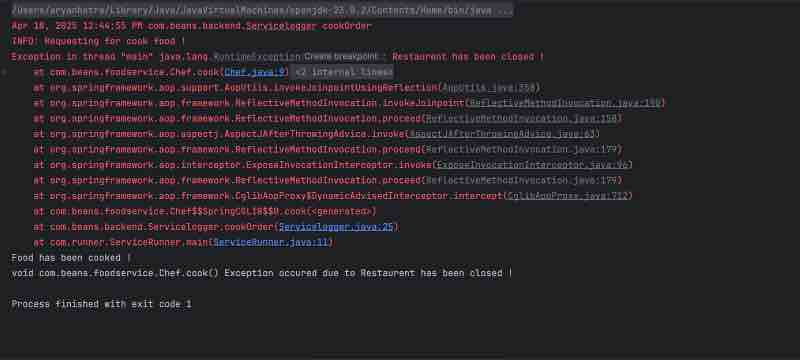
When this aspect comes into action, what it says is that after you intercept this method and if there is a event where in this method ends up into throwing an exception, you capture that exception and from that exception you fetch the message and make use of that message to print this information in the log. This is how it’s getting executed.
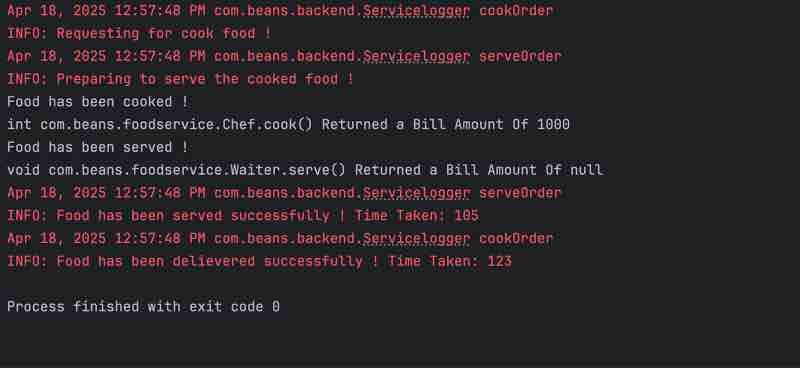
@AfterReturning
This advice is executed whenever your method exists in a normal way after returning some value. Instead of throwing, what we need to pass is returning argument instead of throwing, and an object in method parameter that receives it.
package com.aspect;
import org.aspectj.lang.JoinPoint;
import org.aspectj.lang.annotation.AfterReturning;
import org.aspectj.lang.annotation.AfterThrowing;
import org.aspectj.lang.annotation.Aspect;
import org.springframework.stereotype.Component;
@Aspect
@Component
public class FoodStatus {
@AfterReturning(value = "execution(* com.beans.foodservice.*.*())", returning = "r")
public void status(JoinPoint j, Object r){
System.out.println(j.getSignature() + " Returned a Bill Amount Of " + r);
}
}
Don’t forget to change the function you’re putting point cut on to return something from it.
package com.beans.foodservice;
import org.springframework.stereotype.Component;
@Component
public class Chef {
public int cook(){
System.out.println("Food has been cooked !");
return 1000;
}
}
Based on the joint point execution, methods that match the point cut will be intercepted and whatever is being returned, that will be captured and made use in the log message.
However, when you use @After advice, it will be executed in both the cases regardless of the fact that your method is exiting in a normal manner or maybe it’s exiting because due to some exception.
@Around Advice
It is known as the most powerful advice, because it provides some sort of better flexibility with the help of code execution. So, in order to implement the around advice. Let’s start with implementing the method using ProceedingJoinPonit.
We capture the start time, then we capture the end time. Once the method execution has ended, and finally, we capture the elapsed time, and then print the same. In the last, we’d also print method execution finished.
So, wehn we talk about around, it executes in both ways of before and after. It can either execute before the execution of the method and after execution of the method. What we can do is, we can play around with the execution of the method.
ProceedingJoinPoint
ProceedingJoinPoint is almost the same as JoinPoint, as you can see that it is extending the JoinPoint. It is a specific type of JoinPoint. It goes beyond providing information about the intercepted point. It also provides the capability to control the execution of the target method.
In the method, we call the proceed() method of ProceedingJoinPoint. What it does is that, whatever is before the proceed() method call is treated as before the execution of method, and after the proceed() call, it tells the main method that you are free to proceed with your execution, then we have the execution handle further treated as after section of execution of method.
Using the ProceedingJoinPoint, you could control the execution of the method. It’s kind of splitting the method into before and after parts, from the proceed() call.
Around is somewhat powerful that you could implement both ways before and after the execution of a method.
package com.aspect;
import org.aspectj.lang.ProceedingJoinPoint;
import org.aspectj.lang.annotation.Around;
import org.aspectj.lang.annotation.Aspect;
import org.springframework.stereotype.Component;
@Aspect
@Component
public class FoodStatus {
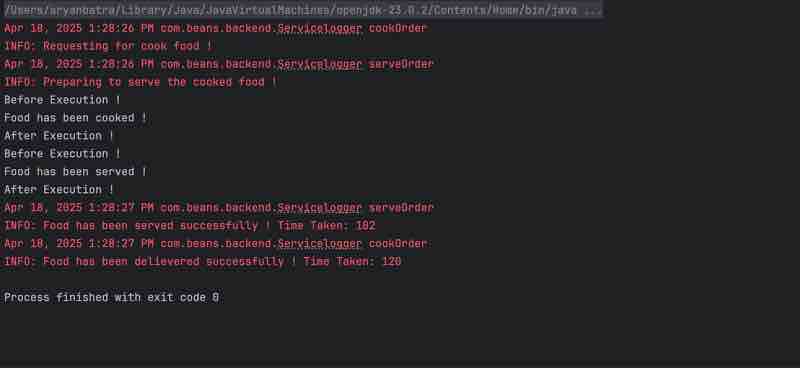
@Around("execution(* com.beans.foodservice.*.*())")
public void status(ProceedingJoinPoint j) throws Throwable {
System.out.println("Before Execution !");
j.proceed();
System.out.println("After Execution !");
}
}
Spring Boot And To Do Application
Spring boot is an extension of the spring framework which aims to simplify the the bootstrapping and development of new spring applications. It is designed to get you up and running as quickly as possible with minimal configurations.
The key features of spring boot are auto configuration, opinion based defaults, microservice support, and starter dependencies.
So, auto configuration means that the spring boot automatically configures third party libraries whenever possible.
Opinion based defaults means that it provides a sensible default for many configuration reducing the need for manual setup.
Microservices support means out of the box support for building microservices with features like service discovery and circuit breakers etc.
Starter dependencies are another great feature of a spring boot which means that using a spring initializer, you could include the necessary starter dependencies that will pull in all the necessary libraries.
Why should we use spring boot?
First thing is that it helps with rapid application development. So, when you use a spring boot, you will be having less boilerplate code, meaning that you can focus on writing the actual business logic.
Second thing is that it’s production ready and it means that there are features like health checks, externalized configuration, matrix collection etc, which makes the application production ready with little effort.
And then we have the ease of use which means that it is designed for developers with any level of experience.
So, we’ll be learning practically, and building an application for the to-do management.

So, we’ll be exposing certain input points, certain REST API endpoints, which can be used by this user. And these endpoints are responsible for creating the to-do list, then reading the to-do list, and we can update it and delete it.
This is facilitated by this layer called as controller layer, which in turn talks to something called as service layer, and then service layer is facilitated by this data layer.
Spring Initializer
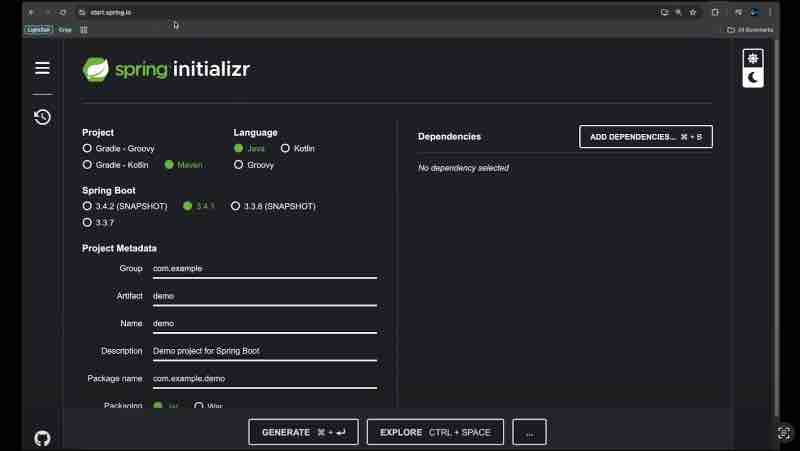
So, we are on this website called as a spring initializer.
This is a platform and a tool using which you could start your spring bot projects. So, using this, you could add all the necessary dependencies. So, you don’t have to create the project structure from XML and all those details manually.
Project here defines which is the build tool that we’ll be using, and I’ve selected Maven.
In the language, we have been provided with the JVM languages.
In the project metadata, we’ll define the project details.
We’ll go ahead with Jar, and Java 17.
Now, let’s start adding the dependencies one by one.
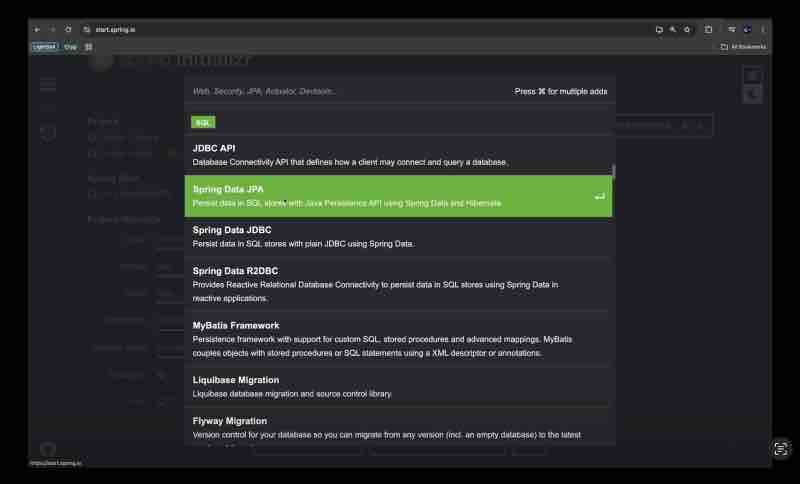
Spring Data JPA: A component that is responsible for persisting data in SQL stores with Java persistence APIs using spring data and hibernate. So, all you have to do is select this and this will be put forward into your pom.xml and all the necessary dependencies, the files and all those things will be available in your class path to be used.
The idea is that the spring ecosystem has all these dependencies, right.
For our to-do-list tutorial, we’ll be using Lombok. Lombok is essentially a Java notation library which will help you in reducin the boilerplate code. So, we’ll see its capabilities and what it can do in brief.
Another dependency, needed is Spring Web. It helps in building RESTful end points, and applications using spring MVC, and it has a default embedded container, that is Apache Tomcat. We can change that too, but this is the default one.
This dependency is needed if you want to build any RESTApis using the spring framework.
After selecting the dependencies, click on generate button, and when we say generate, it’ll download the zip file for us, and we could extract it and import in the IDE.
So, when you’ll check the dependencies in the XML file of your project.
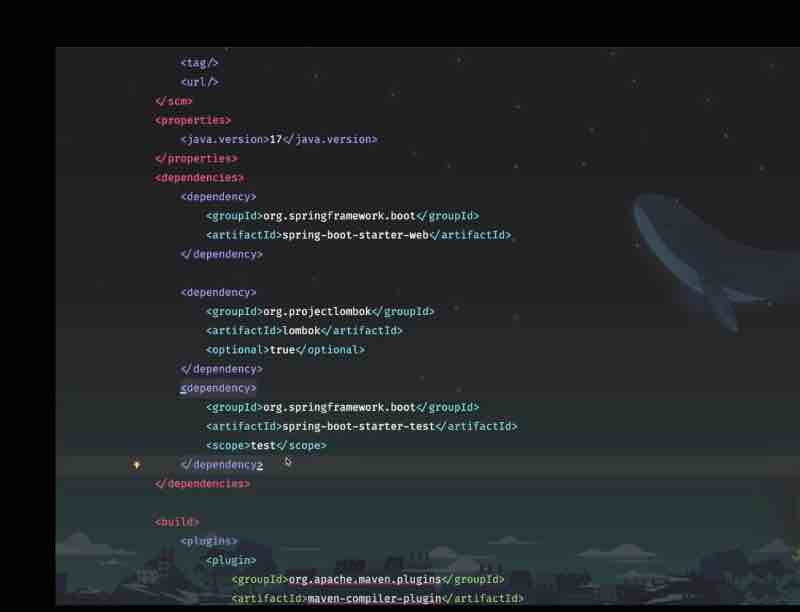
You’ll see that the project has an additional dependency, namely spring-boot-starter-test.
This dependency is added by default in the spring boot framework.
Then we have build configuration. Here, you have this plugin for lombok because the notation processing is something that needs to be available. So, maven is adding this plug-in on your behalf.
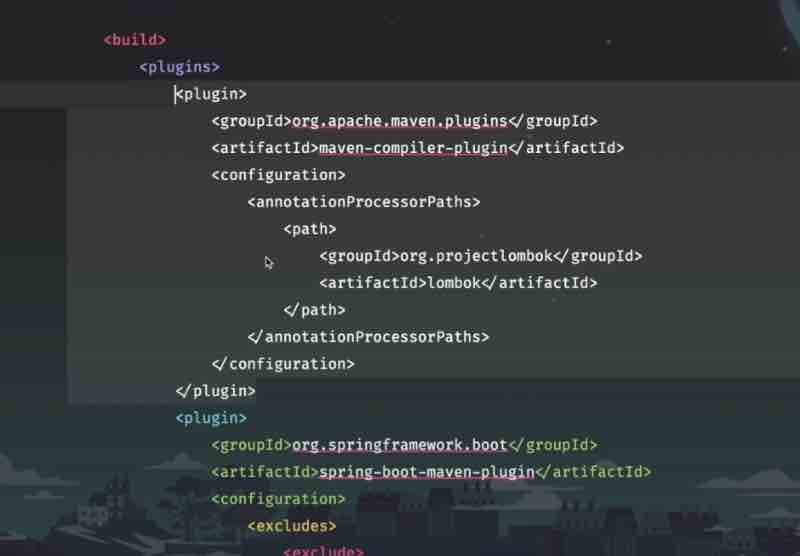
As of now, we can see that no version has been specified for Lombok. At times, I have experienced that if you don’t provide any version, it’ll not work as expected. There are certain weird behaviors that Lombok will start showing up. So, in order to safeguard us from doing that. Let’s go ahead and provide a version for the same. So, the version we’re using is <version> 1.18.34 </version> Add this version tag both in the lombok dependency, and in its build path. Don’t forget to refresh afterwards.
The Main Class ‘DemoApplication’ will be inside the default package ‘com.example.demo’.
This is the class from where the application runs.
package com.example.demo;
import org.springframework.boot.SpringApplication;
import org.springframework.boot.autoconfigure.SpringBootApplication;
@SpringBootApplication
public class DemoApplication {
public static void main(String[] args) {
SpringApplication.run(DemoApplication.class, args);
}
}
And this is the default output of our program, with spring web and lombok dependencies.
@SpringBootApplication
@SpringBootApplication
public class DemoApplication {
public static void main(String[] args) {
SpringApplication.run(DemoApplication.class, args);
}
}
The annotation is a combination of three annotations.
@Configuration, @EnableAutoConfiguration, And @ComponentScan.
The @Configuration annotation indicates that the class can be used by the Spring IoC container, as a source of Bean definition. This is where you define configuration beans if needed.
The @EnableAutoConfiguration tells spring boot to guess how you want to configure the application based on the jar dependencies you have on your class path.
An example could be that you have H2 database in your class path. Then it might AutoConfigure data source for you.
AutoConfigure is a Spring Magic which makes your life easy.
The @ComponentScan instructs spring to scan for other components configurations and services in the current package and its sub packages. This means any class marked with component service repository etc. within the same package as to-do application and it sub packages will be automatically detected and registered as spring beans.
So, this class defaultApplication is inside this package. So, whatever we are going to keep in this package is going to be eligible for bean creation by the spring boot.
So, where exactly do we keep this annotation?
It is typically placed on the main application class. As is the case here. It serves as the entry point for the spring boot application. It is a sign that this class is the root of your application’s configuration.
With respect to the package scanning?
By default, the component scan will scan for components in the package of the class where spring boot application is declared. So, whatever we create inside the package where Spring boot is initialized, will be eligible for package scanning. And the spring will scan this package and all its sub packages for components for bean creation and configuration.
So, In Summary
We can say that this class serves as the bootstrap class for your spring boot application. And by annotating it with the spring boot application. And including the main method with a spring application run() method.
Essentially, you are effectively telling the spring boot that hey, here is where you need to start looking for your application configuration. Here is how you can set up your application based on the dependencies you have been provided in the pom.xml and here is where you can scan for components to add to the spring context. And finally, this is how to run the application.
So, this setup effectively allows developers to quickly create and run applications with minimal boilerplate code, leveraging spring boot’s auto-configuration and component scanning features.
So, you see, with just a single annotation, spring boot is taking care of so many things.
So, this is the magic of spring boot.
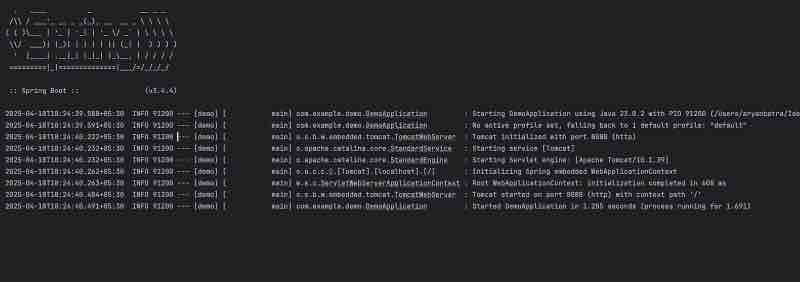
Let’s look closely at the output.
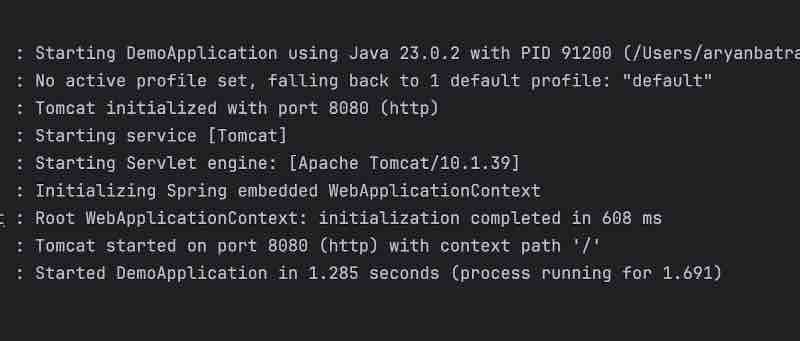
On running the application, there are certain logs that are printed. Let’s analyze them.
It firstly starts our DemoApplication from the run() method.
Then it says there are no spring profiles currently set.
Then Tomcat is the embedded server and it has been initialized on the port 8080
And then Tomcat is being started
And there is something called as a Servlet engine.
And finally, we can see that Tomcat started on port 8080
And the application has also been started.
And the way to access the application is,
By typing in the web browser.
localhost:8080

So, now we are getting this error message. This is because we have not included anything to this particular page. But rest assured, our application is up and running, and we can now start with the process of adding some controllers.
Controllers
@RestController
@RequestMapping(“api/todos”)
public class ToDoController {}
This is how we create a controller using spring boot with these two annotations.
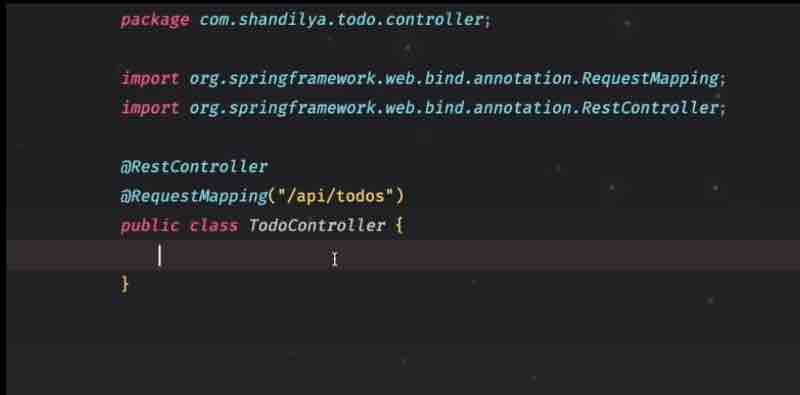
So, whenever you are annotate with @RestController, it tells the spring boot that hey, I want to create this class and I want to use this class as a controller endpoint. So, whatever it takes for a class to be treated as a controller so that it could expose certain endpoints, certain apis, to be accessed, spring boot will do it for you. You don’t have to worry about anything else, like servlets, and configurations you will be needed. Everything will be done by the spring boot itself.
So, let’s see what all do we have in the rest controller.
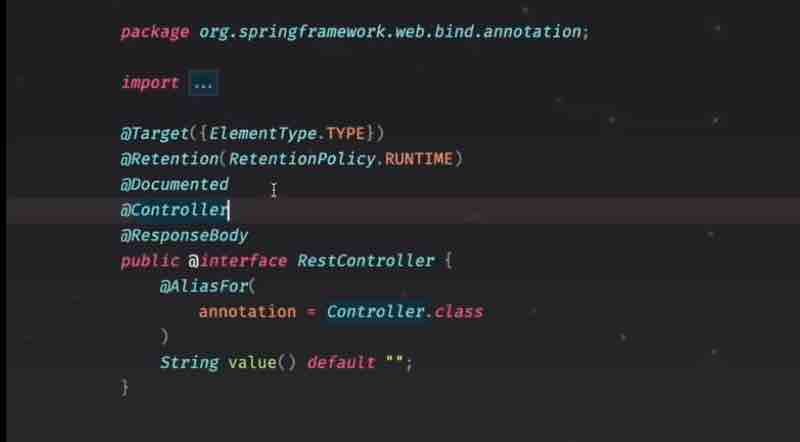
So, we can see that we have this controller then we have a response body. So, controller is basically a component, and response body is something which is responsible for returning the response of the controller entity.
And @ReqestMapping is essentially, going to provide the API path. So, let’s say if I am going to access this particular to-do controller, and I have created two apis. In that case, it will be starting with the server route that is local host in our case, followed by apis followed by to-dos.
And if we choose to expose certain endpoints, then that could be followed by / slash pointno.
So, in order to ensure that controller is working as expected, we’ll create a simple end ponit, but before we go to that, just as a refresher, we’ll revise the http requests.
So, we’re going to create four kinds of points.
GET POST UPDATE DELETE
So, essentially it’s going to be a CRUD operation for our application.
So, let’s create GET point to check if our controller is working as expected.
And the way to do this is by using another annotation called as @GetMapping.
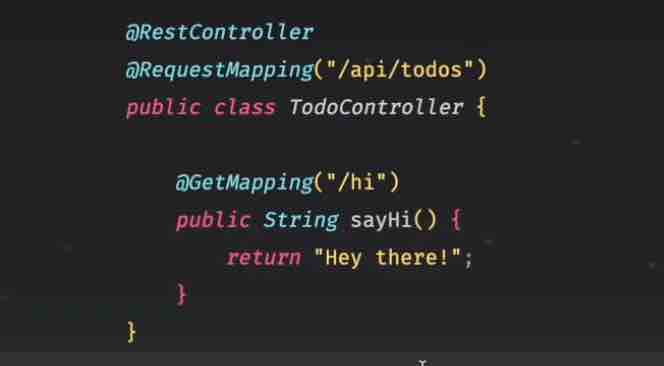
So, our expectation is that when we run the application, then we should be able to access this endpoint using get call and it should be accessible on this particular path that is /api/todos and /hi and we should see this message, hey there.

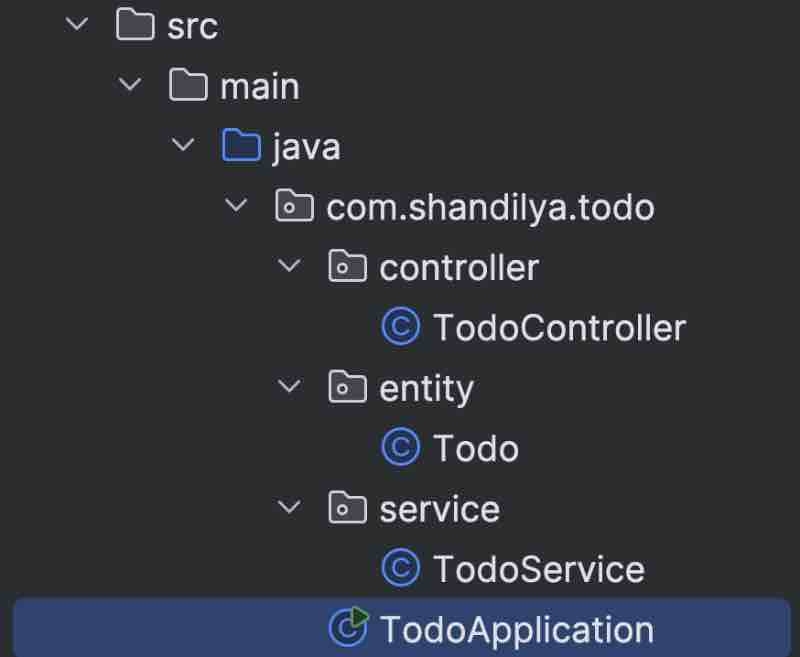
Let’s create other endpoints, to create a to-do, to read a to-do, then update the to-do and finally, to delete the to-do. But before we do that, let’s create the entity.
We’ll be using entity to store to-dos in memory. We won’t be using any database as such, so that is where we’ll be creatin this entity, which will be used to store the to-do.
We’ll create an entity package, and a crud class, where we’ll implement the getters and setters using the lombok since we have its dependency.
@Getter
@Setter
public class Todo{ }
We don’t need to write the getters and setters explicitly, rather lombok does it for us.
We’ll now create another class, and name it as TodoService.
The idea is that, in this application, this service will interact with the data layer and do all the business processing, whatever is needed to support this particular application.
So, the way to write a service in spring boot, is to annotate this with this stereotype annotation
Stereotype annotation
It is a kind of marker annotation which tells about the role of a class. So, essentially if there is a service, this annotation will tell that its role is to act as a service class. Likewise, If there is any repository, we have another stereotype annotation, which is called as @repository.
And the other stereotype annotation which we just now used was @RestController. So, it is nothing but a kind of marker, which is going to tell us, what exactly is the role of this particular class.
We could also have very well probably created this service using a @Component which is yet another stereotype annotation and a more generic one, right. So, that can also be scanned by the Spring IoC container and the bean could be created for that.
The idea is that when you are using a service class, that it’s better to annotate with this particular stereotype annotation, and it clearly puts forward the message that this particular class is supposed to be a service class.
Let’s see the Project Code !
Main class having run() method
package com.shandilya.todo;
import org.springframework.boot.SpringApplication;
import org.springframework.boot.autoconfigure.SpringBootApplication;
@SpringBootApplication
public class TodoApplication {
public static void main(String[] args) {
SpringApplication.run(TodoApplication.class, args);
}
}
Our Entity: Todo
package com.shandilya.todo.entity;
import lombok.Getter;
import lombok.Setter;
import java.util.UUID;
@Getter
@Setter
public class Todo {
private final UUID id;
private String title;
private boolean completed;
public Todo(String title, boolean completed) {
this.id = UUID.randomUUID();
this.title = title;
this.completed = completed;
}
}
Implementing CRUD Operations Service on Todos
package com.shandilya.todo.service;
import com.shandilya.todo.entity.Todo;
import org.springframework.stereotype.Service;
import java.util.ArrayList;
import java.util.List;
import java.util.Optional;
@Service
public class TodoService {
private List<Todo> todos = new ArrayList<>();
public List<Todo> findAll() {
return todos;
}
public Todo addToDo(final String title) {
Todo todo = new Todo(title, false);
todos.add(todo);
return todo;
}
public Todo updateTodo(final String uuid, final String title, final boolean completed) {
// Optional<Todo> todo = todos.stream().filter(t -> t.getId().toString().equals(uuid)).findFirst();
Optional<Todo> todo = findTodoById(uuid);
if (todo.isPresent()) {
Todo updatedTodo = todo.get();
updatedTodo.setTitle(title);
updatedTodo.setCompleted(completed);
return updatedTodo;
}
return null;
}
public boolean deleteTodo(final String uuid) {
Optional<Todo> todo = findTodoById(uuid);
if (todo.isPresent()) {
todos.remove(todo.get());
return true;
}
return false;
}
private Optional<Todo> findTodoById(final String uuid) {
return todos
.stream()
.filter(t -> t.getId().toString().equals(uuid))
.findFirst();
}
}
Actual Implementation of REST APIs
package com.shandilya.todo.controller;
import com.shandilya.todo.entity.Todo;
import com.shandilya.todo.service.TodoService;
import lombok.RequiredArgsConstructor;
import org.springframework.http.HttpStatus;
import org.springframework.http.ResponseEntity;
import org.springframework.web.bind.annotation.*;
import java.util.List;
@RestController
@RequiredArgsConstructor
@RequestMapping("/api/todos")
public class TodoController {
private final TodoService todoService;
@GetMapping("/hi")
public String sayHi() {
return "Hey there!";
}
@GetMapping
public List<Todo> getAllTodos() {
return todoService.findAll();
}
@PostMapping
public ResponseEntity<Todo> createTodo(@RequestBody String title) {
Todo todo = todoService.addToDo(title);
return new ResponseEntity<>(todo, HttpStatus.CREATED);
}
@PutMapping("/{uuid}")
public ResponseEntity<Todo> updateTodo(@PathVariable String uuid, @RequestBody Todo todo) {
Todo updated = todoService.updateTodo(uuid, todo.getTitle(), todo.isCompleted());
if (updated != null) {
return new ResponseEntity<>(updated, HttpStatus.CREATED);
}
return new ResponseEntity<>(HttpStatus.NOT_FOUND);
}
@DeleteMapping("/{uuid}")
public ResponseEntity<Void> deleteTodo(@PathVariable String uuid) {
boolean deleted = todoService.deleteTodo(uuid);
if (deleted) {
return new ResponseEntity<>(HttpStatus.NO_CONTENT);
}
return new ResponseEntity<>(HttpStatus.NOT_FOUND);
}
}
The Output can easily be verified using Postman
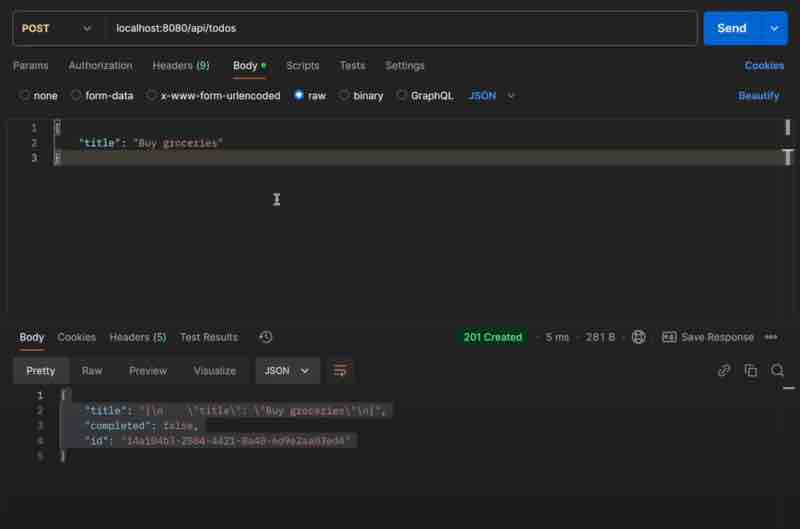
💬 Comments will load when you scroll here