
COMPLETE SPRING BOOT
BACKEND NOTES
Rest API: Get, Put, Patch, Post, Delete Methods
Spring Boot: Layered Architecture, Annotations, Beans And Application Context, Dependency Injection, Component Scan, Customizing Bean Nature, Bean Lifecycle & Scope, Conditional On Property, Profiles, Global Exception Handlers And Controller Advise, Aspect Oriented Programming, Transactions, Transaction Propogation, Isolation Levels, Spring Data Jpa Architecture, H2 Database, Types of Repositories, Spring Data Jpa Relationships, Interceptors, Filters, Caching, Types of Caching, Redis Implementation, Scheduling, Cron Jobs, Logging, Spring Batch, Unit Testing, Spring Security Architecture, JWT Authentication.
AWS: IAM, S3, EC2
Thanks To Chetan Ghate For His Playlist
This Page Is Intentionally Left Blank
REST API
Basically REST stands for REpresentational State Transfer and API stands for Application Programming Interface. We are going to look into how REST APIs are implemented over HTTPS? What are the actual meaning of GET, PUT, POST, DELETE, PATCH? And What is the meaning of Representation, Representational State, and Resources? And the terms such as Headers, Request and Response, Request Payload, Status Codes?
Let's start with REST first. As we know, it is a standard and it is implemented in most protocols. In most cases, rest apis are implemented over HTTPS, and there are various https methods which makes this possible. REST APIs are all about transferring data from one layer of system to another layer of system. Like Client and Server relationship. But there can also be a Server and Server relationship. The data we are talking about here is actually the Resources.
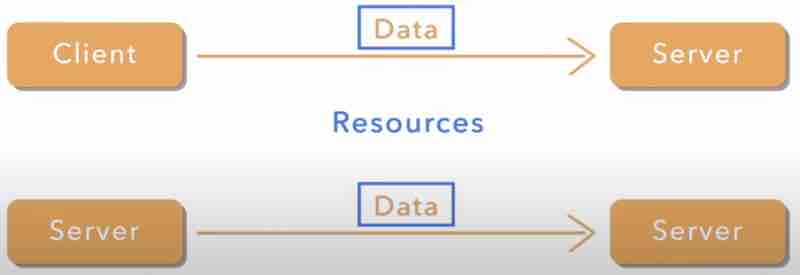
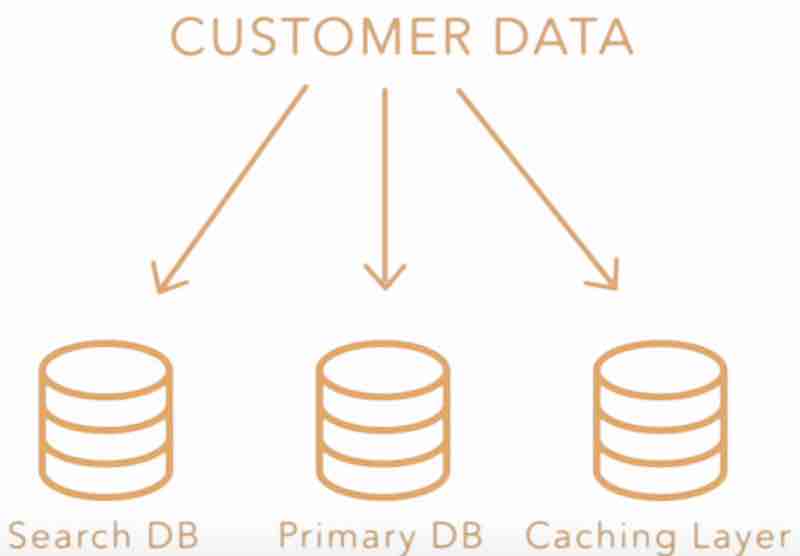
Let's say it's an ecommerce website, and you're designing an webapp for it. Now the resource or data that we are talking about here can be customer data. This data sits in database or storage, and it can be in multiple databases. It can be present in primary database, or in search database, or in caching layer database. And each layer is going to have a different REPRESENTATION of this data or resource.
Now these resources also have to be transferred from one storage to another, or from one layer to other. Whenever the client is trying to interact with the server, the data has to be returned to the client as well. While client is asking for the data, the server is going to return the data to client. Now, the representation of data that stays in the server might not be the same as the representation that has been received by the client on the ui app. So that means for the same data, we have two different representations. And also this data transfers from one layer to another. To represent that data in a particular state, we call it a representational state.

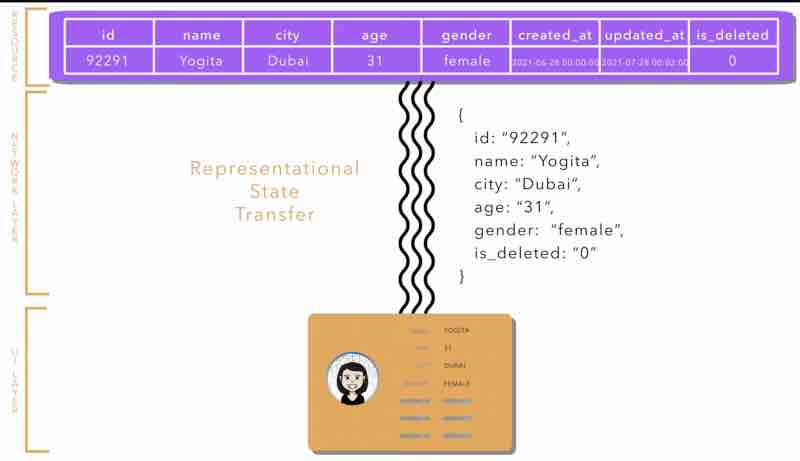
For example, let's say we have a resource customer which says in the database and represents a record. Now the client has requested this data from the UI, so the data has to be transferred from server layer to client layer. And it'd be transferred in a JSON format. Because that's what we do in most cases in REST APIs. And UI may represent it in a different way. So for same resource there are different representations. And the data or resource is getting transferred from one layer to another. When a customer record gets updated then in that case what happens is the resource state has changed and its representational state will also changed.
So REST APIs are all about managing these resources, creating and updating these resources. Second, to represent these resources on different layers, and how to pass one representational state from one layer to another. Now this is done using HTTP protocols using REST APIs.
Any REST API implemented over HTTP protocol will be composed of a URI (Uniform Resource Identifier) which points to exactly some resource in your database. Let's recall our app as mystoreapp. Now https://mystoreapp/customer/1 this URL is going to point to a resource in our system. This URI is also known as API endpoint or path. There are different methods like get or post or put or patch or delete to modify this resource or to interact with this resource. For example, using get might give you some read information about this resource, using put may update the resource, using patch also updates this resource, using delete to delete this reosurce, and finally using post to create a new resource.
Let's understand Path Parameter and Query Parameter. In our URI, https://mystoreapp/customer/1, the number 1 here is a Path Parameter. We know that mystoreappp is a fixed DNS (Domain Name Server), and customer is a fixed string (Resource name), however, 1 is a parameter. If we want to fetch the data for customer 2, we'll change this to 2 and so on. So different parameter might point to different resources. A customer might have different orders, so suppose we have something like this, https://mystoreapp/customer/1/orders. Now this whole URI is pointing to all the orders of customer 1. And changing parameter here will also change the order resource it is pointing to. Now, there can also be URIs without path parameters, suppose if the URI is https://mystoreapp/customer then it should list all the customers.
" So, a Path Parameter is a variable in a URI path that helps in pointing towards specific resource. "
Now, let's talk about Query Parameter. Let's say we're having a pointer that points to all the customers. And I want to apply a specific query before fetching the customers. Suppose I want the customers whose name has a substring " A ". In that case, our URI may look something like this, https://mystoreapp/customers?name=A. So that means I am trying to say I need all the customers whose name has A string. So I am trying to fetch the resources on the basis of that query parameter right.
" So, a Query Parameter variable in a URI path that queries/filters through a list of resources "
So, basically Get method is just about fetching the data, and doesn't modify the existing resource. However, the other methods such as Put/Post/Update may modify the existing resource. So when we talk about modifying the state of resources, we try to send some data with request itself, on the api path itself, that is, for example, https://mystoreapp/customer/1. Let's say I want to change the address of a customer, in that case, I'm going to send a Request Payload, that is the body or the json file, that we send with the request. So whenever we're trying to change a resource, it is called Request Payload. And whatever response we get in return , that body or the json file, as a result of the api call, that will be known as Response Body. These two are basic terms that may be comfortable to understand.
With REST APIs implemented over HTTP protocols, we get some status codes, that try to tell us something about apis, the response that we have called, so there are response codes like these below.
2xx means Success
3xx means Redirection and Others
4xx means Problem on Client Side
5xx means Problem on Server Side
Headers basically in a request are set of parameters or set of attributes that tries to actually tell you about the metadata about the request. For example, you want to mention that the content-type in which this api is going to send and accept resources is going to be json, so we can add that to our headers as, "content-type": "application/json", and there are so many headers that we should actually be aware of. So headers help us to send and get the metadata with respect to the request which does not have anything to do with the actual resources on which the apis are interacting.
POST METHOD
So Post method is used in order to create a resource. But that's not entirely true. Post method can be used to not create a resource but to trigger some kind of operation, on any existing resource or post some data on any existing resource which has to be used for processing. So, let's jump directly to the postman.
In the postman, we have an URI https://localhost:8080/mystoreapp/customer which points to a resource, and we are hitting it with a Request Body, which has some data in json format, and the returend request from the server is in status codes of 201, which means the resource id along with the status code is returned only, however we could also have returned the response with a status code of 200, which not only returns the reosurce id and status code, but the response body itself that we passed initially to be store in the resource. Now, in the case when POST request has been used to process some data, we'll return with the status code 204 which is an empty response with request accepted signal. So, we've understood three types of codes, 201, 200, and 204.
Now what happens if you send something wrong in the request data? Let's say you have sent an invalid phone number or email. In that case, the server is going to return the response 400 saying bad request, that means they expect you to send data in a certain format, and you have not followed that format. It also returns the response body, and it'll mention in the error fields, the error messages and codes so that the client can understand better. Suppose if the server responded with 400 bad request status and had no response along with it, then how will client know where did error had occured? So giving proper error messages is very necessary so that the client can understand and the application developer could debug it. 4xx is generally requests telling clients that there is something wrong from your side while sending the request.
Now suppose you have already sent the response body with your details, and you have hit sent again with the same data. So ideally the same duplicate data should not be created, and it should return 409 which is essentially Conflict Response. That means this entity or resource already exists in the system. And you're sending the conflict request.
IDEMPOTENCY. What is it? It means that if we make multiple identical requests then the request is always going to be the same, which is not the case in post. In post, if you send the same request body two times, you may get an error response for sending it again. First we'll be able to create the resource. But second time, we'll get 409. That means post request is not idempotency. However, if you compare it with Get request where if you send multiple requests again and again, you get the same response, therefore Get request is Idempotent.
Suppose we want to create a resource under an existing resource, for that case, we use Path Parameters. For example, http://localhost:8080/mystoreapp/customer/1/order, the order was existing under customer resource.
" So, remember this by heart, POST URIs may or may not have Path Parameters, but definitely POST URIs are never going to have Query Parameters. "
And always have a response body before sending a post request.
GET METHOD
When using get method, the URI has to have has to have a path parameter, incase a single resource is fetched. We have to mention the id of the resource that we want to fetch. We may think that we can mention the id as an query parameter also? But that's not a good standard practice. We must always have the id that we want to fetch as a path parameter. And usually in get requests, there is no request body, because it is unwanted. Actually when we are using get method, then we're trying to pick information from the server, and not putting any information from our end to the server. So if we send the get request and everything goes fine, we'd get the response body with status code 200, saying OK.
Let's say we have a lot of customers and we want to fetch all those customers in one api request. In that case, we might get rid of this path parameter first. Now, we cannot fetch thousands of customer data from one api itself by doing get request on http://localhost:8080/mystoreapp/customer. That's why, we use something known as Pagination or Limits. We can use some query like ?limit=10 that means just return 10 resources. But from where, either from top or from bottom? For that we have something known as offset, which tells which counting the response has to be written. If we say ?limit=10&offset=0 then that means I want first 10 resources.
Now, let's say I want to fetch all the customers whose name starts with "abc". In that case, I can use an URI like this, where the first parameter has ?name=abc. Now this query parameter is going to filter as per all the customer names, match abc with names and if the name matches server will return only those resources. And again if the number of these customers is huge, then we can use limit query parameter to limit the resources being fetched. However, the implementation of limits, filtering and pagination is done on the backend, it's not like a magic kind of thing okay.
Let's say you provided a long customer id in the get request response, and there was no customer id particularly. In this case, the code should return a response code of 404 Not Found. It is just to say that the server does not have any resource like that.
So in case of get method, status code 200, and 404 are most commonly used.
However, remember to follow good practices, and do not design api in such a way that request body is expected in get method, and 400 is being returned that expected format has not been matched.
Let's say it. Is Get an Idempotent request? Yes. Because if you send the same get request multiple times, it'll give you the same results again.
PUT METHOD
Now we want to update those resources. Put and Patch methods. Now you might have heard that put requests are used to only update resources, and that is partially true. Put requests can be used in order to update any existing resources or put request can also be used to create a resource. Sometimes this operation is known as UPSERT which means if the resource does not exist then create a resource or if the resource exists then update the resource. The important thing to note here is that whenever you're using PUT request, you've to send the whole body of the resource that needs to be updated. Similar to what we have seen in the post method, we send the request body in the request table. Now the question arises. How do we know whether put has been used to update or create that resource? Very simple.
If we want to UPSERT, it can only happen when the client who is sending the request has access to the id of the resource, so either they know the id of the resource or they are able to generate the id on their own, and the server supports the id sent from the client. For example, we send a request to http://localhost:8080/mystoreapp/customers. As soon as we send this request, the server sees the request and realizes that customer with id already exists. In this case, the server is going to update the whole customer resource with the attributes that we just sent with the put request and in response the server is going to retunr the whole object itself with the response code as 200 ok. So we can see that an update operation has happened, since the resource has already existed, a new resource has not been created, in fact, the same resource has been updated. Now suppose, when we give a unqiue id number of customer which did not existed, now since the id did not existed, and according to the implementation, the server trusts on the id sent from the client, for put request, so what the server is going to do, since any customer resource with an unqiue id doesn't exist, it is going to create that resource, this is an create operation.
Now, second case, let's say UPSERT doesn't support operation, and server doesn't trust on the id sent by the put request. In that case, it can only update the existing resource. However, in the case when the server does support UPSERT operation, or allows put to create resources, we're expecting the id of the resource to be sent in the body and not as the path parameter. Why? Because if the Upsert operation has to be supported and if the send the id in the path parameter, if the case where the resource is not existing, it'll result in a 404 Not Found error. That's why we send the id in the request body. This was about supporting upsert operation using put method.
No let's see if the server implementation does not support upsert operation and it only supports update resources. In this case, note that we are going to send a request with the id of the customer in path parameter and the whole customer object in the request body. What will happen on the server side is looking at the id which exists in the server side, the whole body of the resource that is saved in the server side is going to be replaced with the body that has been sent with the put request. Suppose for example we had the phone number of a customer, but then when updating the customer details with the put response we did not gave the phone number, then the phone number will actually be null. So whatever request body has will completely replace what is present in the backend before.
What are the errors of put request? If we're going to use an id in the path parameter which doesn't exist, then you're going to get a 404 in response. And if you're going to send any attribute which is invalid like, invalid email id, then you'll get the sam eerros as you have received in the case of post request like 400 bad request.
Now is there an error 409 in the case of put? The duplicacy conflict error. NO. Because you're definitely going to use the id which already exists on the server side right. And you're trying to update it. So you'll not get 409 in case of put request.
PATCH METHOD
Now coming to patch, what is the difference between put and patch? As we have seen, we just understood that in case of put request, the whole body of resource is replaced by whatever attributes the resource had. Let's say you don't want to replace the whole body, and you just want to modify one or two attributes of a resource. In that case, you can use Patch. As the name suggests, it is just patching or changing few things in the existing resource. So let's say you just want to update the city of a customer, you'll use the same URI as you've been using in put, and you'll use the method patch, and you'll just send the changes that you want to apply to the resource instead of sending the whole json response body. That means you're only sending the changes or difference that you want to apply and you'll use patch request for the same, which'll update only that field of the resource on the server.
However, if you are still sending all the attributes in the patch request itself, you might as well use put and let patch go and don't use that. But if you have a use case of updating one or two fields, or applying just few changes in a resource, then patch is the best way to go about. Now there comes a thought. If we can do the same thing using put, then why there is a need for sending using patch request? Why patch method even exists? Now think about this. There are some resources which will have hundreds of attributes. In that case, it might become very cumbersome for the client to send the whole body again and again, and it'll also slow down the request beacuse you're transferring a lot of data. Instead if you just want to update one or two fields and you don't have to send all the hundreds of attributes, just sending those specific attributes that we want to update, will actually make your apis faster and efficient. That is why patch methods are used.
Now what about Idempotent in put and patch? Actually both are idempotent. Why? Because once you update a resource using a put method, second time also if you send the same request, the server state is not going to change, as we have discussed, the property of idempotentcy is that your reqeust is not going to change the state of the server no matter how many times you send that request. This stands true for put as well as patch as well as get also. The only method which should not be idempotent is the post method.
DELETE METHOD
As we can see, in the case of delete, we just want to delete a resource from our table right. Now how do we do that? We're going to mention the id of the thing that we want to delete along with the URI, and the method is going to be delete. We don't want to send anything in the request body. We just want to tell the server that ideally this resource must be deleted. And the response of all the delete apis should be 200 ok, telling me that the operation has been successful.
Now what this api is going to do on the server side. There are two things that can happen. One, you can completely wipe off the customer resource. That means you just delete everything from your database and there is no entry left for this resource. Or you can actually soft delete the resource, that means you'll keep a field in database for this resource which can be known as deleted, and it can be a boolean like thing, and we can mark that field as true if this thing as been deleted. This is known as SOFT Delete. Usually, in most cases, whenever the resources are deleted this strategy is followed, unless for some kind of data which is not useful, the resources are completely deleted, and like hard delete happens, or removed completely from the server storage.
Now how do we check whether our delete has been successful? Soon after delete, you can send a get request and check that request should return 404 Not Found error, because the resource is not found, since we have deleted that resource.
What if you want to delete multiple resources at a time? Let's say you want to delete all the orders for one customer. Similar to other operations and other URIs, this is going to look like this. http://localhost:8080/mystoreapp/customers/1/orders and call DELETE method on it. This is going to delete all the orders for that particular customer. Next time, when you try to fetch these orders, what is the response that we are going to get? Ofcourse 404 Not Found. Because no orders have remained in the system with respect to this customer.
Now coming to errors, can delete result in an errored response like 400 or 409? Maybe not, it can result in an 500 server side error. But yeah status code 404 is possible if the id in path parameter has already been deleted before.
Now coming to Idempotent, do you think delete is idempotent? That we leave upto you as an exercise to go through.
This Page Is Intentionally Left Blank
SPRING BOOT
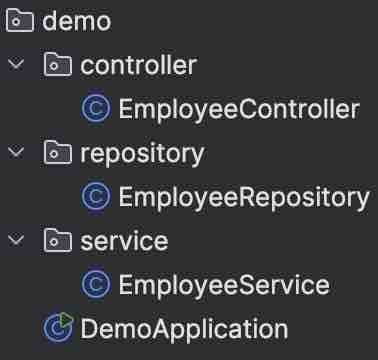
The journey into spring boot starts from creating your first project intellij, to understanding the layered architecture, the package structure. Like we need to understand what is controller layer, what is service layer, what is repository layer, and how they are segregated, and how the test packages are segregated inside our application. Not just this, we have to understand maven and gradle build toold in depth right.
When we need to understand spring boot annotations one by one. How can we configure things by using annotations right.
The next thing is about dependency injection and inversion of control. This is the core of spring boot. There are topics like Field Injection, Setter Injection, Constructor Injection etc and we have to understand the pros and cons of each.
Next we have to understand how do we configure a spring boot application, using application.properties file where we can add various configurations. Like we have code snippets that we can add there and we can use it anywhere in spring boot. Like storing some constants such as APIs and URLs. And we also have to understand what are spring profiles. Let's say you have different environments while developing, testing and deploying, so configuration related to these are handled using spring profiles.
Then we have to understand Spring Beans And Its Lifecycle. And the Four Types Of Spring Bean Scopes. Singleton, Prototype, Request, Session.
Then we have Spring Boot Data Access Layer Using JPA (Java Presistence API), And JDBC for handling data and databases.
Then we'll get a basic knowledge of RESTful APIs Using Spring Boot.
Then we've to go deep into Spring Boot Security, Authentication And Authorization.
Then we'll cover some aspect of Spring Boot Logging. Exception Handling, Caching, Interceptor, Scheduling, Unit Testing Using Junit And Mockito, Spring Boot Actuators and much more.
Then we'll learn about deploying Spring Boot Applications, on Tomcat, Docker, Using CI/CD pipelines Jenkins, Cloud.
Then finally, we'll go into Microservices With Spring Boot using Eureka, And tracing the request in multiple microservices using Sleuth And Zipkin. And we'll understand API Gateway, And Spring Cloud Configurations.
And finally, we'll build a spring boot project from scratch.
SPRING BOOT LAYERED ARCHITECTURE
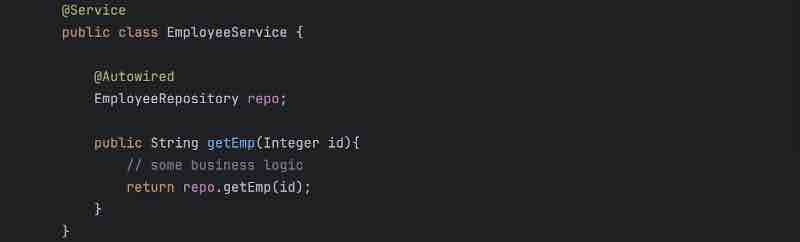
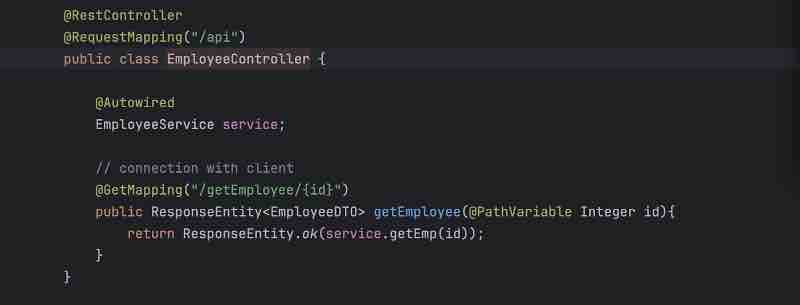
In @SpringBootApplication, we commonly use three layer architecture. First one is controller layer, second one is service layer and third one is repository layer.
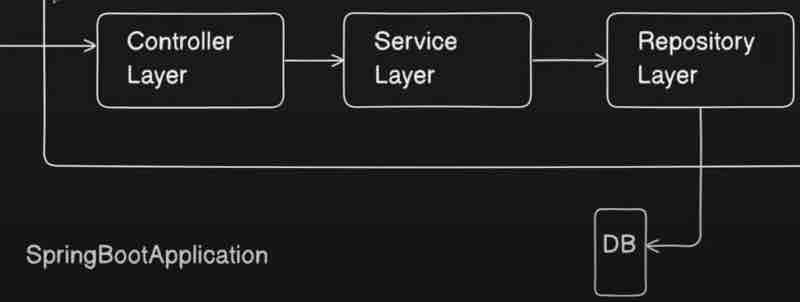
Controller Layer is something where you write your controllers. What is a controller? Controller is first entry point of your spring application where we write apis. So, we have annotations like @Controller or @RestController on top of the classes that we add in a controller. So, these controllers basically will have the APIs that a client will call right. So, client will call some like a setter or getter request so these particualr requests will be handled by your controller layer. So, your client will hit some API to your application. For example, let's say /api/getEmployee so this particular call will go to this controller, this controller will have this mapping to get the details job of your controller, so it'll just get the details, and your call is coming to the controller, and controller will do something at the backend, and it will just return the response, so primary responsibilities of controller layer is to get the request, whatever request is coming from user, process that request, and then return the response back, so that is the primary purpose of your controller layer.
Now, controller layer is just for taking and giving back the requests, and it'll not be able to do any business operations inside it. It'll just take the request, and it'll just forward that to your service layer, in order to do whatever operation, and whatever business logic, and whatever processing that we want to do on that data.
So, our controller does not have any responsibility of writing any business logic, we now understand that the controller sends the details to the service layer to process and do all the business operations tha twe want to do right. So, all business operations will happen in service layer, it'll take the request from the controller, basically client wants the data, so service layer will do all the modifications on the data, all the data populations if needed, and all the business operations will be performed inside your service layer.
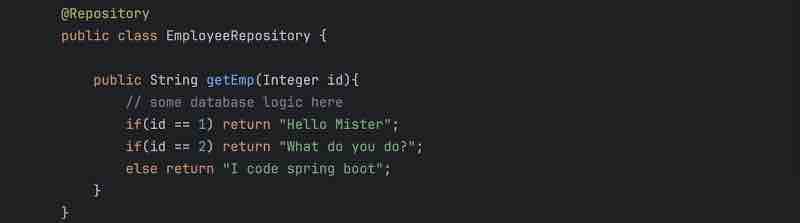
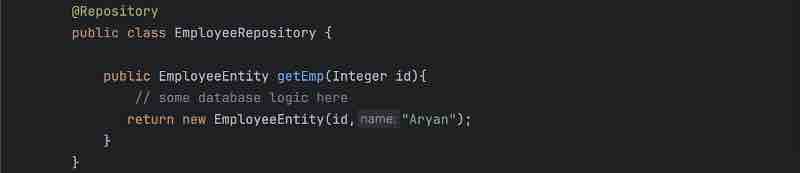
Now, suppose the request was to get something from the database, so what service layer will do is it'll forward the request to repository that dude, I need this data from the database, will you go ahead and fetch it from the database for me and give it back to me? Let's say, the client asked for employee details. So, service layer will call the repository layer and say, I want the details of this employee, and what repository layer will do is it'll talk to the database, hit it with respective SQL queries, or whatever language queries, and it'll get the respective data, and give it back to the service layer right, and the job the repository layer is just to talk to the database, get the data by fetching from database or save the data to the database, and return the response to your service layer.
Now, what service layer will again do is it'll take the response from your repository layer and give it to your controller, and this way, every layer has its own responsibility over here. Well, you might say, service layer can also go directly to database, why do we need repository layer then? Right, you can do whatever you please, no one is stopping you. But that is not the ideal case, and this is not a standard way of doing things, and it'll be more confusing when your business grows.
So, client first taks to controller, then controller talks to service layer for business logic, and finally service layer talks to repository layer for database integration. And it goes in reverse the other way around while sending back the requests it intially accepted.
So, this is how the layered architecture looks like, and these are the responsibilities of each of your layer.
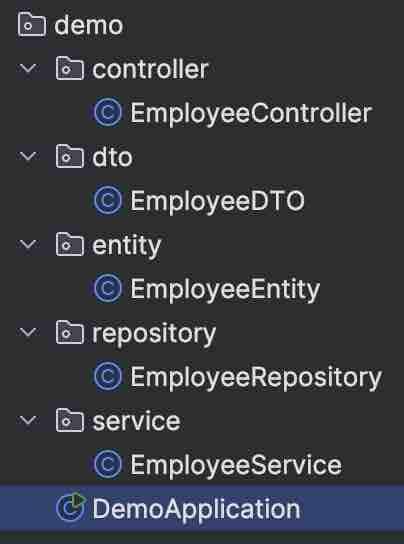
Now, we have four things over here above: DTO, Utility, Entity, Config. What are these? Let's find out.
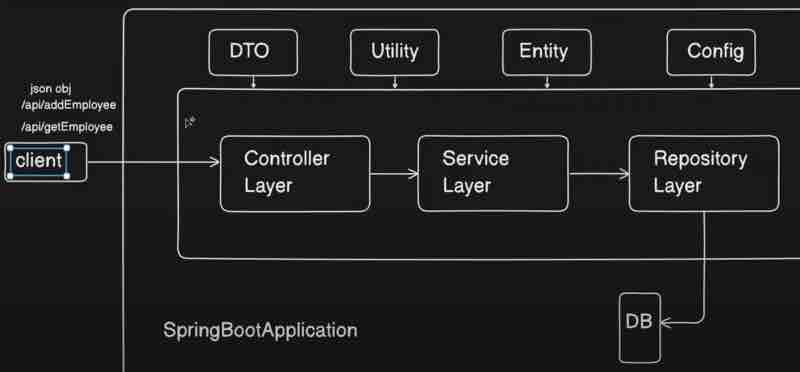
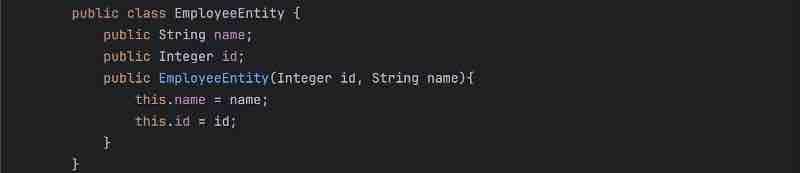
DTO is basically data transfer object. So, let's say client can also call some post request, like using /api/addEmployee, so it'll send some json object which will have the details of the employee, so this json object which is kind of a employee should be converted to some java object inside your controller layer so that particular java object we called as DTO is basically used for client to controller communication. The request dto will have request details, and response dto will have response details. Basically, in similar fashion, there is one more java object that we have when we call to database that we call as entity, so it'll be a similar object to this dto but entity will be a direct mapping to your database, so whatever entity you have, let's say, you have employee class inside, and you have primary id as name, and department and other details of empoyee, then those particular details need not to be shared with your client right. Client just wants the respective details it asked for, so that particular details which are not needed by your client, will be removed in this DTO, so DTO will not be having it, and basically, this DTO will be returned to your client, and the conversion of this Entity to DTIO will happen inside your service layer. And Entity will be a direct mapping of your table inside your database.
When there is something common between these three layers, supppose some calculation functions that we need in all the layers, then that particular code we can put up in utility package or class, and we can directly import and use it right. After that, we have configuration as well. In spring boot, we have configuration files, you can have some common values or common URLs or common configuration that you want to use in your entire application. For example, let's say there is a URL of third party, that you can configure inside your application.properties file and you can use in this configuration right, and then you can use it in your entire application. And changing this URL in configuration will change it in entire application.
This is a basic spring boot setup. We can see that the client has a connection with controller. So client has a controller. Then controller is connected to service. So controller has a service. Then service is connected to repository. So service has a repository. This is the basic flow of a spring boot application.
Now, let us add DTO and Entity here.
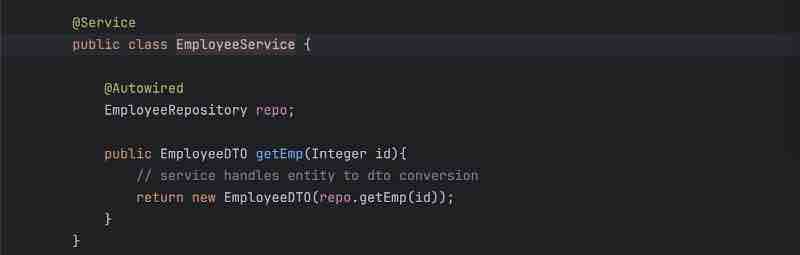
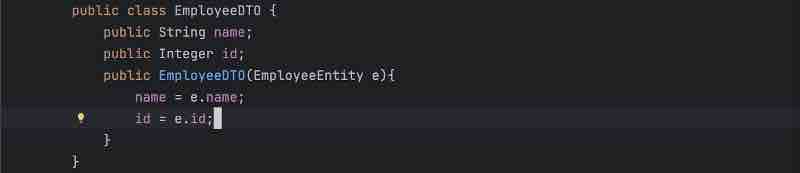
We can see how Entity is being handled by the repository only. And how DTO is being handled by the controller only. In the middle, we have service which is responsible for conversion from Entity to DTO.
SPRING BOOT ANNOTATIONS
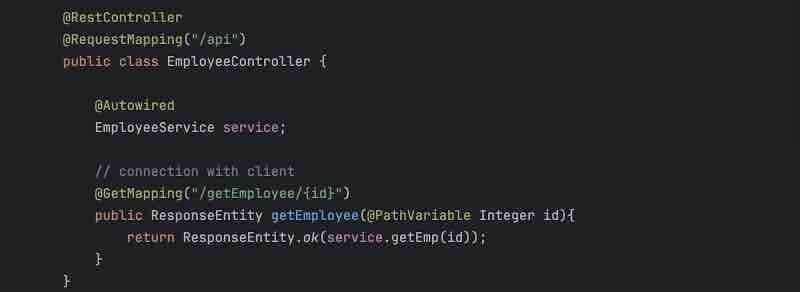
What is @Controller? A controller class simply connects to the clients by letting us write our actual apis. So the api request which is coming from outside your application will first land inside the controller based on the mappings.
Let us go more in details of it. The user is actually connected to the server, it can be tomcat, jboss, jetty. Now when a user is sending a request to your application, so it will first land inside your server. Now what this server will do is this will transfer the request to the next compnent inside your application. The next component will be something called as dispatcher, servlet. Whatever request is coming from your server will first land in dispatcher or servlet inside your application. Now what is the job of this dispatcher or servlet? They'll find out the controller for you that consists of the mapping.
So, let's say the user is calling /getEmployee. Now the moment dispatcher gets this request, it'll try to find out th controller in which this particular request is mapped. So, dispatcher or servlet will use HandlerMapping to figure out the number of controllers right because there can be a thousand of controllers inside your application, who knows? However, we only want the controller in which this request mapping is mapped, we'll try to find out this mapping inside the respective controller right. And how do we know a class is a controller? By using @Controller annotation right.
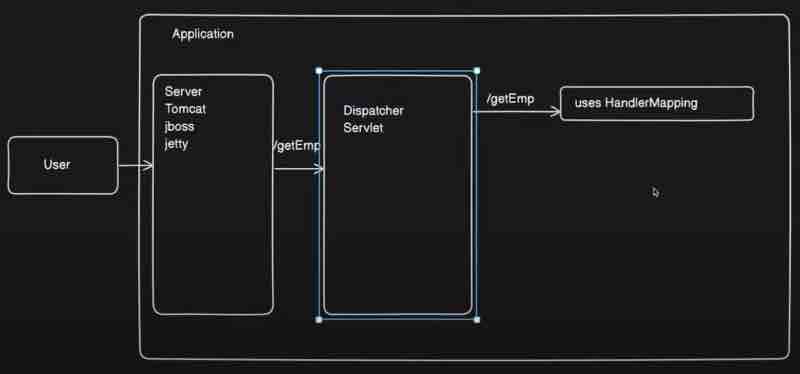
Here, the moment we mark a class as @Controller, the dispatcher or servlet can find it out and it can map the request coming from user to respective controller right. Now, in order to add that mapping, what we need to do is that we need to add @RequestMapping annotation. So what request mapping annotation does is it will have a path basically to which we can map our incoming api to. So, once the user will hit this mapping, the dispatcher or servlet will find this controller and call this particular api right. So, we can make use of request mapping to map the request with particular path, which is a end point for some http method. Now, which http method are we going to use here, for that we need to write a method as well, so here we will add method alongside the path in request mapping annotation like this.
@Controller
public class EmployeeController{
@RequestMapping(path = "/getEmployee", method = RequestMethod.GET)
public String getEmployee(){
return "employee";
}
}
However, this particular mapping will not actually return a body. Once this api will be called, what this try to do as we are returing it is that it will try to find something like employee.html file to render it on UI right. Because it'll think that we need to render some kind of UI as a response right. But that's not what we want to do here, what we want to do is to actually return a json response body. For that we use @ResponseBody on top of it. So, it'll return this particular string as a json or whatever format you want to give to the user instead of rendering any UI. Response body will just indicate that the response of this api should be a body and not any view right, so that is the use of @ResponseBody.
Now, suppose I have multiple functions within the controller class and each function has to return a response body. Would I be using @ResponseBody on each function then? Well, everyone is going to return the same kind of response body right. So, instead of annotating this way, what we can do is we know that this controller is serving as a rest controller so we can actually go ahead and convert this to rest controller using @RestController. So, the moment I do that I don't need to annotate any function with response body rather I can remove that @ResponseBody annotation and the api will still return response body. So that is the use of @RestController annotation.
So @RestController is basically the combination of your @Controller and @ResponseBody Annotation. So if someone is asking you the difference between these two, highlight that if there is certain controller which is only going to return the data and not going to render any UI then we need to go ahead with @RestController rather than going with @Controller.
Similar way, we can mention the method we want within @RequestMapping and it can be any http method. However, I have to mention those methods explicitly in request mapping annotation each time, which is not developer friendly. Instead, we could just use annotations for each mapping separately. such as @GetMapping, @PostMapping, @PutMapping, @DeleteMapping. Mappings to these annotations can be provided as an String arugment, for example @GetMapping("/api");
Now, suppose the user wants the get the employee by id, now the user has to provide some kind of an id to get that employee's details, and we have to get the id that has been passed by the user. So, in order to get the employee id, what we need to do is we need to do is define a parameter in function and use @RequestParam so that we could accept whatever request parameter user is going to pass to us right. We can also provide some other name ot it like this @RequestParam(name = "id")
@GetMapping("/api/getEmployeeByID")
public String getEmployeeByPathID(@RequestParam Integer empID){
return "employee"; // some db logic
}
However, we are going to take this as a query parameter right. Let's say I don't want to pass it as query parameter rather I just wan to pass it as a path variable like there are some apis where there won't be any query parameter right. So how do we do this? For this, we need to use something called as @PathVariable. For this to work, we have to provide a variable inside our mapping like @GetMapping("/api/{id}"). So we are passing a variable parameter from our request url into the method signature. So the moment I use @PathVariable with the same name as in {} variable parameter, the value will be automatically mapped to this method signature. And we can also provide naming like this @PathVariable(name = "id")
@GetMapping("/api/{id}")
public String getEmployeeByPathID(@PathVariable(name = "id") Integer empID){
return "employee"; // some db logic
}
Now, suppose the user is sending the post http request and sending a json object in the response body, and we have to catch that response and store it up as an java object, for that we use @RequestBody, which'll take the json object and automatically set the values into the corresponding object values we have created.
@PostMapping("/addEmployee")
public String addEmployee(@RequestBody Employee e){
return "added";
}
public class Employee{
int id;
String name;
}
json object {
"id": "1",
"name": "Aryan"
}
Now, we have used some annotations such as @Service, @Repository, @Controller which marks the 3 layer architecture and makes our code readable, but these annotations are stereotype, which means they are just an alias name for @Component annotation, which simply creates a bean of that class and stores it in its container. We'll look into @Component soon.
SPRING BEANS
AND APPLICATION CONTEXT
So what is a Bean? Bean is just a java object right. Nothing fancy. We refer to java objects as a POJO meaning plain old java object, and same thing in spring we refer that particular object as a bean right. So when a java object or a pojo is managed by your spring application then that is referred as a bean. So whenever we say Bean it's just a java object.
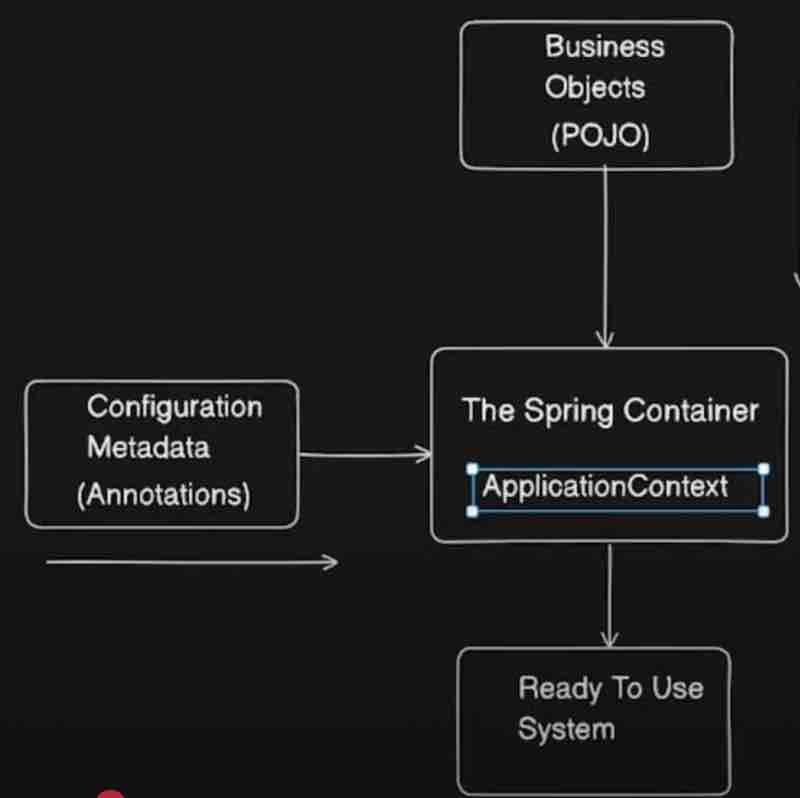
Now spring has something which manages all your beans inside your spring application along with the dependencies of those beans. So bean creation and deletion and everything will be handled by the spring IoC container. So consider spring IoC container as a box in which all the beans of your application will be stored right. Now spring IoC container is kind of a terminology. When it comes actual implementation, it'll be ApplicationContext. So, more often these two terms are used interchangeably. Basically, application context is the implementation of your spring ioc container.
So application context will be the actual object inside your application which will store or refer to all the beans right. Now consider this as a spring boot application which will have a container running spring ioc container and let's say you have business objects that is pojos. So pojo will be used in your application right. Along with that, you will have multiple configuration metadata like multiple annotations. It'll take the configuration metadata for the pojo object you have provided and then the bean of a particular object will be created inside your application context and your application will be ready to use. That means you can perform operations on that particular object.
Now consider your application as a backbone of your application which will manage all the beans which will have a reference to all the beans that you have and which will handle all the bean injection bean dependencies bean deletion and all the life cycle of bean it can handle, and it is the implementation of spring ioc container right.
So this is just one implementation, there is yet another implementation of spring ioc container that we call as Bean factories.
Let's have a look at actuator. It's a very deep topic and a lot is going on here. But let's take a quick look at it.
First we'll configure actuator inside application.properties in resources/ folder of our spring application.
Inside this file we'll write:
management.endpoints.web.exposure.include=*
Now, I need to get a dependency spring boot actuator in our pom.xml file.
<dependency>
<groupId>org.springframework.boot</groupId>
<artifactId>spring-boot-starter-actuator</artifactId>
</dependency>
Now, we can check the beans that we have added to our application like magic. We have to go to localhost:8080/actuator/beans. We'll find a lot of predefined beans here by spring. And inside these, we'll have our bean as the class name somewhere which we'll be abe to find once we have used @Component annotation or its stereotype annotations.
@Component
public class ProductService{
public ProductService(){
System.out.println("ProductService");
}
}

Here we can see that all beans are of Singleton pattern. And all stereotype annotations that are alias of @Component are of singleton scope.
So, fundamentally there are just two ways of creating beans. One is by using @Component. And the other way is by using the traditional @Configuration & @Bean annotations.
SPRING DEPENDENCY INJECTION
So there are basically three types of dependency injection, these are basically Field Injection, Setter Injection, Constructor Injection. We'll learn about them now with each injection's pros and cons. And along with that, the commond problems that we face during dependency injection, such as Circular depdendency and Unsatisfied dependency.
public class User{
Order order = new Order();
public User(){
System.out.println("Initializing User");
}
}
Now what is happening here is that user has a tight dependency on your order. So this tight coupling between two might create some problem in future. So what problem it will create? Let's check it out. Let's say we have an order class and we want to convert this to interface in future and have separate implementations of Order class like OnlineOrder and OfflineOrder whose parent interface will be order right. Now when I go back to my code, it's obvious that it'll throw an error, because we cannot instantiate the object of an interface right. So, if in future you're converting your classes to interfaces and have such a tight coupling then you cannot create object of that interface right and our code may break apart.
public class OnlineOrder implements Order{}
Now what we did is: Order order = new OnlineOrder();
It may work but we are breaking one SOLID principle okay. Which one? It breaks dependency inversion. So, dependency inversion is basically D inside your SOLID principles which says that do not depend on concrete implementations, rather depend on abstrations. So we do not have to use the new keyword and initialize our Order class inside the constructor.
public class User{
Order order;
public User(Order order){
this.order = order;
System.out.println("Initializing User");
}
}
So, in spring we can make these classes independent of these dependencies right. What we can do is we can add dependency dynamically right. So, this dynamic dependency injection will be taken care by your IoC container. So, here this step our bean lifecycle takes place which we'll look into soon.
Basically we are avoiding any tight coupling over here, and because when injecting that dependency, we want that to be a component too managed by bean, we'll use @Autowired on top of where we declared order interface.
Now let's go into each of the dependency injection types:
1. Field Injection
So in field injection, dependency is set on the field of a class right.
@Component
public class User{
@Autowired
Order order;
public User(){
System.out.println("Initializing User");
}
}
So, what happens inside the hood is that in the bean lifecycle, once the IoC container is initialized, it'll start constructing the beans right, it'll check for the @Component annotations and it'll create beans inside it. So by here spring has initialized the bean object and have the object ready inside your spring ioc container. And then this bean object will be injected over here, adding that dependency right.
So basically spring uses reflection it iterates over the field of your class and then injects the dependencies right so that is how it works right. So any number of dependencies you add, it'll inject all those fields right if those fields are your spring components and they are annotated with @Autowired where they're being injected.
So advantages of your Field Injection is that it's very simple to use, we can just add @Component and inject fields directly using @Autowired.
What are the disadvantagse of field injection? Well, the first problem is that it cannot be used with immutable fields.
@Autowored
public final Order order;
Let's say you mark your injected field with @Autowired as final, then you can see we're getting some error. Since final fields do not change their value once they're initialized, at class level, and since an object field is initialized to null first if we have not used the new keyword.
The second problem is chances of null pointer exception over here. Let's see an example to understand it further.
@Component
public class User{
@Autowired
Order order;
public User(){
System.out.println("Initializing User");
}
public void process(){
order.process();
}
public static void main(String[] args){
User user = new User();
user.process(); // NullPointerException
}
}
Now if I run this code, we are getting a null pointer exception over here because even though we are creating the instance of user yet this dependency is not actually injected because this code is not running from spring right and this is not a spring component, so when we ran it explicitly we don't know what is order. However, when we run it in spring context, it'll automatically inject the dependencies right.
So, if we create objects like this that is not a spring component then it'll likely break the code and throw NullPointerExceptions.
Now let's proceed and look into Setter Injection.
So we inject the dependency by using setter of that particular field right. So let's say I created a setter for Order class and here I am going to use @Autowired on top. We'll remove @Autowired from the field and put it on top of the setter right.
@Component
public class User{
Order order;
@Autowired
public void setOrder(Order order){
this.order = order;
}
}
Now let us discuss the advantages of setter injection. " Dependency can be changed any time after object creation. " What does that mean? We can change dependency at any point of time like that right and this is easy for junit testing as well. We can pass mock objects independently so we can use setter methods and we can pass the mock objects and set the mock objects explicitly right.
But it does have some cons. What are these? Fields still cannot be marked as final. So the same problem presists as we encountered in field injection. We cannot use setter injection when it comes to your immutable variables right. It'll give us an error because that field object was initially null at the time of parent object creation before it even called the setter method.
Another disadvantage of setter injeciton is that it is difficult to read and maintain, as per standards. So the readability is the problem here right.
Now, let's see the main thing that we're waiting for: Constructor Injection.
This is the one mostly used rightm because it brings a lot of advantages and overcomes the disadvantages of other injections. So both the problems of the field injection and setter injection are resolved here like magic. Let's understand it.
" Dependency will be resolved at the time of initialization of object "
Now dependency is injected while creation of your bean only. The dependencies will be injected like this.
@Component
public class User{
Order order;
@Autowired
public User(Order order){
this.order = order;
System.out.println("Initializing User");
}
}
What happens under the hood is that Order class itself is a @Component so it'll be created in the IoC container first. When it'll go to the User class, it'll see the dependency injection in the constructor initialization, so it'll inject that same order class here that was already present in the IoC container, and then user class will be created in the IoC container.
This is something which we call as constructor injection right. Now let's say there are multiple fields that you want to inject. We can also add in our constructor right and all those fields will be initialized and injected accordingly. So overall this is the recommended way of injecting your dependencies.
Note: " When one constructor is present then @Autowired is not mandatory. "
Let's say we remove @Autowired and write the code something like this.
@Component
public class User{
Order order;
public User(Order order){
this.order = order;
}
}
Now dependency will still be injected because spring will use reflection right and it will analyze that okay this order is also a spring component and we already have that component present so what it'll do is it'll inject the same bean directly okay.
Now suppose we have two constructors like these.
@Component
public class User{
Order order;
OnlineOrder onlineOrder;
public User(Order order){
this.order = order;
}
public user(OnlineOrder order){
this.onlineOrder = order;
}
}
Then spring will get confused that which bean needs to be initialized so @Autowired is mandatory here.
We'll get BeanInstantiationException: Failed ot instantiate Bean because it doesn't know what bean to instantiate.
Basically we can explicitly say that okay I want to inject this one using @Autowired. But we have a simple rule, we cannot have @Autowired in more than one cosntructors. So when we want to inject more than one fields, we cna ismply extend the constructor parameters.
@Component
public class User{
Order order;
OnlineOrder onlineOrder;
@Autowired
public User(Order order, OnlineOrder onlineOrder){
this.order = order;
this.onlineOrder = onlineOrder;
}
}
Now what are its advantages? Well, all mandatory dependencies will be injected at the time of initialization itself. It makes sure that our object will be initialized with all the required dependencies else it won't be initialized. Avoids NullPointerException because your injected objects will never be null. Another thing si we can create immutable object using constructor injection which is very very important right. Even if we make our fields final here there won't be any errors now. Which means immutable fields we can also inject now by using constructor injection. That's why it is useful and recommended as well.
And lastly, Fail Fast which means fail at compilation only in case of missing dependencies. For example, let's say one of the classes that we injected in constructor was not a component. Then it'll say application failed to start and it'll say that class we were trying to inject could not be found in the IoC container since we have removed @Component from it.
Now let's discuss the problems that could occur during dependency injection.
Let's look into Circular Injection first.
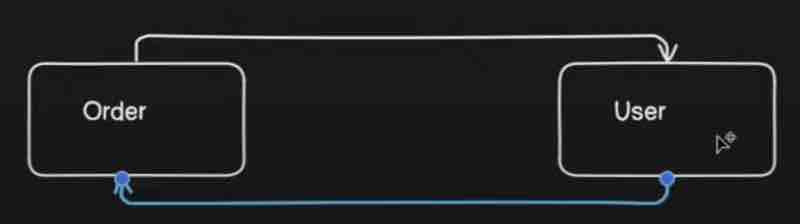
What we were doing till now is we are injecting order component inside your user right. We are auto wiring your order inside your user. What we are going to do now is we are going to inject this user as well inside yoru order component. So this becomes a circular dependency. Yoru order is dependent on user and user is dependent on order.
@Component
public class User{
Order order;
@Autowired
public User(Order order){
this.order = order;
}
}
@Component
public class Order{
User user;
@Autowired
public Order(User user){
this.user = user;
}
}

So spring is say we have circular dependency so go and fix it. So how can we resolve this? One way to resolve this is by using lazy annotation right. So lazy annotation is basically injecting beans whenever they are needed right. So how we achieve this by lazy annotation? What can do is while using @Autowired in constructor injection, we caa also use @Lazy along with it, which will avoid the cyclic dependency. We'll look into how lazy works in more detail later.
@Component
public class User{
@Autowired
Order order;
public User(Order order){
this.order = order;
}
@PostConstruct
public void init(){
order.setOrder(this);
}
}
@Component
public class Order{
User user;
public void setOrder(User user){
this.user = user;
}
}
Let's look into other problem of dependency injection, that is Unsatisfied dependency.
We have seen one kind of unsatisfied dependency when the objects that we were trying to inject into a compoent was missing in ioc container because it was not a component itself. Obviously in this case we are going to get some error that there is a dependency missing right.
Anthor behaviour of unsatisfied dependency is ambiguity when putting @Autowired on an interface and there are two classes that are implementing the interface with @Component. Now how will spring know which concrete implementation of that interface should it inject onto where @Autowired has been written. What we can do in this case is mark one of the classes that have been marked with @Component as @Primary so that will be the default concrete implementation of that interface for spring even though there are many component classes that implements it. We cna also use @Qualifier instead and give the bean name that we want to inject from the number of components that were implementing that interface by using @Qualifier("className") in camelCase.
So when we are trying to adhere to SOLID principles by using abstractions (interfaces) and there are multiple implementations of those interfaces then we can tackle them out either by using @Primary or by using @Qualifier annotations.
SPRING BOOT @ComponentScan
Have you ever wondered how application finds the beans? Finding the pojos inside your classes which needs to be converted to beans. How exactly it is scanning all the packages and looking for your beans. So the answer to these is component scanning.
So we'll first look into what exactly is the component scanning and the usecase of @ComponentScan annotation. Then we'll look into th earguments that we can pass into the component scan such as basePackages and exclusions.
So whenever your application is being initialized it'll look for beans right. So how does spring find beans? So suppose if spring does not know in which package are the beans kept so spring'll go through each one of your packages which might take some time. Instead suppose if it had some required metadata or required annotation through which it'd know exactly where to search for beans, it'd so easy for it right. So which package it should scan for beans that will be defined by component scanning.
What is the use case of component scan? Well scanning is fine but where is scanning taking place, that needs to be defined somewhere right, because we cannot just go ahead and randomly look into all the classes inside your application. So we need @ComponentScan annotation for that. But we haven't been using this annotation in our spring boot applicaiton right. Where is it?
So basically when we go inside the @SpringBootApplication annotation, we'd find that it is actually a combination of various other annotations. And @ComponentScan is present inside this annotation. So component scanning is already a part of spring boot application. The @SpringBootApplication annotation will contain that and you don't need to explicitly define that. This is the magic of spring boot. It does so many things behind the scenes that we won't even notice them.
So what happens is that all the subpackages from the class having @SpringBootApplication will be scanned for bean components by default. And any component outside of this default package where @SpringBootApplication has been written will not be scanned for beans.
Now we are going to study the arguments of component scan.
Now suppsoe we also wanted spring to scan for the components outside of its package, how would we do that? That's where we'd use @ComponentScan manually alongside @SpringBootApplication right. And we'll pass basePackages in its parameter like this.
@SpringBootApplication
@ComponentScan(basePackages = "com.example.default")
public class SpringApplication{
psvm{}
}
Now when we add basePackage in component scanning then it is only scanning that particular package only so that is something we need to keep in mind. However to add one more package over here, what we can simply do is use comma in between package strings. And because it is kind of an array it has to be enclosed within curly braches. Let me show you.
@ComponentScan(basePackages = {"com.example.default", "com.example.extras"})
There is a rule that we must look into: @ComponentScan should be used along with @Configuration annotation
Now, you'd say where did we used @Configuration annotation? It's working fine even without it. That's spring boot magic. It has already been implemented inside the @SpringBootApplication if we look deeper into it. Suppose for example, we'll scan it within a simple class like this.
@Configuration
@ComponentScan(basePackages = "com.example.extras")
public class Extras{
}
Now, let us take a look at exclusions/excludeFilters
Let's say there is some class that is now deprecated, and we don't want to include some class. I'd say exclude that particular class but include all the other classes. How do we do that exclusion? Well we have one more argument in @ComponentScan along with basePackages, that is excludeFilters. Now, this excludeFilters accepts another annotation @ComponentScan.Filter() which further takes 2 arguments for filteration. First it takes the kind of a filter type we want. Then it takes the class names that we want to exclude.
@Configuration
@ComponentScan(
basePackages = "com.example.extras",
excludeFilters = @ComponentScan.Filter(type = FilterType.ASSIGNABLE_TYPE, classes = {DeprecatedUtilityService.class})
)
There are some FilterTypes for this, that we can look into
1. ANNOTATION to filter that are marked with some annotation
2. ASSIGNABLE_TYPE to filter based on their certain type
3. ASPECTJ to filter that matches a given AspectJ pattern
4. REGEX to filter based on a given regex pattern
5. CUSTOM to filter based on a custom implementation of TypeFilter class
CUSTOMIZING BEAN NATURE
First we'll see what do we actually mean by customizing the nature of a bean. Then we are going to look into the interfaces to customize bean nature such as InitializingBean, DisposableBean. And another way ot customize beans using @PostConstruct and @PreDestroy annotations.
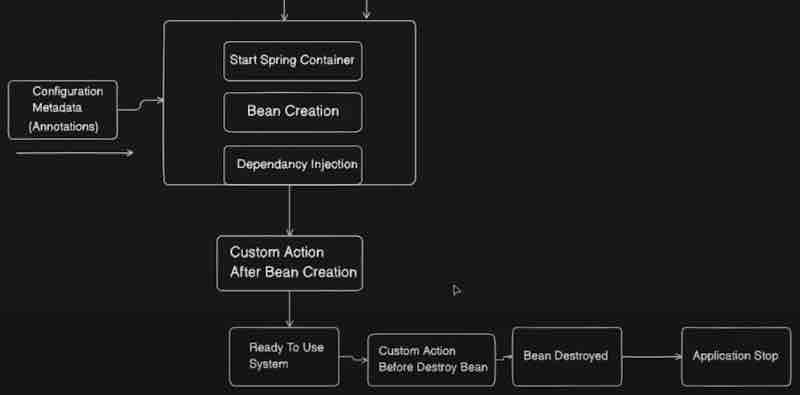
Let's say just after creating a particular bean I want to perform some certian action, it can be any action. For example, initializing any database connection. So those initialization aspect I want to perform right after creating the bean and before the bean is ready to use. Other thign I want to do let's say when we stop our application the beans that are created over here will be destroyed, so before destroying the bean let's say I want to clear some memory, that means I want to perform certain task before destroying the bean right. So these are custom actions we want to perform after creation of bean or before destruction of bean. That is what we call as custom actions where at being creation or destruction, we are customizing the nature of bean life cycle.
What exactly is custom action? We can let the bean perform certain action upon initialization and destruction of your bean, or we can let the bean perform certain actions after bean creation or before destroying bean. That is something which we can achieve by using this.
Let us go by the traditional approach first, that is by using interfaces.
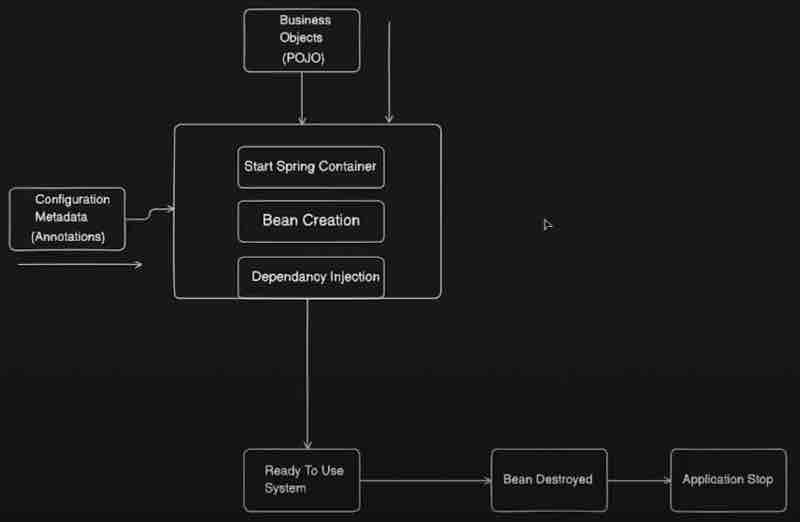
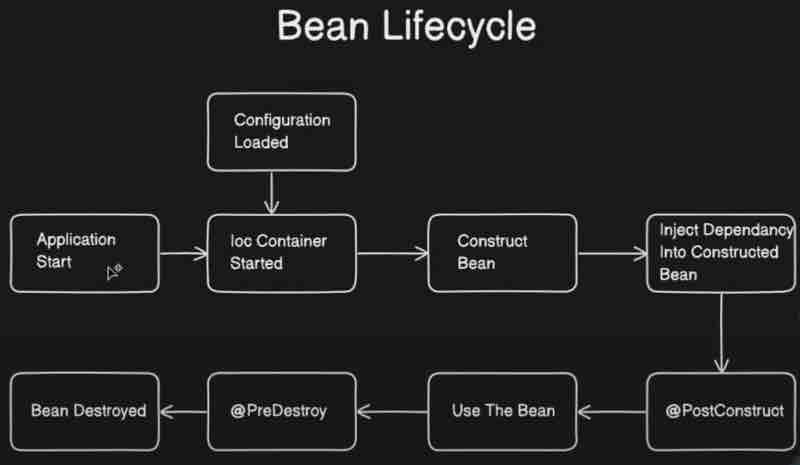
Now, we have POJO classes which we apply inside our application and we will have some configuration metadata for example annotations. So what will happen in the traditional way, first when we start our application, your spring ioc container will be started, after that once the container is up, the bean creation will be started, so it'll find which packages to scan and it'll start creating beans. And how to know which packages to scan? By using @ComponentScan that we know now. While doing bean creation, there will be multiple dependencies. Let's say Class A is dependent on Class B. Then that dependency will be injected. So your ioc container will be started, beans will be created and dependency will be injected. After that your bean will be ready to use and will be used inside your application. Now let's say I'm stopping my applcaiton at that point when the bean will be destroyed, and after that the application will stop. Now that is the typical lifecycle of a bean.
Now let us add two more stages into it for custom action after bean creation and custom action before bean destruction.
Let's go into interface bean customization.
We can simply customize our bean by implementing " InitializingBean " interface and overriding it's method afterPropertiesSet().
@Component
public class Example implements InitializingBean{
public Example(){
System.out.println("Bean has been created");
}
@Override
public void afterPropertiesSet() throws Exception{
System.out.println("I come after bean has been created");
}
}
So before bean being ready and after bean has been created, we are doing our custom actions here.
Similarly we can use " DisposableBean " interface for custom actions before destorying having the method destroy() to be overrided.
Now let us look into @PostConstruct and @PreDestroy annotations.
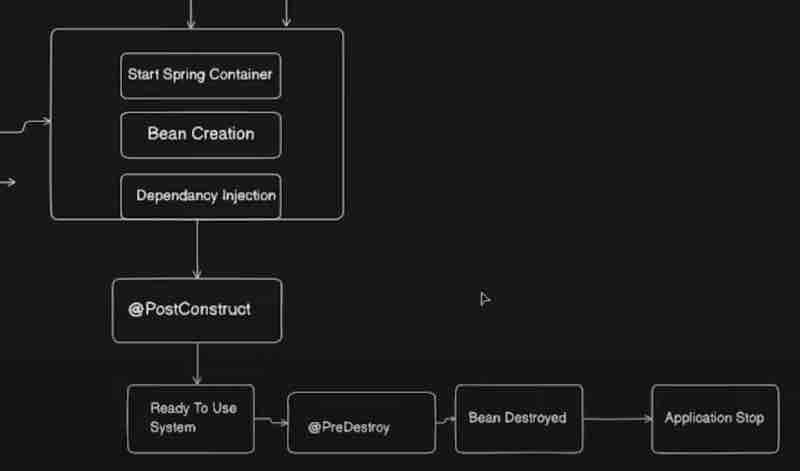
What we have to do is use @PostConstruct on top of the method that you want to run after bean creation and that's it.
Similarly we can use @PreDestroy on top of some method and it'll run automatically before bean destruction.
So they may be behaving same as the interfaces internally but this is the modern way.
BEAN LIFECYCLE & SCOPE
Now we'll understand the scope of a bean and its four types with examples. That is: Singleton, Prototype, Request, Session.
Before that let's take a look at the bean lifecycle.
Now, let's jump right into the bean types.
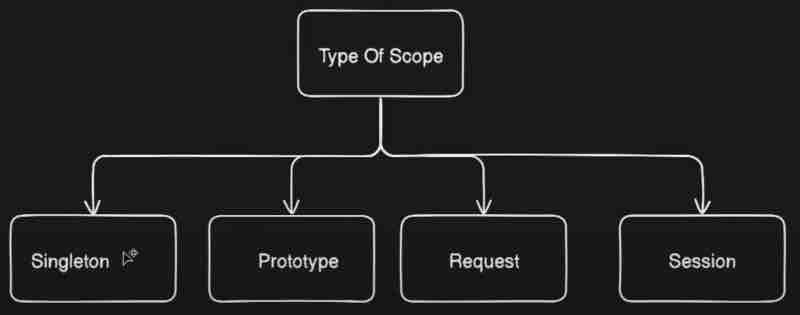
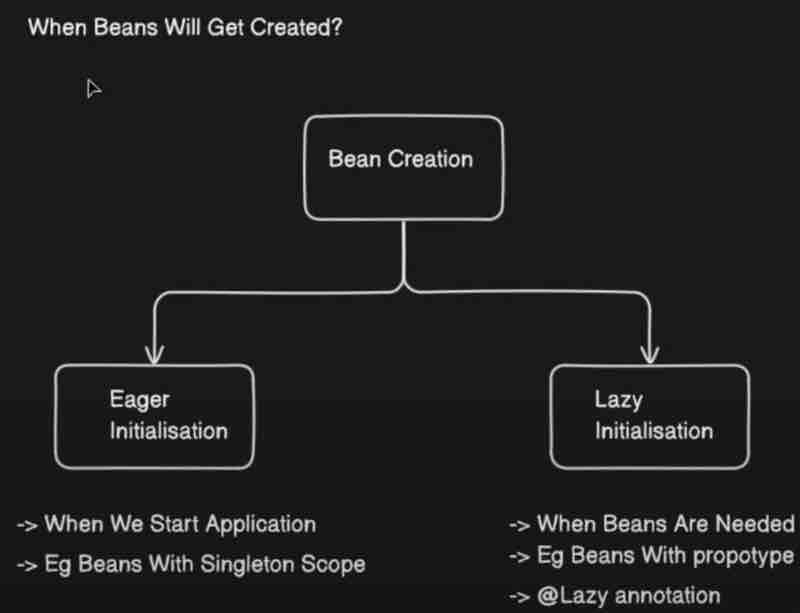
What is a singleton bean? Well as the name suggests only single bean will be injected right. In the eager initialization, beans with singleton scopes will be initialized eagerly. That means when the application starts the beans with singleton scope will be initialized at that time only. When we do not give any scope then the default scope of our beans will be singleton.
Let's say we want to add some other scope to beans. Then how do we define our custom scope? For that we use @Scope("typename"). Like for singleton we use @Scope("singleton") and for prototype we use @Scope("prototype")
Now what is a prototype? In prototype each time new objects are created. And they will be lazily initialized, which means new object is created each time it is requested. Well all scopes other than singleton are lazy in nature. What do we mean by lazy? When it is required at that time only then it'll be created and not otherwise.
Beans with eager initialization that uses default singleton type will be created and injected first. But the lazy types will be created and injected when used later on, and if they are not used then they'll never be injected at all.
Now the third type is Request type. So inside request scope there will be one bean created for each request. Again this will be lazily initialized. Which means not at the time of startup rather whenever needed right. By request we're referring to http requests. So whenever a request is sent, beans with prototype will be created whereever needed. But suppose we want to put this request type in a component which is not a rest client. For that we have to use custom proxy mode.
@Scope(value = "request", proxyMode = ScopedProxyMode.TARGET_CLASS)
There are in summary 4 scoped proxy modes. DEFAULT which is an alias for NO. When NO is used, it does not creates a scoped proxy, which is not useful when beans are non-singleton. Then we have INTERFACES which creates a proxy implementation of interfaces to expose class objects. Finally, TARGET_CLASS is basically used to create a class-based proxy.
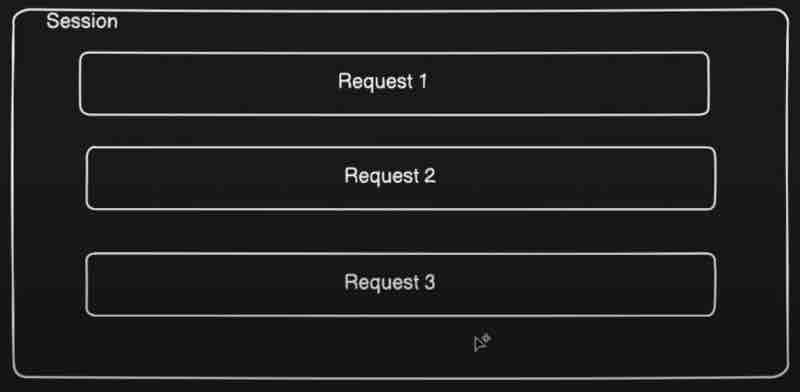
Now beans that are of session type have a behaviour such that new object is created for each http session. They are also lazily initialized. So whenever user accesses any api a session is created right, so there can be multiple requests inside your session. And it remains active till the session gets expired.
SPRING BOOT @ConditionalOnProperty
Annotation
Let's say we have a spring application with thousands of beans. So thounsands of beans are being created inside your application context that will likely create a chaos right because your application will be bombarded at one time right. Because all the beans are craeted while your application is coming up at first place perhaps you don't need all the beans and you may only a few beans at first. But these unneces sary beans are also getting initialized in your application context. In this case, your application context will be cluttered right. So that is one of a kind of problem right. What we can do is initialize only those beans which are needed at the time of initialization so that your application loads faster and your application contexts gets declutterd. And we can do this by using conditional on property.
What exactly is condition on property? Well beans are created on some certain conditions. If your condition is true then bean will be created and if your condition is false then bean will not be created.
Assume a scenario to handle, that we want to create only one bean that is either MySqlConnection or NoSqlConnection. Another scenario to handle could be, we have 2 components sharing the same database, but one needs MySqlConnection and the other needs NoSqlConnection.

@Component
public class DBConnection{
@Autowired(required = false)
public NoSQLConnection nosqlcon;
@Autowired(required = false)
public MySQLConnection mysqlcon;
@PostConstruct
public void init(){
System.out.println("Initialized Connection");
}
}
@Component
@ConditionalOnProperty(prefix = "nosqlconnection", value = "enabled", havingValue = "true", matchIfMissing = false)
public class NoSQLConnection{
public NoSQLConnection(){
System.out.println("NoSQLConnection Init");
}
}
@Component
@ConditionalOnProperty(prefix = "sqlconnection", value = "enabled", havingValue = "true", matchIfMissing = false)
public class MySQLConnection{
public MySQLConnection(){
System.out.println("MySQLConnection Init");
}
}
Let's see what exactly these parameters do. Now prefix plus value will create your key. What key will it create? A key which it will try to find a configuration. Where it will try to find configuration? Inside application.properties. So what it will do? It will try to find the prefix plus value inside your application.properties. And having value is the value for it. So let's see.
nosqlconnection.enabled = true
sqlconnection.enabled = true
If these properties having true as the value then we create the bean. As simple as that. Let's say I have it as false. In this case, it won't create. Because it is checking for true right. So the string in the havingValue parameter must match the value that we give in application.properties.
Now suppose your configuration itself was not present in application.properteis. In that case, what matchIfMissing does is if you mark this as true then it'll still inject the bean otherwise it'll not inject the bean. So this is basically fallback mechanism. If this configuration is missing then what are we going to do thenthis is something which comes into picture.
Now suppose we write our application.properties to not match like sqlconnection.enabled = dontcreate. Then what happens is the bean will not be created. But because we have injected that bean somewhere as a dependency then our application may fail. That is why we have marked @Autowired(required = false) in DBConnection for this particular case to demonstrate. Because if go inside @Autowired it has a required parameter which is by default always true. In our case, it may or may not come right, it is not mandatory. When we have marked sqlconnection.enabled = dontcreate then it'll not be matched with havingValue and the MySQLConnection bean will simply be null.
So what are the advantages of doing this? Well it gives us kind of Toggling feature. It avoids cluttering application context with unnecessary beans. We can avoid a few beans which are going to be created at the runtime which are not needed right. If they are not needed why to create them upfront? It saves memory for us. And also reduces application startup time.
But there are some disadvantages as well? Like misconfiguration can happen. Code complexity increases when over used. Complexity in managing.
SPRING BOOT PROFILES
First we'll see what exactly is Profiling? And then how are we going to use that profile inside our spring application. After that we'll see the @Profile Annotation.
Let's say you have application running on your local machine. Now here this is your local machine and you are going to connect to your database and that will require some user id and password. And where do we provide this application in configuration? The configuration file we call it as application.properties which are used to configure all the properties which are needed for your application.
Let's say we have given username, password in application.properties to connect to database, then you can use it in your java classes as
username = devUser
password = devPass
Then in your java classes, we can use these values like this using @Value annotation.
@Component
public class DBConnection{
@Value("${username}")
String username;
@Value("${password}")
String password;
}
Now let's say we pick up this application and we deploy it in another environment. By environment I mean let's say QA Stage where testing people deploy their code and test in separate environment. However, the username and password before belonged to the local database. But now in this case, we want the username and password for QA database. So that will be different and what we need to do is update the password and username in application.properties that's it.
Again tomorrow let's say you are going to go live with this code. You are going to deploy this in production. Now this database would need different configuration. And this is just an example. There are multiple properties that you need to configure right. There are so many other configurations, which are different in different environments. For example, URL, Port, Connection Timeout Values, Retry Count and many more.
But how do we handle different configuration for different environments? We canot go ahead and change it over here and then deply right. So this is when profiling comes into picture. Suprisingly, we can create multiple application-{profileName}.properties files like this.
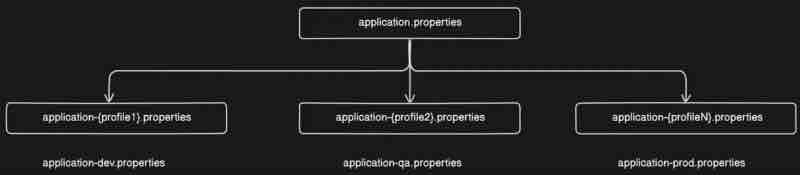
But how do we set profiles? At application startup we can tell spring to pick specific application.properties file.
Let's say we have application-dev.properties and application-prod.properties and each of it has different database username and passwords
How are we going to tell our spring boot application that go ahead and pick this dev properties for me and don't pick it from prod properties for now? So that is when how to set profiles comes into picture. At application startup we can tell spring to pick specific application.properties file using spring.profiles.active configuration. We can have application.properties which is kind of a parent property that we have and here we add this profile like this:
spring.profiles.active=dev
By writing this in our parent property, that is application.properties we can run our application-dev.properties file and set active profiles.
Suppose spring was not able to find that specific property then default values from application.properties will be picked up. Now suppose we not have given the default values and further the profile that we marked as active was not found by spring. Then our application may broke and say, Injection of autowired dependencies failed. So because it was not able to find the configuraiton so your application initialization itself is failed.
Let's say I've moved from dev environment to production environment. I need to still go ahead and makes changes over to that one line in parent property right. So that again involves code changes because this application.properties is again inside your application only. So basically we need a way to externalize things without making code changes inside your application. What we want is we want to provide this active profile from outside the application while running the application? So let's say there's a jar file with me. We run that jar in our production or dev envionment and provide this active profle dynamically.
So how do we configure profiles dynamically? Basically there are 2 ways by which we can achieve that. First one is application startup by using command. Basically we can start our application manually and provide profile to it like this.
mvn spring-boot:run -Dspring-boot.run.profiles=prod
So the first keyword mvn is maven, and then spring-boot:run is a command that runs your application. After that hyphen D means we are going to set a parameter right. Where? spring-boot.run.profiles and then we specify which profile word matches with application-{profile}.propertices and runs that configuration.
So this is how you can externalize your configuration of profiles right.
Another way is by using pom.xml file. What we can do is add profiles in your pom.xml file as well. And run using this command instead.
mvn spring-boot:run -Pproduction
<profiles>
<profile>
<id>production</id>
<properties>
<spring-boot.run.profiles>prod</spring-boot.run.profiles>
</properties>
</profile>
</profiles>
This is basically how we can add profiles in our pom.xml file. This is placed below the <build> tag and outside of it.
Now let's see what is @Profile annotation? So by using profile annotation we can tell spring boot to create a bean only when particular profile is set. That means if we set let's say dev profile inside our application.properties then profile annotation will tell particular bean should be created or not. Let's see how? Simply by using @Profile("profileName") according to application-profileName.properties on top of that bean we want to run for our profile.
Global Exception Handlers
& Controller Advise
So first we are going to see a traditional way of handling exceptions. So whenever client is calling your api, how do we handle exceptions and how do we propagate errors to respective clients right? After that we are going to see how exception handler comes into picture and how it helps us in order ot handle exceptions. Then we will see what is the need of controller advice. Why is it needed? So that's something which we are going to answer. After that we will see the actual implementation of controller advice as well.

Now let's try to visualize it right. Let's say we have this client whihc is kind of a postman in our case, sending a request to our application, let's say here we have this particular application over here, so request is coming to our controller, and then it is going to service, then to repository, and then finally the call is going to database right.
Let's say there is no product found inside this particular database over here right. Then what will happen? Then our repository and service will be null right, and this controller is going to throw an exception to the client that our product is missing. What we do is we handle the exception inside our controller only. Now as per traditional approach, what we usually do is add a try/catch for each and every function in controller. But we can use an @ExceptionHandler so that all the error responses will be thrown by this exception handler and duplicacy in code is reduced.
Now consider this exception handler as a smaller package inside your controller which will handle all the exceptions that are being thwon to the client. So in case of any exception coming, controller will not give the response rather the exception will be handled by this exception handler. And this exception handler will give the responses to client.

Suppose we have created a rest api in controller for products and we have to write a product not found by id exception. We have written a custom exception that extends RuntimeException. What we will do is pass the class file of this custom exception class into the @ExceptionHandler parameter on top of a function that takes the instance of that custom exception class which has been instiantiated whenever a runtime exception occurs. Then we can handle it accordingly for any runtime exception irrespective of the route in which the api call has been made.
@ExceptionHandler(ProductNotFoundException.class)
public ResponseEntity<> handleException(ProductNotFoundException e){
return new ResponseEntity<>(e.getMessage(), HttpStatus.NOT_FOUND);
}
Now the apis inside our main controller that are throwing an exception is being handled by the exception handler annotation. But let's say we have another rest controller. Now suppose this second controller was for some processing with another database. And we want to throw same exception over here as well if product not found. However, exceptions inside our second controller will not be catched by this exception handler because this exception handler is of the main controller only. One obvious solution that comes into mind is to copy the same exception handler code into the second controller as well. Well that may definately work. But this code is repeated in each controller right. Suppose if I have a thousand controllers where other thousand controllers are throwing product not found exceptions. Then are we going to go ahead and add this particular exception handler in each controller. Not a feasible appraoch right. It is when controller advises comes into picture.
Now what controller advice is that it will allow your exception handlers at a generic place in a generic file. It will allow us to centralize our exception handling. Let's see how we can implement that? What we can do is add a GlobalExceptionHandler class alongside your controllers and write the same @ExceptionHandler function over there and remove it from all controllers. Now what we have to do over GlobalExceptionHandler class is add a @ControllerAdvice annotation in order to convert this exception handler to controller advice. That's it.
Now there is one more annotation that we can use that is @RestControllerAdvice. It is basically for response body plus controller advice handling right. If you go inside you'll see it's an alias of controller advice and also has a response body.
Suppose we use a simple @ControllerAdvice and try to return just a string when exception is thrown. In that case, that string internally will be treated as a view that servlet will try to find by name of that string plus .html extension, and if that file is not present, it returns an error saying unspecified view. Remember that we can solve this by using @ResponseBody annotation. So @ControllerAdvice do not have any response body by default unless we use the ResponseEntity class. However, by using @RestController, the default behaviour is returning response body.
In our GlobalExceptionHandler, we can add as many exception handlers as we want in a generic place where each custom exception extends a specific type of exception and handled it in all controllers accordingly. For example, let's see the code.
@RestControllerAdvice
public class GlobalExceptionHandler{
@ExceptionHandler(ProductNotFoundException.class)
public String handleNotFound(ProductNotFoundException e){
return "Product Not Found";
}
@ExceptionHandler(MaxOrderException.class)
public String handleMaxOrder(MaxOrderException e){
return "Maximum Orders Reached";
}
}
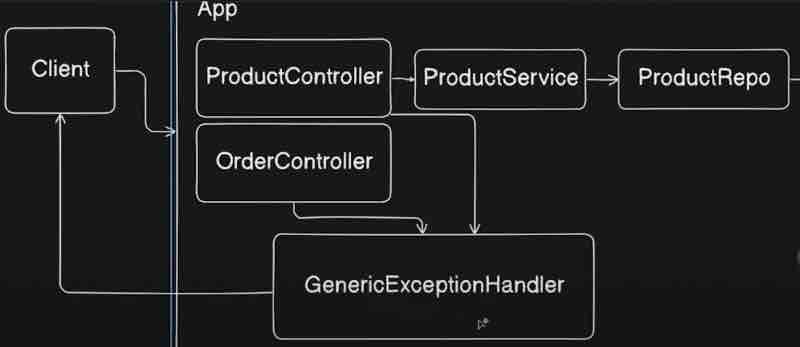
@Aspect Annotation
Aspect oriented programming complements oop concepts in a manner that instead of objects we now have aspects. These aspects enable the modularization of concerns that cuts across multiple types and objects. This may be complex to understand but we'll simplify it.
They are trying to say AOP will handle cross cutting concerns. When they say cross cutting concerns, it mean that things that we do apart form business logic. Let's say there is one method which is doing some business logic right and now you have some other code which is doing some other thing for example having loggers inside that method right. Now loggers and that are not a part of business logic. And that is something which you are doing for logging purpose right or debugging purpose in the latest stage when you are going to deploy your application and logging will be useful for monitoring and all later on. But this is different from the business logic right. For example, logging is your cross cutting concern which is different from your business logic.
For a class that has bussiness logic as its core functionality. Logging is an overhead concern and therefore called a cross cutting concern.
" Aspect enables separation of cross cutting concerns from your actual business logic. "
Let's look into AOP Concepts one by one.
A join point is represented by a method. Before invocation of a method or after invocation of a method, we are going to call our aspect. So that method becomes a join point for our aspect.
Advice is an action taken by an aspect to a particular join point. Like for example if we separate the logging concers in a class aop, then the call will pass through that aop class before invoking the actual business logic method. We have different types of advices such as "around", "before", "after", which will look into soon.
Now this method aspect over here only needs to be called on the methods of class. Let's say I only wan tot call it before or after or around, but on which class we want to call this aspect, or I would say on which method we want to call this aspect, everything will defined by using a point cut. And that point cut will be present over here on top of this particular method. We'll clear it shortly, but just keep in mind that point cut is about which particular class or method this particular aspect should be applied to.
Spring AOP is proxy based. Let's see what are AOP proxies? But first let us know what is a proxy? A proxy is basically an object which surronds the pojo object. When someoen is calling your code, the call will first land inside your proxy and then the call will be diverted to your plane object. They are saying proxy can delegate to all the interceptors (advice). That may sound confusing. Let's understand it.
The call will first land to the proxy of this class, and now we are inside the proxy. Now the proxy will check if we have any aspect for this particular class right. How will it check? It will check by using point cut expresssion. It will check if we have any aspect of this class. If we do have the aspect then proxy will call this aspect first and do whatever is needed, and after calling that depending on point cut expression, it will finally call your method join point. So that is the flow and use case of proxy. So what we understand by this is that method calls on that object reference are calls on the proxy.
Let's go straight into annotations first. @EnableAspectJAutoProxy is required alongside @Configuration. However, we have the magic with us. @SpringBootApplication annotation already has them by default. So we need not to worry about configurations, and we can go straight into using aspects.
Suppose we want to use Aspects for logging purposes which separates the concers with the business logic. So what we can do is use @Aspect annotation on a class. Let that class name be LoggingAspect. Now we can add any methods to these class. And we can run them as per advices and point cuts. Also remember that an aspect is also a component.
As we have seen, advices are @Before, @After, @Around. And then we have point cuts, which points to the exact location of methods. A point cut also takes a declaration which tells how our advice function is supposed to run on those point cut functions. Let's look at the code.
@Component
@Aspect
public class LoggingAspect{
@Before("execution(* com.demo.example.ExampleClass.helloWorldMethod(..))")
public void log(){
System.out.println("Aspect log called");
}
}
Here, @Before is an advice. The string inside is a declaration. Inside the declaration, we have the point cut. The point cut is like this. First is *, that means any return type. Then we have the package name and specific class name and then specific method in that class following by any parameter of that class. We could also do something like com.demo.example.*.*(..) which would mean any class and any method within a package. However, being specific is preferred for clean code.
Now what will happen is the aspect will find the exact method in the exact class within the exact package, and run that advice method before the it joins the point, that means before it executes that method. And similar is the approach with @After and @Around.
@Around is little more advanced. It has to take the class ProceedingJoinPoint as the parameter in the advice function where you define @Around on top, and then it has to specify the split with .proceed() method. Basically, advice with @Around runs before the point cut function on which it is being called, but when we call proceed() within this advice function, then the call is passed to the point cut function, and when the point cut function ends it's call, then it returns back and completes the remaining function. Let's see the code.
@Component
@Aspect
public class LoggingAspect{
@Around("execution(* com.demo.example.*.*(..))")
public void log(ProceedingJoinPoint joinPoint) throws Throwable {
System.out.println("Aspect log called before");
joinPoint.proceed();
System.out.println("Aspect log called after");
}
}
SPRING BOOT TRANSACTIONS
Code segments where shared resources are being accessed and modified are our critical operation code sections. For example, let's say there are multiple people who wants to book a flight right basically long weekends are coming and people want to go to Goa right. Now they want to book a flight over here. And let's say everyone wants a window seat right. Now multiple people will hit the same request to book a window seat right. Let's say there is just one window seat left. And these people are hitting the request to book that particular window seat.
Now what will happen over here is we will first read the flight seat with id_number, and we will check if the seat status is available right and if it is available then we'll update the status to booked right. Now what will happen if the simultaneous requests are coming with three users at once and your database will read that the status is available. Now the booking status may be updated for all three users as booked right. All three of them will think that okay my seat is booked but when they onboard, there will be a chaos right, so that situation may happen over here. That there will be inconsistency of your data if you hit multiple requests and try to access a same resource.
" When multiple requests try to access the critical section, data inconsistency can happen. "
What is the solution? Basically Transaction right.
Transaction helps us to achieve ACID properties. So what are ACID properties? Atomicity, Consistency, Isolation, Durability.
Atomicity ensures that all operations in transactions are completed successfully. And even if any operation fails then entire transaction is rolled back.
For example, let's say you want to send some money to your friend. Now, let's say you are sending 100 rupees to your friend. You initiated a transaction, and 100 rupees got debited from your account. Then the requests went to the bank. And bank is transferring that money to your friend. But while transferring this money, there is some error that has occured. So the money got debited from your account but never credited to your friend's account. So this is basically a classic problem over here. In such scenarios, if there is some error which is occuring inside your tansaction, then the entire transaction should be rolled back. That is the debited money from your friend's account should get credited back. So that's what we call as a rollback. And that covers our atomicity.
Consistency ensures the database state before and after transaction is consistent.
We have to ensure the database state before and after transaction is consistent right. So even if the transaction is failing, the database state of both the users is consistent right. The user had 100 rupees before transaction and it's still there after transaction failure. Basically no change inside the account of both the parties. So that is basically consistency.
Isolation ensures that if multiple transactions are running in parallel, they do not interfere with each other.
So if there are thousand people who are sending money to each other, the transactions will be different right. They will be in parallel in your application. Ther may be multiple things which are happening in parallel, multiple transactions which are running in parallel but even if those are in parallel, each of the transaction is working in isolation right, each of the transaction is running in isolated state, they are not interfering with each other. So that is basically isolation.
Durability ensures that committed transaction will never be lost despite of system failures.
That marks the end of ACID properties.
Let's look at how a typical transaction looks like.
BEGIN_TRANSACTION
- Debit From A
- Credit To B
If All Success
COMMIT;
Else:
ROLLBACK;
END_TRANSACTION
Now we could see a lot of bolier plate code in a typical transaction that may be similar for nearly all transactions. That is where AOP comes into picture. It'll handle the boiler plate code and let us focus on our business logic. Let's say you have a thousand methods, and each method if you start handling every step of transaction manually then what'll happen is it'll be kind of a chaos right. And you'll have to take care of a lot of things.
This is when spring transactions comes into picture. We don't need to handle these things manually right. We just need a transactional annotation on that method we just need to annotate. However, to begin with spring transactions, we need a dependency that'll need to add to pom.xml file. That is spring-boot-starter-data-jpa.
Where would we handle the transactions? In service, as the service handles the business logic. There we'd annotate any method having a critical section suppose add() with @Transactional on top of it. So this @Transactional annotation can be applied either at a class level or at a method level as well. When we do this at class level, then it is enabled for all methods of that class. Note that transactions cannot be applied to private methods. So even if you annotate a private method with @Transactional annotation that is of no use, because they simply cannot be a transaction.
There is one more configuration that we have to use @EnableTransactionManagement alongside @SpringBootApplication annotation. However, we don't have to care much about it as we have enabled auto configuration, and spring will take care of it for us, so this is not needed, but if spring is not doing auto configuration then we'll need this.
Let's go deep into how Transaction Management in spring works. Basically, it uses aspect-oriented-programming heavily, which uses a point cut expression right and it uses a advice right. So advice is basically a method which runs before or after a certain function right. So we have this function that has @Transactional on top of it. Before and after execution of this function, a certain method will run that is called as advice and that will be executed based on a point cut expression which we have seen already in aspect-oriented-programming. So basically how spring works is it uses a point cut expression to search methods having transactional annotation right. We have seen how aop works internally right. So at the run time only it will create all the proxies which are needed in order to execute these methods right.
Now this is how your point cut expression may look like right now within the method which are annotated with @Transactional within the method or classes. Now we have an advice over here. Let's see it.
@within("org.springframework.transaction.annotation.Transactional")
So this particular method is basically present inside TransactionInterceptor class which is kind of an inbuilt class inside your spring framework provided by spring, and that will have invokeWithinTransaction method which is kind of advice. So once the point cut expression matches, it will run "Around" type advise. So we have seen in aop that @Around handles both before and after, and the switch form before to after is with proceed() function.
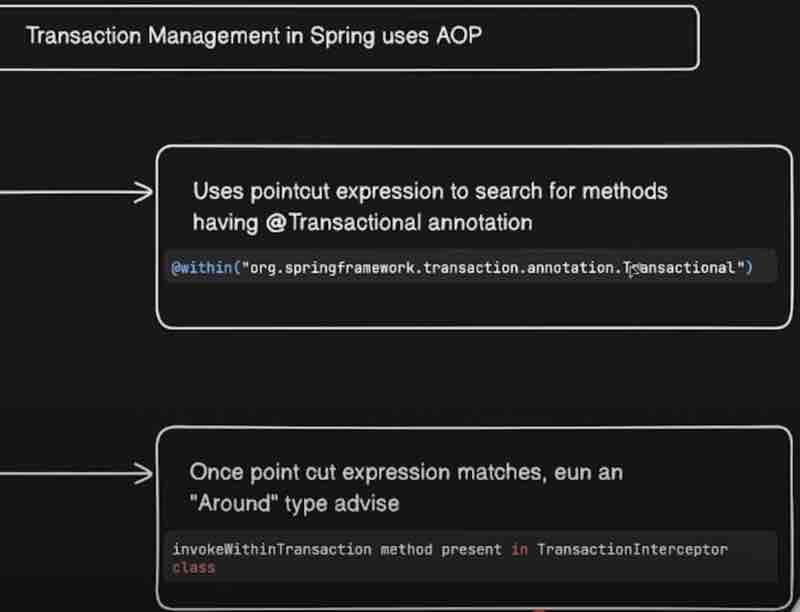
Now the invokeWithinTransaction method actually has three jobs. First it'l initiate a transaction. Then it'll invoke your class. Then it'll commit the transaction. Or in case of any exception it'll just roll back itself. If we go inside the invokeWithinTransaction method, we see that it first calls the createTransactionIfNecessary method. Then it proceeds with the around advice .proceedWithInvocation() invoking the next interceptor in the chain which normally results in a target object being invoked. And finally completeTransactionAfterThrowing() method will rollback itself if there occurs an exception during the transaction. If no exception has occured then instead of this commitTransactionAfterReturning() method will be called.
If we actually debug the method with @Transactional, we could see that spring is calling the createTransactionIfNecessary() method first through the annotation before calling the actual method on which the annotation is being applied. So the advice is being invoked within transaction. Then it proceeds with invocation which moves ahead with the actual method we called which will do all the business logic operations and come back to the invocation. And then it'll call the commitTransactionAfterReturning() method to commit at the end. That's the way it works.
Suppose if we throw a RuntimeException explicitly to demonstrate that an exception has occured during transaction, then it'll automatically invoke completeTransactionAfterThrowing() method from the invokeWithinTransaction() method which is rolling back the transaction.
Basically creating proxy and everything applies here as it applies in your aop. And that is how our transaction is working internally and invoking advices around the methods which are annotated with @Transactional annotation.
Let's look into Transaction Managers and both Programmatic and Declarative approaches.
What is transaction manager now? It is basically responsible for manging your transactions like getting your transactions, commit to it and rolling back. So all the transaction operations are handled by your transaction manager inside spring. They'll understand the particular transaction manager hierarchy. Transaction manager inside spring is basically an interface right. So it is a parent interface.
On the top we have a transaction manager which is kind of an interface which do not have much things. And your PlatformTransactionManager interface extends this particular interface which will have three abstract methods in the interface which is getTransaction(), commit(), and rollback(). Now that particular implementation is provided by AbstractPlatformTransactionManager which is an abstract class So basically it provides the implementation of these methods. So these particular methods will be used when we actually use transaction inside your spring framework right. Now this abstract class will be used by your different transaction managers inside your spring application. Basically, there are multiple transaction managers. For example, DataSourceTransactionManager which is used for JDBCTransactionManager. We can also have HibernateTransactionManager or JPATransactionManager. And we'll choose just one between them. Basically, spring will choose for us. Mostly, it chooses JPA at runtime which has simple operations.
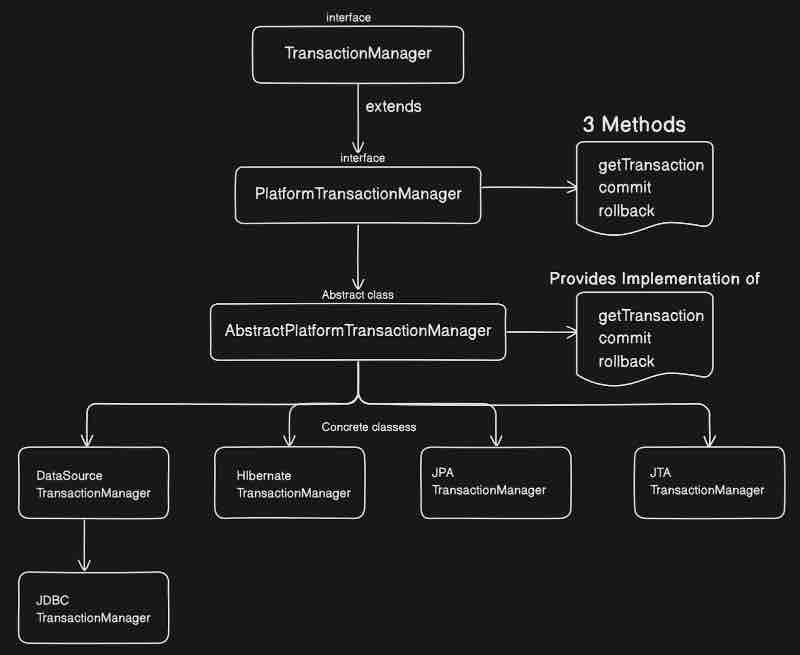
The first three Transaction Manager concrete classes are used for our local transaction management. And the fourth one JTA TransactionManager is generally used for two-phase commits for distributed transaction management. Otherwise, the other three transaction managers are used.
Now, let's look into the type of transaction managers, which are declarative and programmatic.
So, declarative transaction management is kind of done heavily through annotations. Declarative means to declare a transaction and the job is done. Whatever we are looking into till now is a declarative way of define your transaction right. So by now we were using @Transactional annotation only right. And spring boot will choose the appropriate transaction manager for us. We have seen that it was choosing JPA transaction manager for us. And we can create an explicit transaction manager and tell spring to choose that as well.
So suppose I don't want what spring chooses for me. Rather I want to tell it explicitly which transaction manager to choose. Let's see how we can do that?
@Bean
public DataSource dataSource(){
DriverManagerDataSource dataSource = new DriverManagerDataSource();
dataSource.steDriverClassName("org.h2.Driver");
dataSource.setUrl("jdbc:h2:mem:testdb");
dataSource.setUsername("root");
dataSource.setPassword("Password");
return dataSource;
}
@Bean
public PlatformTransactionManager transactionManager(DataSource dataSource){
return new DataSourceTransactionManager(dataSource);
}
So here we have given our own data source of H2 database. What we have to do is tell spring while using @Transactional(transactionManager = "transactionManager") that use this particular transaction for me. Here, we are giving the same name as function name of that bean that returns the new datasource. In order to demonstrate we have seen that we can also do it this way. Now instead of JPA transaction manager, we have dataSource transaction manager.
Let's look at Programmatic transaction way.
As the name suggests, programmatic means handle your transaction programatically through a code, that means don't use annotations and write a code. Now we have discussed that boilerplate code will be handled by aspect oriented programming. Then why to go and write a code in order to handle the transactions? Basically the answer is a specific use case in which this type of transaciton management could be used.
Let's say you have a class, and you have updateUser() method which is doing three things, updating the database, then it is calling an external api call, and then again it is updating the database. And then we are done. So, while it is hitting the external api call, it'll go and hit the call and keep waiting for the response right. Meanwhile, your database connections and everything is there. Let's say the connection took 2 to 3 seconds, and for that particular time, the connection is not released. This particular function is holding that one okay. Now when you scale your application and put it in production, there is such cases where your connection is not being released quickly, and that can be the bottleneck issue. In such scenarios, we should not make a use of @Transactional rather we should do a programmatic approach and we handle those operations explicitly. So that is when programmatic transaction managers comes into picture. So, it's basically flexible but it's difficult to maintain right.
We're going to look into two approaches for the programmatic approach. What we have to do is create a component class, and inject the PlatformTransactionManager object into the class through constructor injection at runtime. And this object will come from the dataSource we have created above in AppConfig configuration class for example. Now what we have to do is get the TransactionStatus object instance in a method suppose updateUser() by using getTransaction() method on it. Remember that our PlatformTransactionManager had 3 methods within it that is getTransaction(), commit() and rollback() and we are going to use just them. What we are doing is directly calling these methods from this interface and they wll be dynamically resolved at runtime from the abstract class the implemented that interface that is AbstractPlatformTransactionManager.
@Component
public class FirstProgrammaticApproach{
PlatformTransactionManager transactionManager;
public FirstProgrammaticApproach(PlatformTransactionManager transactionManager){
this.transactionManaager = transactionManager;
}
public void updateUser(){
TransactionStatus status = transactionManager.getTransaction(null);
try{
System.out.println("Do Operations");
transactionManager.commit(status);
} catch(Exception e){
transactionManager.rollback(status);
}
}
}
The second approach of programmatic transaction management is by using TransactionTemplate which will handle all the boilerplate code for us, and we need not to write each and everything explicitly. What we have to do is create an instance of TransactionTemplate instead of PlatformTransactionManager and use the constructor injection again as we did before. Where this TransactionTemplate bean will come from? Then we have to add a @Bean for it.
@Bean
public TransactionTemplate transactionTemplate(PlatformTransactionManager transactionManager){
return new TransactionTemplate(transactionManager);
}
Now let's look at the code implementation of second approach.
@Component
public class SecondProgrammaticApproach{
TransactionTemplate transactionTemplate;
public SecondProgrammaticApproach(TraansactionTemplate transactionTemplate){
this.transactionTemplate = transactionTemplate;
}
public void updateUser(){
TransactionCallback<TransactionStatus> dbOperationTask = (TransactionStatus status) -> {
System.out.println("Perform Operations");
return status;
};
transactionTemplate.execute(doOperationTask);
}
}
Here callback is the task you want to create, and we are doing this by using lambda expressions. Here, we are just executing a particular task inside the transaction callback and we are just returning the status code. So when we do execute, then all those boilerplate code things will happen internally.
Transaction Propagation
We'll look into each of propagation ways such as REQUIRED, SUPPORTS, MANDATORY, REQUIRES_NEW, NOT_SUPPORTED, NEVER, NESTED. But let's first understand what exactly is transaction propagation? As the name suggests, how the transaction should be propagated to other method right. That will be decided by your transaction propagation. So transaction propagation refers to how transaction behaves when a method annotated with transactional is called by another method that may or may not have transactions right. For example, there is one method and there is another method inside your same application. However, they may or may be in same class okay. Let's say one of them has @Transactional annotation on them. Then in this case, what will happen? How the transaction of method one will be propagated to method two. Suppose if method one only has @Transaactional annotation. Then does method two needs any transaction? If it does not needs it then what exactly needs to be done? All these things will be handled by propagation inside your @Transactional annotaiton. So depending on your use case, spring will handle propagation for us, as we can specify the propagations on the respective methods according to our scenario and we can get the task done. That's where transaction propagation comes into picture.
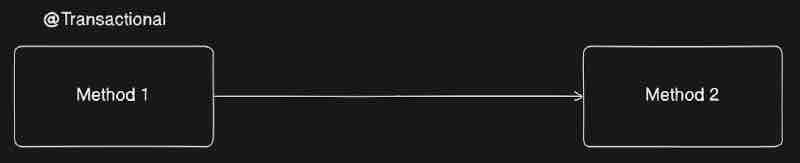
When we do not mention any propagation way then REQUIRED is the default propagation behaviour of @Transactional. So it works something like this. @Transactional(propagation = Propagation.REQUIRED). However, we need to mention it for the case of REQUIRED because it is default. When it comes to understanding this default behaviour, required means that this particular function requires a transaction. So basically if the transaction is already active, it will join the same transaction okay, or even if we do not have transaction in the calling method, then it'll start a new transaction. So suppose controller is calling the method on service where we have put @Transactional on top of a method, however we do not have @Transactional annotation in the parent caller in controller that is calling the method to the service where we actually handle the transaction. So, even though the one who started the transaction does not have a transactional annotation, the method call will still be started with a transaction. Another situation is suppose the parent caller in controller and the method being called in service both have @Transactional annotation on top, then they will join the same transaction that was started earlier by controller instead of creating a new one. So these are the two common scenarios of understanding REQUIRED propagation.
Basically the default propagation says that the function is joining the existing transaction which is coming from the calling method which is kind of a method inside controller. So this behaviour is not creating any new transaction. Now there is a keyword named REQUIRES_NEW propagation which always creates the new transaction in such scenarios and never joins the already existing transaction. But the question is why do we need to create a new transaction? Basically we use REQUIRES_NEW propagation whenever we want to isolate a particular transaction form other sorrounding transactions. For example, we can use requires new while we are doing logging or auditing for certain cases right or whenever we want to perform some independent operations which are isolated from your existing transaction. The famous example of that would be sending a notification right, you are doing a certain task but you want a notification to be sent to client in a different transaction that is something you can handle inside requires new. Another famous example where you can use requires new, basically whenever you want to implement a retry mechanism right, and each entry could happen in a new transaction. That is when REQUIRES_NEW comes into picture. In a nutshell, what it does it it'll suspend the existing transaction which is coming from your calling method and it'll start a new transaction over here.
Now when we propagation as MANDATORY, it enforces that there should be a existing transaction present in the calling method. That means this function should not start any transaction rather the calling method of this method which we called should already have a transactional annotation. Let's say if the calling method does not have any transactional annotation. Then this method that we called will not start any new transaction rather throw an exception that there should be active transaction present in order to propagate that particular transaction. So this MANDATORY propagation is useful when you want to enforce that there should not be any new transaction created rather things should work inside the existing transaction and there must be a existing transaction present while someone oen calling this particular method. To put simply, this is basically enforcing the exisitng transaction present.
Now when we mark a transaction as NESTED, that means if the calling method have a existing transaciton then this method will run in same transaction in a nested way. However, if the calling method does not have a transaction annotation then this behaves like a required type and it'll simply start a new transaction.
Now by nested way, we mean that it'll eventually join the existing transaction but it'll create a save point at that point okay, and then the transaction will run ahead of that save okay okay. If for instance, there is some exception that has occured, then only that particular transaction upto taht save point will be rolledback and the existing transaction before that save point will not be rolled back. So NESTED is basically useful when you want to do partial rollbacks, like only rollback just this function and not rollback the entire transaction.
Now when we mark a transaction as SUPPORTS, that means this particular function will support a transaction if the calling method have transaction right. That means if the method that has been called from the controller have any transaction then our method in the service will support the transaction and have it, otherwise if the calling method form the controller does not have any transaction then this method being called in service will also not have any transaction.
Now NOT_SUPPORTED means that if the calling method have existing transaction then for this particular method only, the transaction will be suspended right, and after this particular method the transaction will be resumed again. That means this particular function will not run inside any transaction. So the usage of this is straightforward, whenever we don't want any transaction and we want to skip the transaction for certain methods, then we can do it.
Now NEVER means that this particular method should not run in any transaction. If the calling method of this particular method have a transaction then this method will throw an exception saying that there is already ongoing transaction and I don't want to interfere that transaction. It'll throw IllegalTransactionStateException saying that Existing transaction found for transaction marked with propagation 'never'.
Isolation Levels
Adding an isolation level on a transaction is pretty simply right. We have to add that up in the parameter of our annotation.
@Transactional(propagation = Propagation.REQUIRED, isolation = Isolation.DEFAULT )
Let's first discuss what is an isolation? Let's say we have multiple transactions running in parallel right. Let's say you are working in multi-threaded environment and there are multiple transactions running. Now how is Transaction A is isolated from Transaction B? What is the impact that they have on each other? How Transaction B is separate from Transaction A? That is something which we define as the Transaction Isolation Levels. How these two transactions running in parallel will impact your data? Isolation is basically a global concept whereever we use transasction right. Not just related to spring, it'll be a global concept basically everywhere when we talk about transaction.
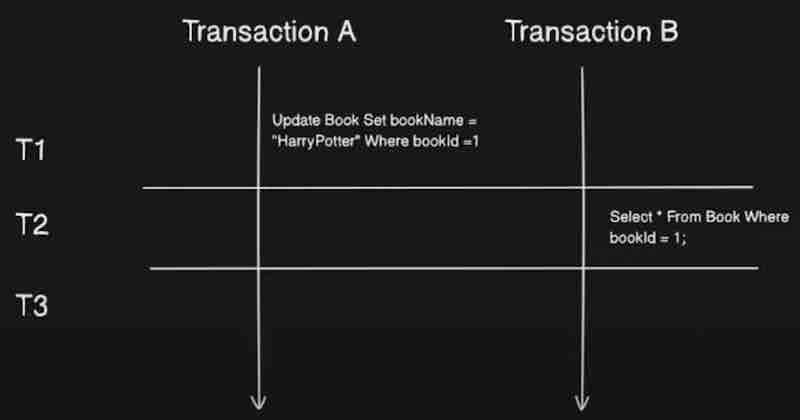
Now the next question is, Why Isolation? We have different levels of isolation and they are introducted because they are solving some problems while running a parallel transaction. What problems are they solving? They are solving dirty reads, non-repeatable reads, phantom reads which we already know.
READ_UNCOMMITTED says that it allows a row changed by one transaction to be read by anotehr transaction before any changes in that row have been committed. And if any of the changes are rolled back, the second transaction will have retrieved an invalid row. It indicates taht dirty reads, non-repeatable reads, and phantom reads can occur here. If it has so many problems then why are we even using it? It is particurally used when we are using a particular data source for only reading the data then it's fair. However, for updating and deletion stuff, it's better to go a higher isolation level.
READ_COMMIT says that it prohibits a transaction from reading a row with uncommitted changes in it. However, it says that dirty reads are prevented here, but non-repeatable reads and phantom reads can still occur. Here dirty read is being prevented using locks.
REPEATABLE_READ says that it prohibits a transaction from reading a row with uncommited changes in it, and it also prohibits the situation where one transaction reads a row, a second transaction alters the row, and the first transactionr re-reads the row, getting different values the second time (a "non-repeatable read"). Thus it indicates that dirty reads and non-repeatable reads are prevented but phantom reads can occur.
SERIALIZABLE says that it includes the prohibitions in REPEATABLE_READ and further prohibits the situation where one transaction reads all rows that satisfy a WHERE condition, a second transaction inserts a row that satisfies that WHERE condition, and the first transaction re-reads for the same condition, retrieving the additional "phantom" row in the second read. It indicates that dirty reads, non-repeatable reads, and phantom reads are prevented.
SPRING DATA JPA
Now whenever your repository layer is talking to the database layer, there should be some kind of connectivity between these two right. There should be some kind of connectivity between your java application and the database right. Let's see the traditional way first, so if we go by using the JDBC, still we'll able to connect to database right. Let's look into it in more detail.
First, we load the JDBC driver, and after that, we establish a connection between your database and your application by using some classes like driver manager right, then we need to create SQL queries right, then we need to prepare a statement, and after that query might need some parameters, like you have entity or object and thoes entities are mapped to this query right, and those parameters needs to be set, so we used to write a lot of code in order to do that, and at the end, we used to execute the query right that will actually hit.
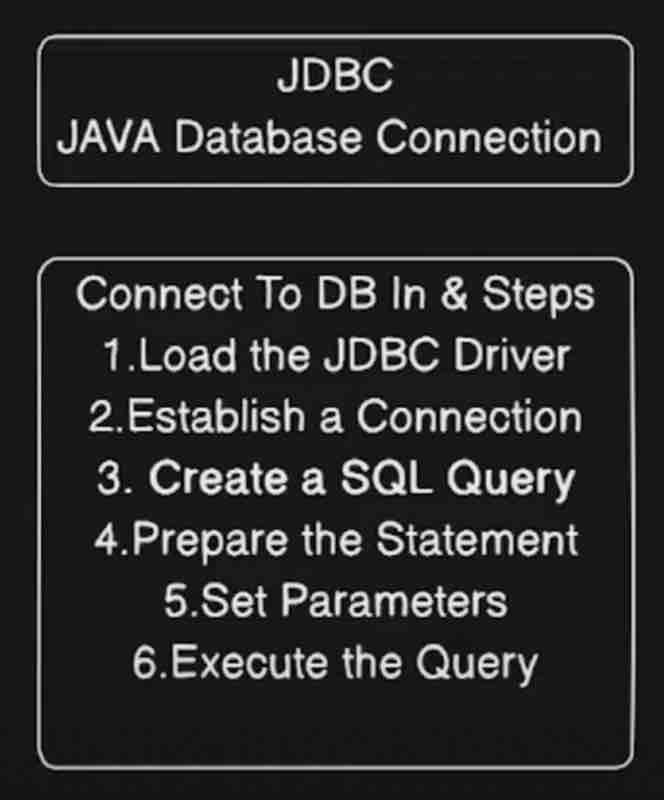
Now, spring JDBC comes into picutre. And this is a framework which automates a lot of these things for you right. It's still a jdbc connection but it'll automate this boiler plate code for you.
Now let's look into the concept of ORM. What is ORM? ORM is basically object relational mapping. The term itself defines what exactly it is. The relationship between your object and the relational database that you have. For example, SQL right. So it's a mapping between your object and relational database. Now, when you are defining your java object, it'll have some kind of fields. Let's say if you're talking about user, you'll have id, name and a lot more things. So in a table, you've some columns of the table with same names as your fields. So it looks like kind of a direct mapping right. That is when ORM comes into picture. It provides the direct mapping between your entity (object) with your table. For example, let's see the code.
@Data
@NoArgsConstructor
@AllArgsConstructor
public class Book{
@Id
@GeneratedValue(strategy = GenerationType.IDENTITY)
private Integer id;
private String title;
private String author;
private String genre;
}
We'll understand the annotations in the code snippet above in a while, but first focus on the point that these fileds can be direct columns inside your table and your table can be mapped right. So, " Java object to table mapping is basically ORM. "
When there is a mapping between a java object and the orm, then entires are automatically added to your database on an object creation. And the data in a database should be updated and deleted as per the java objects automatically. Now, who is going to manage this mapping? Who is going to retrieve the data? Who is going to update and delete data inside this table? That is when framework comes into picture. Who is going to automate all of these things for us? Right. Now the famous framework for ORM is Hibernate. Although there are other famous frameworks as well such as EclipseLink and OpenJPA.
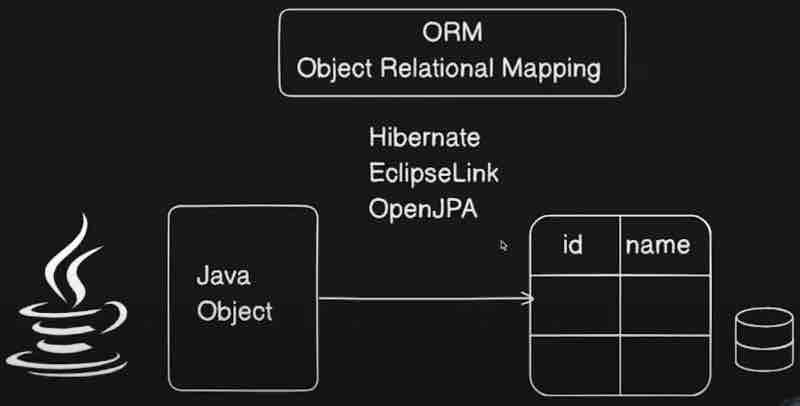
Now what exactly is JPA? JPA is basically Java Persistance API. It is not a framework like Hibernate. It is basically a specification provided by Java in order to manage relational data inside your application by using OOP principles. This is essentially a set of interfaces or we can say a set of guidelines right. This needs implementation. And who provided that implementation? It is again Hibernate. So Hibernate is basically implementation of JPA. And internally JPA is basically using JDBC in order to do database connection right. So it is kind of a hierarchy right.
Now there may be a question. Why exactly do we ned JPA and why not Hibernate? If JPA is internally using Hibernate then why not just use Hibernate as a default behaviour. Well, we can use that and precisely no one is stopping us from doing that. But in case we need to migrate away from Hibernate then we'd need to do a lot of changes inside our application. Now because JPA is kind of a standard practice so everyone is using it. It is kind of an abstraction layer ontop of our Hibernate. It is simplifying stuff for us. It is an standardized API.
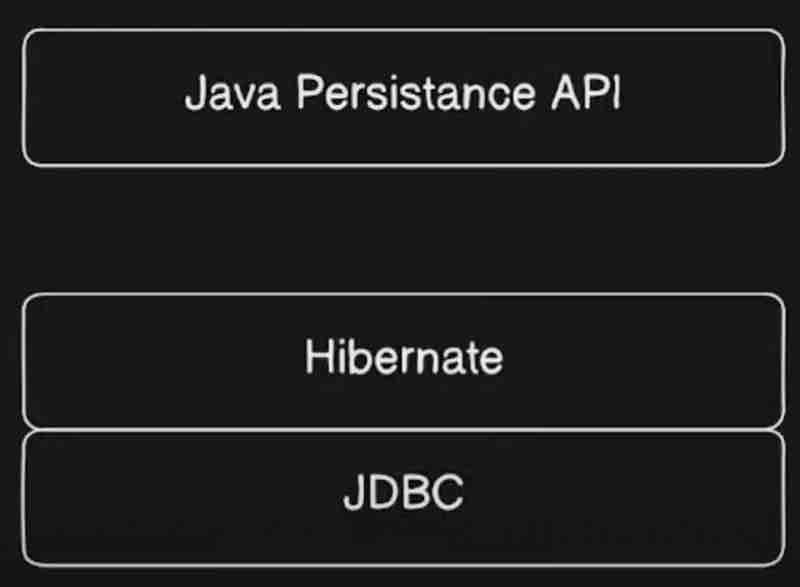
Now when it comes to Spring Data JPA, that is different from this jpa? Spring data jpa is basically a framework provided by your spring framework in order to do your database connections right. Spring data jpa is kind of a layer of abstraction on top of your jpa right. It's a layer of abstraction which will provide us a lot of interfaces okay. And we can directly make use of those interfaces inside our application. We don't even need to provide the implementation because the implementation is handled by jpa and hibernate internally.
So spring data jpa is an abstraction which uses jpa that meeds an implementation which is hibernate in our case which in turn uses jdbc which will do the database connection and manage everything for us. So this is how spring data jpa flow will look like. And spring data jpa basically makes our crud operations very easy because as we said it's a layer of abstraction on top of jpa. It provides interfaces like crud repository, jpa repository, and like paging sorting repository.
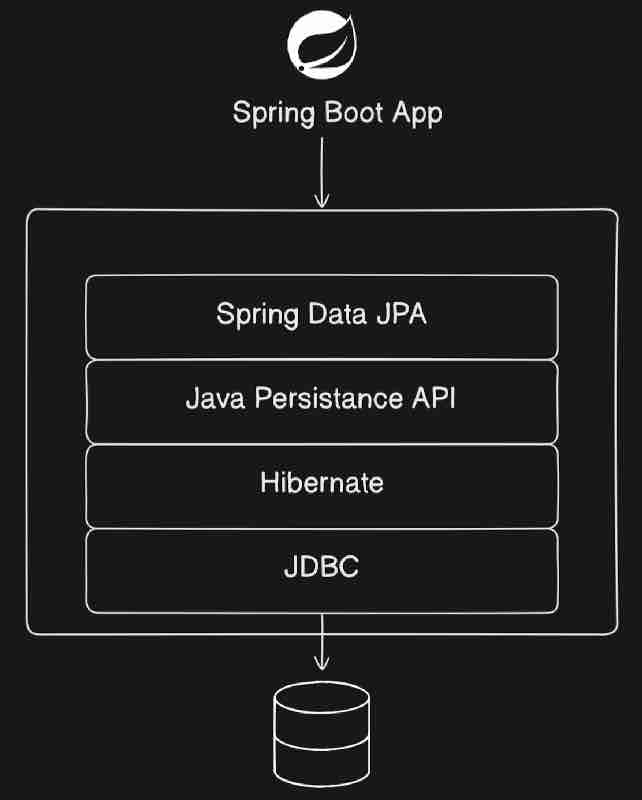
Now let's look into JPA architecture.
Let's start from entity which is an object which will be mapped to table inside your relational database right. Now how this entity will be saved inside your database? So what is the journey of this entity to this database? Now this entity will be managed by a EntityManager. What is this entity manager? It is an interface inside our application which is responsible for managing the entities. So whatever entities you create all of them will be managed by this guy over here. Think of it as a manager who manages multiple entities inside your application. So all the operations that you are going to do on this particular entity for example let's say save or presist that operation will be done by entity manager. This is kind of a responsibility of entity manager to perform operations on entity.
EntityManager em = entityManagerFactory.createEntityManager();
em.persist(book);
And who creates this entity manager? Basically entity manager factory is responsible for creating our entity manager. It'll generally be one factory per application which will be managed by persistance. In our application, the configuration will be managed by something called as persistence.xml. That will basically create entity manager factory which will be one factory and it can create multiple entity managers inside our application which will manage all the entities inside our application. This persistance.xml is something which we define in JPA. That is something which we do not need inside spring data jpa. But in order to understand spring data jpa, we need to understand jpa first and this is basically the architecture of jpa and what happens inside jpa. Because spring data jpa as we know is just an abstrastion on top of jpa, and internally it'll use all of jpa.
Next let's look into this Persistance Context. Now think of persistance context as a cache where these entities will be stored temporarily inside a persistence context. Consider a bag inside which we have this entities stored on a temporary basis and this guy entity manager is interacting with this persistence context to get those entities. It will be more clear when we see entity life cycle.
Now what entity manager will do is it'll call persist right. It'll say EntityManager.persist() and it'll try to save this entity. Now entity manager is kind of an interface. Entity manager cannot directly interact with database. What it will do is it'll have some kind of a provider. Internally JPA will use Hibernate as a provider. So what entity manager will do is it'll offload the task of interacting with database to Hibernate. Now hibernate will have its own query language. And depending on what entity manager is asking, hibernate will create the sql queries and hit on the database. And entity manager will also create the transactions which is also managed over here.

Let's look at the lifecycle of entity.
We have some states of the entity, that is Managed, Transient, Detached, Removed. So whenever we create new entity, the moment it is created it is in the Transient state. This is basically the state of our new entity. Whenever the entity is in transient state, then it is kind of a fresh entity. And it is not managed by our entity manager here. So when our entity manager will manage it, the moment we call persist() on the entity. When we call entityManager.persist(entity) then it'll be a managed entity. And managed by whom? As we have seen, the EntityManager manages it. Means this entity will be in the Managed state now. And how this state transition happened? By using persist() funciton on that entity by the entityManager.
Now whenever the entity is in Managed state, then it'll be associated with the persistence context. That means this entity will be added inside our persistence context. That is why this state is also called as Persistence state as well. Basically persistence context will store the managed entities and not all. Now when our entity is in managed state, if we make changes to that particular entity, then it'll be automatically synchronized with our database. And it'll actually be save dinside a database when we actually flush() it. That means when we do transaction commit. And in case we are finding something, that means we are finding an entity inside our database, then that particular entity will be created and it will be in the managed state.
After that we have Detached state right. What is detached? The entities which are detached. Those entities were once in persistence context but now they are no longer managed by our entity manager. So basically once we detach the entity using detach() or clse() or clear() then it'll not be managed by your persistence context and will be in the detached state. And if we want to move it back to the managed state, then we have something called as merge() operation which we can do in order to move it back to managed state and make them manageable by our entity manager.
Now the last state we have is Removed state. Let's say our entity is marked for deletion, but it is still inside our persistence context, and it is ready to be deleted. When we call this remove() operation then our entity will be transitioned from Managed to Removed state. When we commit the transaction, it'll be removed from our database. And that is basically the entire flow.
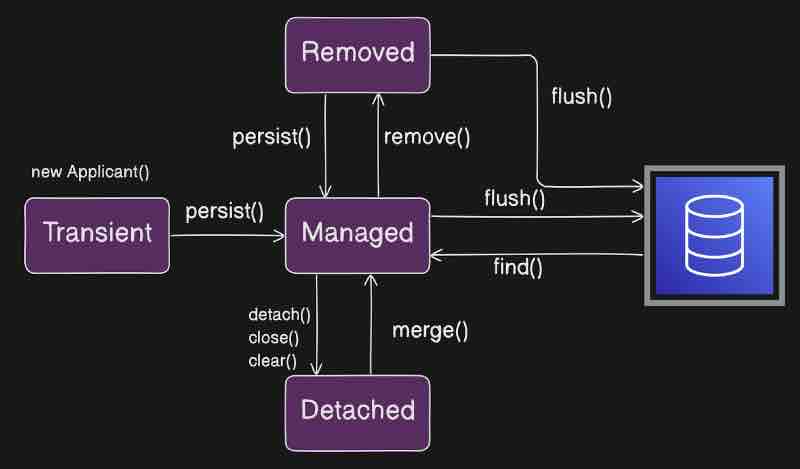

SPRING BOOT JPA IMPLEMENTATION
In order to convert a typical pojo class into an entity, we need to make the user of an annotation that is called as @Entity which comes from persistence. Once we add @Entity on top of our class, it'll be converted to entity. And it'll be treated as a table inside our database. It'll create a table with the name of class inside the database. Now every database needs a primary key. We make use of @Id annotation for that. Now whenever we create that class, we're going to manage that primary key on our own.
Suppose the database is for storing applicants for a job, why would they care about the id then? So system should handle the autogeneration of this particular id. So then is when @GeneratedValue comes into picture. Now it needs to be given a strategy. There are different types of strategies such as TABLE, SEQUENCE, IDENTITY, UUID, AUTO. Now each persistence provider has its own way of creating this primary key. For example, Hibernate will have its own way. If we choose AUTO then our persistence provider can pick up any one of these. UUID is basically a universally unique identifier. IDENTITY means it should use identity column in order to provide an id. SEQUENCE means it should use database sequence in order to generate the primary key. TABLE means our persistence provider must assign a primary key for that particular entity using a underlying database table. But let's select AUTO for now.
@Entity
public class Applicant{
@Id
@GeneratedValue(strategy = GenerationType.AUTO)
private Long id;
private String name;
private String email;
}
As we know that spring data jpa is an abstraction layer on top of jpa. It provides three types of repositoriesz; CrudRepository, JpaRepository, Paging&SortingRepository. Now because spring data jpa provides abstraction to interact with jpa. Similarly, we have to rely on abstraction by using interfaces that extends one of these repositories. Supose we extend the CrudRepository, then it'll take some parameters as well. First parameter, what would be the entity? Second parameter, what type of primary key of this particular applicant? Let's see the code.
@Repository
public interface ApplicantCrudRepository extends CrudRepository<Applicant, Long>{}
Once we do that we need to go to service, and create the object of that interface. What we can do here is use @Autowired on top and inject it on service.
Now we can save an Applicant instance on this ApplicantCrudRepository using save() method.
@Service
public class ApplicantService{
@Autowired
private ApplicantCrudRepository applicantRepo;
public Applicant saveApplicantCrud(Applicant applicant){
return applicantRepo.save(applicant);
}
}
Before running our spring application, we have set up some default configurations in application.properties.
spring.datasource.url = jdbc:h2:mem:appdb
spring.datasource.driverClassName = org.h2.Driver
spring.datasource.username = sa
spring.datasource.password = password
spring.h2.console.enabled = true
spring.jpa.hibernate.ddl-auto = update
spring.jpa.show-sql = true
So what we have to do now is just move to /h2-console after running application in local host. And we'll have something like this.
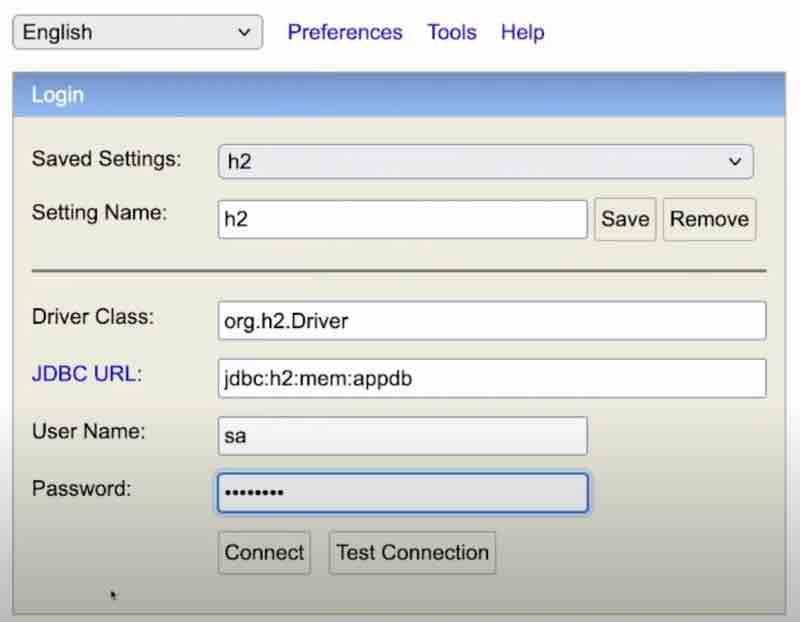

And this is how the h2 console looks. Now it has created Applicant table with all the columns that we had listed while creating our entity. Now who is creating it? If we check the logs, we could see that Hibernate is creating the table automatically. And it is doing sequence generation for primary key and stuff. In our case, the provider is hibernate.
Now, in order to add applicants, what we will do is use @PostMapping and send the response body in json with the same parameters as our entity class, and then we'll accept the response using @ResponseBody Applicant parameter inside our post function in controller. And then we'll pass it to service which will save it up usng applicantRepo.save(applicant). So this is the whole process. And now if we do select * from Applicant in our database after sending responses through postman, we'll be able to see the records successfully.
Now H2 database does not persist data. When we rerun our application, the data is basically vanished, because H2 is in memory database and it'll be reloaded each time you reload your application or restart your application. So if you want the data to persist, then use something like MySQL which'll persist your data inside your database.
If we look into the methods that CrudRepository provides us, then we have save(), saveAll(), findAll(), count(), delete(), deleteAll(), existsById(), findAllById(), findById(). So these functions are majorily for CRUD operations on our database.
However, there are two more types of repositories such as PagingAndSortingRepository, and JpaRepository.
But what's the difference between these repositories? Let's look into it. Basically CrudRepository provides very basic stuff related to crud operations. Basically this is very lightweight and suitable for your simple operations. Then we have PagingAndSortingRepository, as the name suggests, will give features related to paging and sorting, and what this repository does is extends over from our crud repository. So this has all the functions of CrudRepository plus it's own functions as well. After that, we have JpaRepository, so this comes from spring data jpa. Now this jpa repository extends from the PagingAndSortingRepository, that means it'll include functions form both CrudRepository and PagingAndSortingRepository along with few Jpa specific functions. For example, we have flush() methods. And it also supports something called as query methods and batch operations which is very important for us.
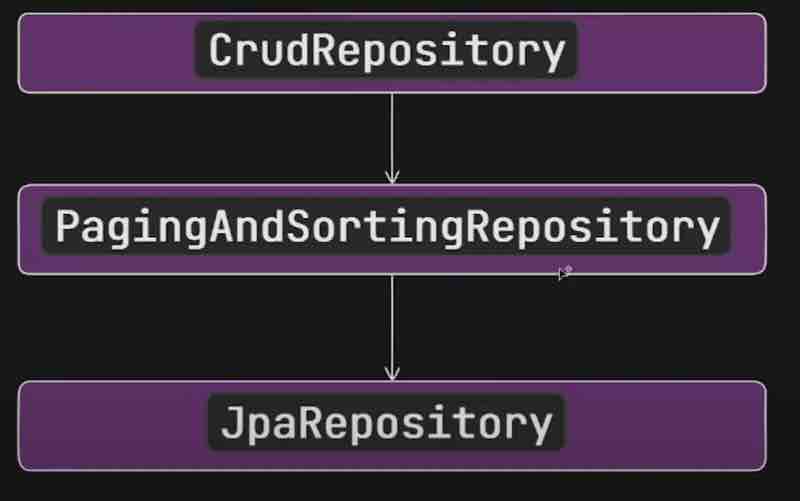
So what we need to do is create an interface and simply extend from paging and sorting repository giving the parameters of the entity and the type of primary key, and then inject its instance in service using autowired keyword and use its functions. Let's see the code.
@Repository
public interface ApplicantPagingAndSortingRepository extends PagingAndSortingRepository<Applicant, Long> {}
On each page how much data we want, that is something we have to define while hitting the post api , and as per what we pass as page and size in postman key-value pairs it'll show the entries accordingly. Let's see the code.
@Service
public class ApplicantService{
@Autowired
ApplicantPagingAndSortingRepository applicantPagingAndSortingRepository;
public Iterable<Applicant> getApplicantsWithPagination(int page, int size){
return applicantPagingAndSortingRepository.findAll(PageRequest.of(page,size));
}
}
@RestController
public class ApplicantController{
@Autowired
ApplicantService applicantService;
@GetMapping("/page")
public Iterable<Applicant> getApplicantsWithPagination(@RequestParam int page, @RequestParam int size){
return applicantService.getApplicantsWithPagination(page, size);
}
}
A very important point to highlight over here, the behaviour we have seen where the three repositories extends is not valid in the recent versions of spring data. Now there are some modifications and new introductions in the new version of spring data. What are those? Let's see.
What happens is when we use findAll() method, it returns something called as Iterable, but we don't want that right. We have to convert that iterable to a list and then return. This is an extra work right. Now, they have introduced new repositories like ListCrodRepository, and ListPagingAndSortingRepository.
Now, the newer verions looks something like this.
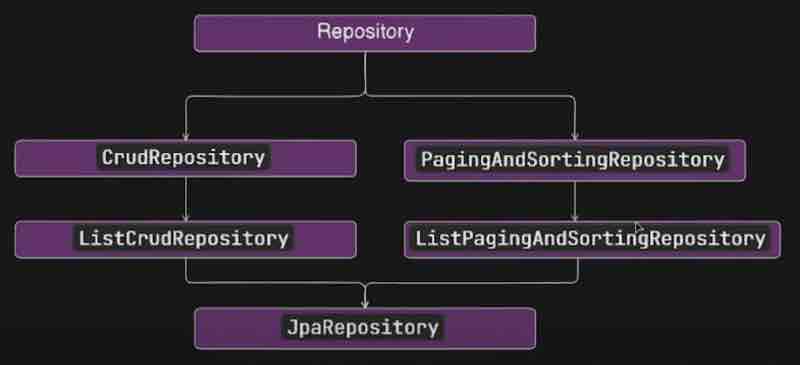
First, we have a marker interface that is Repository. Now we can see that CrudRepository and PagingAndSortingRepository both extends from the Repository. But a major thing to notice over here is that our paging and soritng repository is no longer extending through the crud repository that it used to do before. So the behaviour that we saw in the earlier diagram is no longer valid anymore. And they have introcued two new repositories of list. Now the jpa guy will extend both of these list repositories. And an interface can also extend from multiple repositories since paging&sorting and crud do not extend each other and are separate. The way to use both of them is like this.
@Repository
public interface ApplicantRepo extends ListPagingAndSortingRepository<Applicant, Long> , CrudRepository<Applicant, Long>{}
Now let's see the JpaRepository. It is an interface that internally extends from multiple interfaces we have extended above. And if we see within that JpaRepository, we may see methods such as flush(), saveAndFlush(), saveAllAndFlush(), deleteAllInBatch(), deleteAllByIdInBatch(), getReferenceById(), findAll() and many more.
The whole point of using Jpa is Query methods. These methods comes in handy in cases when we want to filter data not just based on id, but on various other parameters in a database. Suppose we want to find users by their name. What we are going to do is define a method in our ApplicantJpaRepository like this. And Jpa will be pretty clear what it needs to do if name is one of the field inside our applicant entity. We can also combine queries and it is quite simple. Let's see the code.
@Repository
public interface ApplicantJpaRepository extends JpaRepository<Applicant, Long>{
List<Applicant> findByName(String status);
List<Applicant> findByNameOrderByNameAsc(String status);
List<Applicant> findByNameAndEmail(String name, String email);
}
@RestController
public class ApplicantController{
@Autowired
ApplicantService applicantService;
@GetMapping("/getByName")
public List<Applicant> getApplicantByName(@RequestParam String name){
return applicantService.getApplicantByName(name);
}
}
@Service
public class ApplicantService{
@Autowired
private ApplicantJpaRepository applicantJpaRepository;
public List<Applicant> getApplicantByName(String name){
return applicantJpaRepository.findByName(name);
}
}
Suppose we want to find entires by something like partial names, then there cannot be query method that would match with findByPartialName(). So that's where @Query annotation comes into picture. We can actually write SQL queries inside the @Query annotation, and suppose if it needs a parameter then we'd use @Param in the method parameter for it. Let's see the code now.
public interface ApplicantJpaRepository extends JpaRepository<Applicant, Long>{
@Query("SELECT e FROM Applicant e WHERE e.name LIKE %:name% ")
List<Applicant> findApplicantsByPartialName(@Param("name") String name);
}
SPRING DATA JPA RELATIONSHIPS
Whenever multiple entities are coming into picture then how are they interrelated with each other and how that can be implemented by using spring data jpa? We are going to see the relationship between entities and the types of relations as well, such as one to one, one to many, many to one, and many to many.
Let's get started with relationships. So Applicant is basically one entity right now. As we have only one entity inside our application, we cannot really define the relationship. So when we say relationship, it is basically the way by using which two entities are associated with each other, and they way they are related to each other. That is basically the relationship between entities. So let's say there's another entity called Resume. Basically each Applicant will have Resume.
Suppose I'm the Applicant, then I can only upload one Resume right. I cannot upload 10 Resumes and ask them to select one for me. When we talk about Resume entity, then one Applicant can only have one Resume. That is how we can define the relation between applicant and resume. Let me write some entity relationship diagram. So there is something called as entity relationship diagram. And it looks something like this.
Basically we have a applicant table, and we also have a resume table. And both tables represents the respective entity. Now we can define how they are related to each other. Let's put an arrow from applicant to resume, and show the ER diagram relationship. So one resume can have just one applicant and one applicant can have just one resume. So it's kind of a one to one mapping.
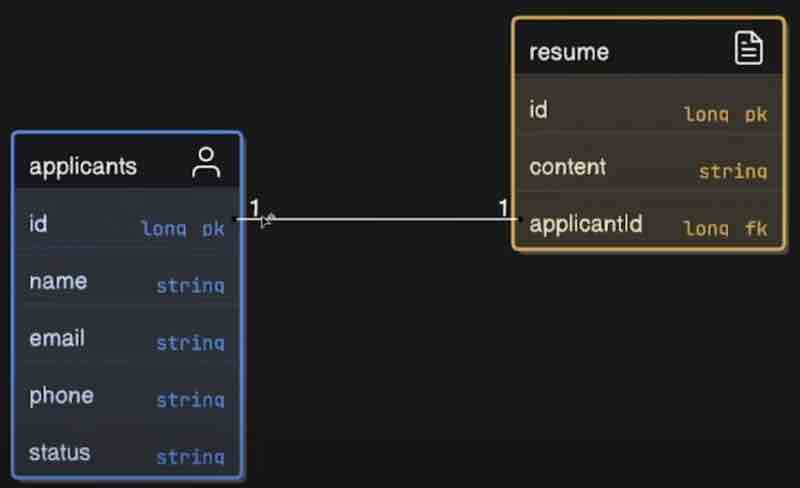
Now we have to tell spring that Applicant is a foreign key in Resume entity. For that, we have to use the @JoinColumn annotation. It is basically a annotation to add the foreign key inside our entity. And we need to add some kind of a key name over here as well. And this key name will be saved inside our database, and we can add one more field, that is nullable, which means this column cannot be null inside our resume.
@Entity
public class Resume{
@Id
@GeneratedValue(strategy = GenerationType.AUTO)
private Long id;
privateString content;
@OneToOne
@JoinColumn(name = "applicantId", nullable = false)
private Applicant applicant;
}
Now we can also make use of the @OneToOne annotation. It means that one applicant is associated with one resume. This annotation will actually tell joa that this particular entity have one to one mapping with your other entity. And jpa will use the later annotation @JoinColumn to set up the relationship when it creates the table right.
What we can do is instead of a unidirectional mapping, we can do bidirectional mapping, that is while creaing the applicant entity, we can create an resume for it as well, that is bidirectional association within our entities right. In the Applicant entity we can add something like this.
@OneToOne(mappedBy = "applicant")
private Resume resume;
However, if we see the response from postman, we'd not get the resume field, and instead we'd get an internal server error. If we see the logs, we'd see TransientObjectException and it says save transient instance before flushing. Now if we see carefully, when we were trying to save the Applicant entity through service, the Resume entity is not saved inside a database. So Resume is not storesd and it says how it is going to store the Applicant. That is when something called as Cascading comes into picture. There are two ways to solve this. First we can do while saving Applicant, we can first save Resume and then save Applicant programatically right. But there is another way, just use cascading okay. So we just have to highlight the cascade type in @OneToOne mapping. That means first resume will get added and after that applicant will be added in database. And if go inside CascadeType, there are many types right. ALL, PERSIST, MERGE, REMOVE, REFRESH, DETACH.
@OneToOne(mappedBy = "applicant", cascade = CascadeType.ALL)
private Resume resume;
Now, if we run it, we'd see another exception from Hibernate saying PropertyValueException, not-null property references a null or transient value. Here, if we carefully observe, when we were doing mapping in Resume with Applicant earlier. We had given nullable = false in @JoinColumn parameter that applicant for a resume cannot be null. But when we were using CascadeType.ALL in @OneToOne mappnig, then it is first trying to insert Resume, and at that moment, Applicant is not inserted in the database, so Resume is not aware of what exactly is the value of our applicantId. Now they are referring to each other and giving exceptions.
What we have to do to solve this is actually manually get the resume response from the Applicant json in service and pass it to resume to set the applicant there first, then this null check inside resume will no t fail.
@Service
public class ApplicantService{
@Autowired
private ApplicantCrudRepository applicantCrudRepository;
public Applicant saveApplicantCrud(Applicant applicant){
Resume resume = applicant.getResume();
resume.setApplicant(applicant);
return applicantCrudRepository.save(applicant);
}
}
Now when we go into postman and see the response, we'd actually get an infinite loop. If we look carefully, resume has applicant, and applicant has again resume, and it is going so on and creating an infinite loop right. So, bidirectional by its very nature is kind of a circular dependency right. To prevent this behaviour, we can use @JsonIgnore annotation in Resume entity, which is basically to prevent resume to serialize this applicant in order to avoid the recursion that we are facing over here.
Finally, our bidirectional one to one mapping works.
Now let's go next level, basically one to many mapping. Let's say one applicant can have many applications. Let's see the ER diagram.
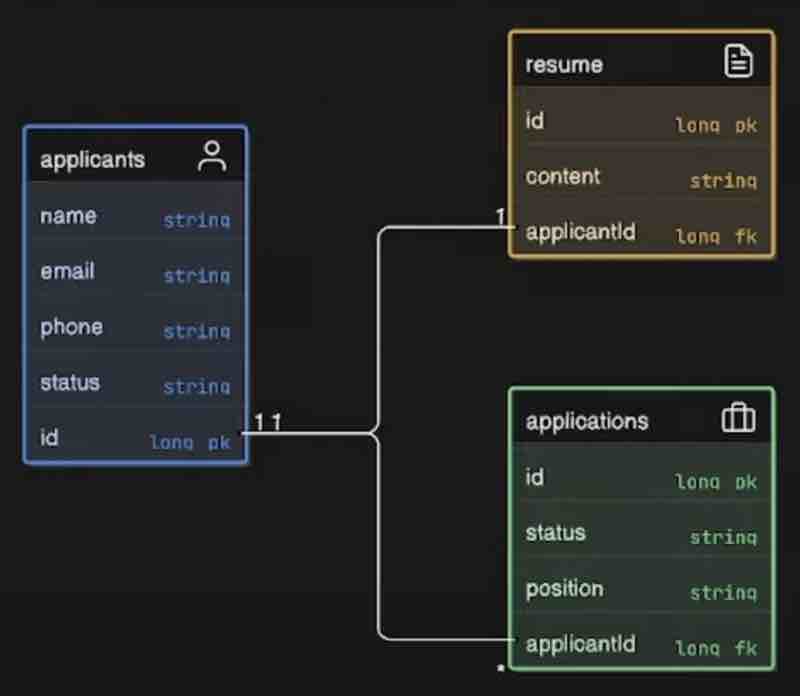
For applicant, we have one to many mapping, but for application, however, we have many to one mapping. One applicant can apply for many jobs but many applications can be associated with one job. It is very straightforward once we understand it.
@Entity
public class Applicant{
@Id
@GeneratedValue(strategy = GenerationType.AUTO)
private Long id;
private String name;
private String email;
@OneToOne(mappedBy = "applicant", cascade = CascadeType.ALL)
private Resume resume;
@OneToOne(mappedBy = "applicant", cascade = CascadeType.ALL)
private List<Application> applications = new ArrayList();
}
@Entity
public class Application{
@Id
@GeneratedValue(strategy = GenerationType.AUTO)
private Long id;
private String status;
private String position;
@ManyToOne
@JoinColumn(name = "applicantId", nullable = false)
@JsonIgnore
private Applicant applicant;
}
@Repository
public interface ApplicationRepository extends JpaRepository<Application, Long>{}
@Service
public class ApplicationService{
@Autowired
private ApplicationRepository applicationRepository;
public Application saveApplication(Application application){
return applicationRepository.save(application);
}
}
@RestController
@RequestMapping("/api")
public class ApplicationController{
@Autowired
private ApplicationService applicationService;
@PostMapping
public ResponseEntity<Application> createApplication(@RequestBody Application application){
return ResponseEntity.ok(applicationService.saveApplication(application));
}
}
Now let's see many to many mapping. For example, let's say there are many jobs, and many applicants can apply for that job. There is some kind of job opening, and many applicants can apply for that job right. On the other hand, there could be many jobs and applicant can apply for many jobs. When there is many to many mapping, it is advisable ot create a separate table where we can store the applicant id, and job id. And that table may look somthing like this. Which can have duplicates as well.
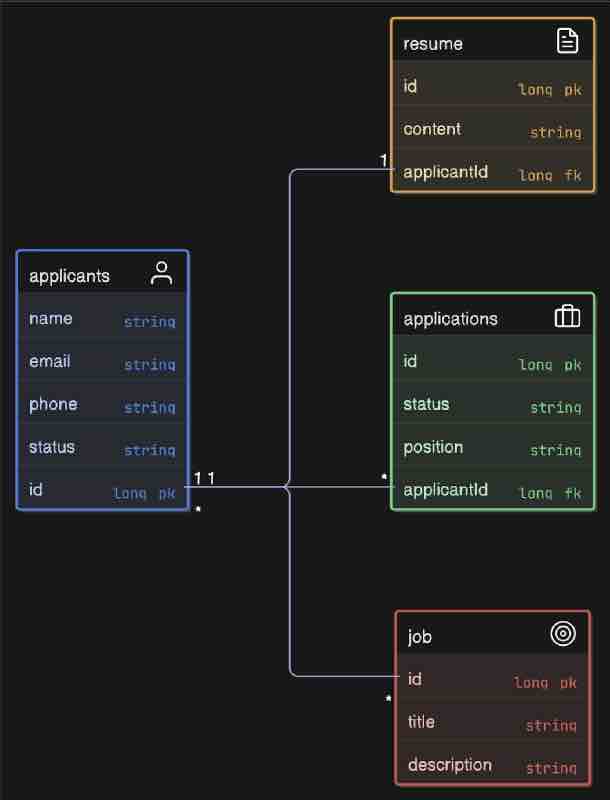
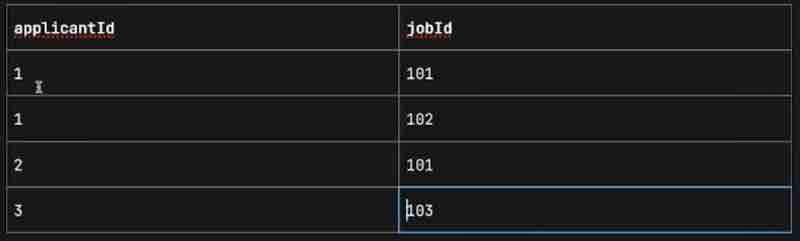
Now here we need to make use of @JoinTable. Why join table now? Because we need to create some kind of other table as well? This annotation creates a table by joinning some columns of those two tables which we are mapping. Let's see the code.
@ManyToMany
@JoinTable(
name = "applicants_jobs",
joinColumns = @JoinColumn(name = "applicantId"),
inverseJoinColumns = @JoinColumn(name = "jobId")
)
private List<Job> jobs = new ArrayList<>();
Now, the rest of the code and its implementation will be your Assignment. This one assignment will be your entire revision of Hibernate, JPA, ER Relations. And it just can't be done by just reading it. The more revisions you may do through this assignment, the more comfortable you'd be with handling databases in spring applications.
SPRING BOOT INTERCEPTORS
So what are interceptors? Let's say you have this client and client is making certian request to your application inside your spring application. THe request will first land inside your dispatcher servlet. Now what is this guy dispatcher servlet? Right. So the job of dispatcher servlet is basically to take the request from your client and assign it to the respective controller inside your application depending on the URL. For example, you have many controllers inside your application. Let's say this is your application with multiple controllers. Now each controller will have multiple apis right and each api will have its own path right so depending on the path, this guy will select the appropriate controller and transfer that request to that particular controller, that is basically the job of thsi dispatcher servlet. Let's say there are multiple requests coming to this particular controller.
Now, let's say there is a use case right. Let's say you have a client right and your client have a user id. Let's say there is a field user id that is stored inside your database right and this is basically your application. Let's say client knows this user_id in numeric format. So in UI everything is in numeric format. And in the database it was saved in the same format. But now let's say there is a requirement of converting that numeric format to uuid format right. And we have changed this inside our database and inside database we have the uuid. But we don't have it in numeric format. And our client will still have it in numeric format. Let's say we have kind of a table where we have numeric to uuid mapping. And we know the relationship between the numeric format from the client and the uuid in our database. Now suppose you have thousand tables, and you try to migrate a numeric id to uuid. Now we are not able to migrate this because user understand snumeric values only. And in this case, user will keep sending numeric values to your controller. And our database do not understands that numeric values, it only knows about uuid values. You just have kind of a table where you have mapping right and all the operation inside your application is working based on uuid. Now we are not actually changing the user ids, just the format will be changed right. Whenever the request will come, let's say get user by user id to your controller. What we have to do is get that particular uuid of that particular number. Let's say i'll do a database call and I'll get that uuid right, and using that uuid I'll perform the operation on the database. Now let's say you've a thousand controllers over here. What we need to do inside each of the controller api, we'll need to go ahead and convert our incoming request numeric format user id to uuid before doing anu processing. Suppose if you have 5,000 apis inside your application, you'll need to change 5,000 apis to do that which is not feasible.
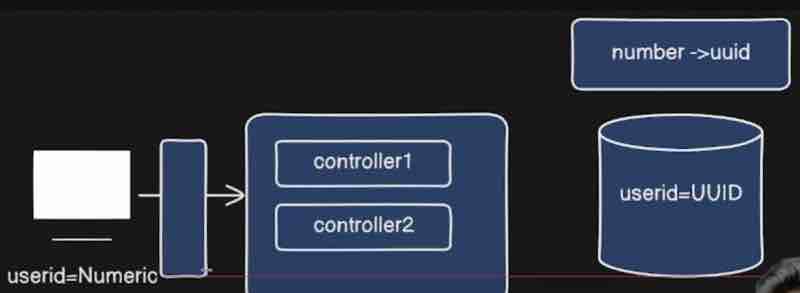
What if there is a way to change this numeric format to uuid even before your request is reaching your controller? Now we can just pass the uuid in controller and then we don't have to change the apis right. Now this middleman we're talking about is the Interceptor.
So Interceptor is basically something which will allow you to modify your incomimg requests even before the request is reaching to your controller. So it sits between your dispatcher servlet and your controllers. So whatever requests are coming from your dispatcher servlet it'll modify it. For example, one of the use case would be converting your user id to your uuid right. So that is basically the example.
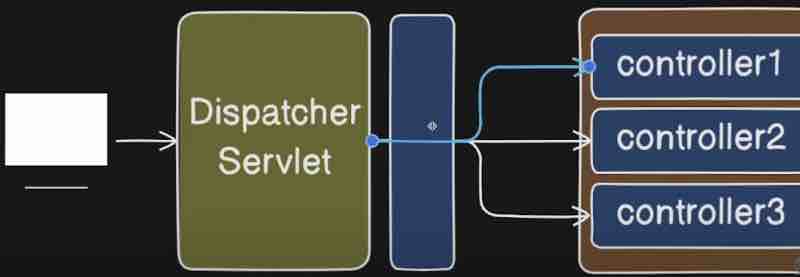
Now suppose there are multiple uses of this, we can also do loggign over here, we can also do authentication as well, right. Let's say before your requset goes to controller you want to log it, you can log it here before your response goes back to dispatcher servlet also. So basically Interceptor allows you to intercept any http request even before your call reaches to controller. You can intercept and modify your request right that is something which you can do as well. When you have let's say service right, so before your call reaches to service from your controller, you can add some kind of aspect in between and you can intercept the request right that was something which was aspect oriented programming, but here we're talking about the middleware between our dispatcher servlet and controller when sedning an http request.
Now, let's see what are handler interceptors? So hander interceptors is basically an interface which is provded by spring in order to make use of interceptors inside your application. We can extend it like this.
public class LoggingInterceptor implements HandlerInterceptor{}
Now if we go inside this inceptor, we could see preHandle(), postHandle(), and afterCompletion(). We can do over here in the class that has implemented that interface is implement all those methods. We'd override these methods. But what exactly are these methods?
Let's say we have dispatcher servlet, we have our controllers right. In this case, our controllers are HomeController and ApplicantController. Let's say our request is coming to dispatcher servlet. So first when your request is received by this guy dispatcher servlet. What this guy will do is it'll check if we have any Interceptor. If we have any interceptor, we have Handler Interceptor. It'll find our interceptor. What it'll do is it'll transfer the request to preHandle. PreHandle means before our request is reaching to your controller, this function will be executed. How to configure the controller? That we'll see. Now, in the postHandle we cna also modify the response sent back so that it is better understandable by your client right. Lastly, we have afterCompletion. Once the response has been sent. This guy will clean up any resources if you have. For example, garbage collection and stuff like that over here.
Apart from that, we need a configuration. For example, we have a configuration here okay. And we need to implement WebMvcConfigurer on that class. Now what is it? If we go inside, we could many functions in this interface such as addInterceptors(), addFormatters(), configurePathMatch(), configureAsyncSupport() and many more. So basiaclly it helps us to register our interceptor. Because we need to register our interceptor. Because we see, we can use the addInterceptor() to register our interceptor so that it'll be invoked whenever our request is reaching to your application. This add interceptor method will help us right. So we override it.
@Configuration
public class WebConfig implements WebMvcConfigurer{
@Override
public void addInterceptors(InterceptorRegistry registry){
registry.addInterceptor(new LoggingInterceptor());
}
}
Now we can add url patterns, add path patterns, which we want to include inside this particular interceptor right. So what we'll do is add path patterns right. So whatever the path is for our @RestController, we can copy that and paste it over here. And we can do like * * after that, which is basically regular expression right. So whatever is coming after star and star, it will match everything. That means all the paths starting with our @RestController path will be intercepted. And we cna exclude few patterns as well. So let's say I want to exclude few patterns right. For example, let's say we have some authentication, so what'll do is we can add a specific path that we want to exclude right.
public void addInterceptors(InterceptorRegistry registry){
registry.addInterceptor(new LoggingInterceptor())
.addPathPatterns("/api/**")
.excludePathPatterns("/api/auth/**");
}
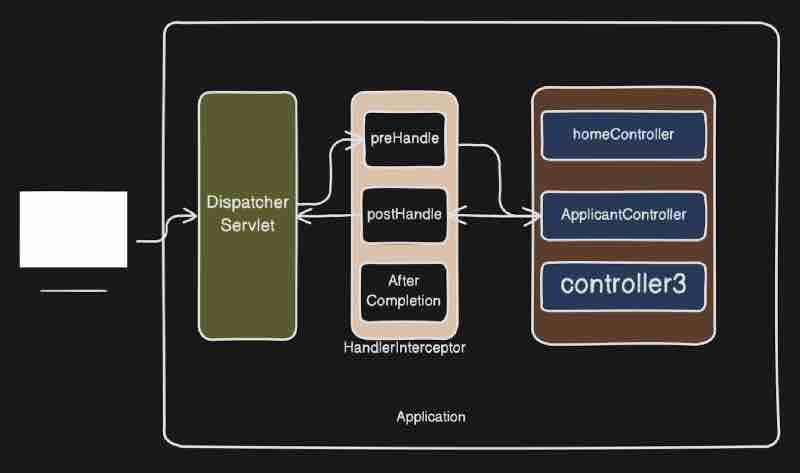
Here in spring, we also use filters to modify the request, and we also use interceptors to modify the request. So what is the difference between the two? So everything in inceptors is basically inside your spring application. But however, filters is not a part of your spring application, rather it'll be a part of your servlet api. It'll be outside your spring mvc application right. It is a part of servlet api and it'll modify the request even before reaching to your spring application. And this guy will not have access to your spring application. On the other hand, handler interceptor is basically part of our spring application, it is a component inside our spring application as we have seen. This guy dispatcher servlet can access spring beans inside your spring application directly. It can inject it as well. That is something which servlet api cannot do. Filters will operate on entire life cycle of your http request. But on the other hand, interceptors work specially within spring mvc flow. So inside spring application, the request is inside your spring mvc application. It can modify, it can access your bean. It can do whatever you want, like logging, authentication, request modification, or even it can inject the beans and play with your database.
SPRING BOOT FILTERS
Now when we say filters. Conside filters as kind of a gatekeeper of your application right and for each request they'll validate the request. For example, write or perform some kind of operation on that particular request. So basically the job of filter. For example, you want to fly somewhere and you go to the airport. Now there will be multiple checks that will be happening, and multiple security gates will be there. So we can relate to those gates as your filters.
Now, let's say we have our spring application and we're hitting some request with our browser or our postman to our service right. Now our service will be deployed somewhere on the server right. If we're talking about spring boot, we'll get multiple embedded servers. For example, tomcat, or be it jetty, or be it anything. So request will first go to your server right. Now, java has a mechanism to handle all your request and responses right. What is that mechanism? That is basically the servlet api. That is basically the legacy mechanism inside java to handle to your requests and responses. So your request will be handled by this guy, servlet api. Now when it comes to our spring application, there is something called as dispatcher servlet, which is basically an abstraction of your servlet api, which is provided by your spring application. So internally that guy is using servlet api itself. But everything is abstract over there for us and we don't have visibility of anything because it's a framework, and it's designed to handle and automate stuff. Now remember that in between the dispatcher servlet, we have the interceptors, and then the request will be sent to the controllers to be handled.
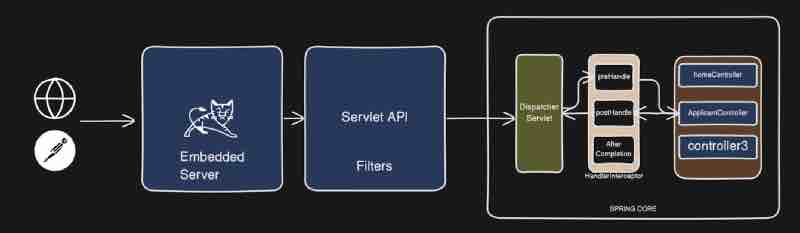
So basically filters is a part of your servlet api, and it is basically a legacy interface which is a part of your servlet api. So even before the request has gone to the spring core, the filters will handle the request. And mostly filters will perform operations such as performing login or performing authentication, which we are going to look into inside spring security. The filter will have authentication and stuff.
Now let's look inside the servlet api and what kind of filters we do have. When we send the request, it'll first go to this particular logging filter, then your request will be transferred to this particular dispatcher servlet. Whatever operation we're going to perform inside this filter will be executed first right. Be it your logging, be it your authentication, authorization and much more.
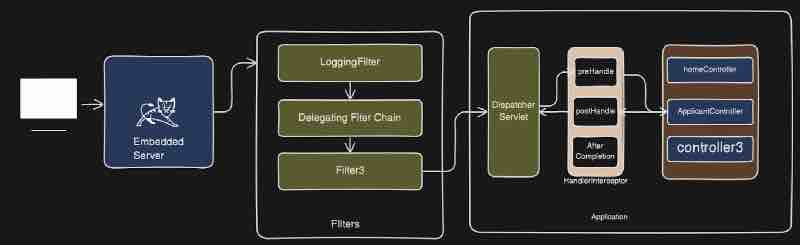
Now if we have to define filters, it is a component inside your java which processes http requests and responses for you even before the request reaches the dispatcher servlet. So that is basically filter right. So we have understood what exactly is filter. Then let's see what is filter chain? It's just multiple filters right. We can have authentication filter. But what happens particularly in filter chain? That after reaching the first filter, that is logging filter, your request will not go to the dispatcher servlet, and rather than your request will now go to the next filter. And that filter will filter out stuff for you. And after that, whatever is the last filter inside your filter chain, that particular filter will transfer the requets to your dispatcher servlet inside your spring boot application. This is basically the filter chain. So when I say filter chain, then it is nothing but the chain of your filters which are running in sequential manner.
Let's see implementation of a custom filter. Like we have create a separate package named filters. And we need to implement this class with filters.
public class LoggingFilter implements Filter{}
We can see over here that Filter interface comes from the jakarta servlet. If we go inside this filter interface, we could see init(), doFilter(), and destroy() methods. What we can do is override the doFiler() method which has servletRequest, servletResponse, filterChain in its parameters, and we just have to use them. Now we can filter our requests as we want it to be. If we use filterChain.doFilter(servletRequest, servletResponse) inside the doFilter() method, it's kind of like calling itself either in the next filer, or it'll directly call the dispatcher servlet if it seems to be the last filter out there.
@Component
public class LoggingFilter implements Filter{
@Override
public void doFilter(ServletRequest servletRequest, ServletResponse servletResponse, FilterChain filterChain){
HttpServletRequest httpServletRequest = (HttpServletRequest) servletRequest;
filterChain.doFilter(servletRequest, servletResponse);
}
}
SPRING BOOT CACHING
So what exactly is caching? So let's say we have a library right. And there is this librarian. And people are coming to get some books. For each person's request, what this librarian will do is he'll go to this library and he'll fetch some kind of book which this particular person is asking right. He'll find the books and he'll give it to that particular person right. Now for each person, this poor guy is going to this bookshelf finding the book and returning it to this particular person right. So that they can go ahead and read the book right. So this poor guy is basically tired but this guy is smart. So what he is doing now is finding a trend that there are many people who wants harry potter books. Because harry potter book is very popular right. What this guy will do is he'll go over here to bookshelf and he'll pick the bunch of harry potter books and he'll keep it on the desk right. So that next person who wants the harry potter book. This librarian don't have to go to this bookshelf again and again rather he can just pick the book from his desk and give it to that particular person. In this approach, he'll just save his time to go to this particular bookself. This guy is making his life easy.

Now consider this library is our application, and this particular shelf is basically our database right. This particular librarian is going to this database and fetching the data. Our application is sending the request to the database and it keeps on doing that on each request rate. But this stack is basically the cache that comes into picture. So what we are doing over here is the frequently accessed data we are storing it inside a cache, so that we don't have to send the request to this particular database right.
Now our application will get the request to get the data from database right. What we'll do is we'll call the database, we'll make a call to database and finish the data and return it to the user right. Now what we can do over here, we can introduce a cache in between your application and your database. So it'll be here so it'll be a layer between your application and your database right and the frequently accessed data. We'll store over here in the cache, so that we can directly return it to the user without visiting your database right. So database is just one example.
We can also think of a microservice based architecture. Let's say there is some other service right. Let's say there is another application and our application have to make a request to this particular application in order to get the data again. Now the frequently accessed data for which the response is not going to change for a long time. We can store that data over here inside cache and now instead of calling this particular app, our application directly will call our cache and get the data and this'll save a lot of time. So that's basically the use of caching.
Why use Caching? Well it'll help us reduce latency, that means faster access to data compared to fetching from a database or an external service. It'll decrease our load, that means it reduces the number of calls to the backend systems or database. And it improves scalability, that means it helps applications handle higher traffic loads efficiently. So that's why we use caching to reduce latency, decrease load, and increase the scalability of our application.
Note that this is a very important concept for microservices architecture because we eventually have to cache a lot of things.
Now let's see how we can implement cache in spring boot. First, in order to make use of spring boot caching, we you need to do is you need to enable caching right. How can we do that? So we have to use @EnableCaching annotations. It'll enable us to make the use of cahcing inside sprin gboot. Now this annotation needs to be added on top of your configuration class. So we have to use @EnableCaching annotation on top of @SpringBootApplication annotation. Basically this caching annotation has to be placed with a @Configuration annotation, and spring boot application already has that configuration annotation.
What happpens is that we handle caching in a service class, when the database returns the same data multiple times, it'll catch the input being similar, and it'll use the cached data. The way it'll use it instead of calling database is by using @Cachable above the method in service class that may have a database call to repository.
@Configuration
@EnableCaching
public class AppConfig{}
@Service
public class MainService{
@Autowired
public class Repo repo;
@Cachable
public String getFromDB(String id){
return repo.dbScan(id);
}
}
Further what we can do is ues CacheManager from spring framework to manage the entire lifecycle of caching.
@Service
public class CacheInspectionService{
@Autowired
private CacheManager cacheManager;
public void printCacheContents(String cacheName){
Cache cache = cacheManager.getCache(cacheName);
if(cache != null){
System.out.println("Cache Contents:");
System.out.println(Objects.requireNonNull(cache.getNaiveCache()).toString());
} else {
System.out.println("No such cache: " + cacheName);
}
}
}
@RestController
@RequestMapping("/api")
public class MainController{
@Autowired
MainService mainService;
@Autowired
CacheInspectionService cacheInspectionService;
@GetMapping
public String getById(@RequestParam String id){
String getResource = mainService.getFromDB(id);
return getResource;
}
}
Types of Caching
First we have InMemoryCaching, which is basically the cache which is created inside a memory of your application right so it is part of your application. Like we never mentioned which cache we want to use. So that's the reason internally spring is making use of a concurrentHashMap and storing all the cache data in memory. So this will be basically stored inside the heap memory within concurrent hash map.
But in memory cache comes with its own problems. Let's say you have an application and you have deployed your application inside production right. So you have this application and you have a node server, and now you are doing horizontal scaling right. So our load is slowly increasing as we are creating more nodes. So we scaled instances of our application. Now when you have in memory cache. Each of the instance will have its own cache. Now each node will have its own in memory cache, and it'll cache things over here. Let's say you have an element cached inside all three of these nodes right. All three nodes and now one of the node is updating the data inside database. Now the cache of that guy will be updated as per the latest database value but the cache of other nodes will still have the older data right. That is basically the problem that happens when it comes to in memory caching. It is fine if you have have one node like a monolith architecture. But when it comes to multiple nodes and an microservice based architecture. it'll start creating a problem instead of being an help because each node will have its own cache and it will lead to data inconsistencies. That's were distributed caching comes into picture.
When we say distributed caching, it is something called as, it is like you do not have any in memory cache, and you just have a single cache which is out of your application. So now this big guy is not inside your application, rather it's outside your application, and now all the nodes that have been created will be connected to this particular caching right. Now they are referring to same cache right. The famous example of distributed caching is redis. Redis is basically a distributed caching which is widely used. Now how can we connect redis caching to spring boot? We'll see soon.
Now what happens is sometimes cache may have stale and old data, and the data in database has been update using Post request. Now we need some way to tell the cache that the data it was referring to has been updated. Because if we do not update the cache after initial store, there may arise a case, where the data has been changed by other end point, but still the cache may return the old data on hitting the same query parameters. Because cache validates on the basis of input, and checks whether the input earlier was same or not, and it gives the response accordingly. It has no concern with database unless specified that we are going to do. So we use @CachePut in order to update cache.
But whenever we try to update and store it up in the cache, it'll not update onto the same mapping key, rather it'll store that value as a separate new cache data, and still it'll return the old cache data. Why this happens? Because internally spring uses ConcurrentHashMap. To fix this new key everytime even for same values. What we can do is mention specifically in @Cachable and @CachePut the behaviour of key. We can also mention cache name like this.
@Cacheable(value = "weather", key = "#city")
@CachePut(value = "weather", key = "#city")
Now let's go into @CacheEvict annotation. Right so again it is pretty similar to cache put but it's other scenario right. For example, we have used the @DeleteMapping annotation, to delete a record from database. Now even though the data in database does not exist because we deleted it. It'll respond to the apis requests that are handled by cache, and has not been updated. So what we is put the annotation on top of the function that is handling deletion within database like this.
@CacheEvict(value = "weather", key = "#city")
SPRING BOOT AND REDIS
So basically we're going to see what exactly is redis? and how do we connect our spring boot application with redis.
Let's read from the official docs. Redis is basically an in-memory data storage as a cache, vector database, document database. Now when they are saying redis is an in-memory data storage, that means redis can store data on ram making it much faster instead of storing data on disk. And this in memory storage is not similar to what we have seen eariler as the types of cache. Redis is in fact a distributed cache which we can run on an separate server apart from our application server, so that all nodes can connect to this particular one cache server when we are doing horizontal scaling.
Now we have to give configuration to spring that okay you have to use redis instead of its own concurrent hash map for cache. But in order to connect to redis first, we have to run redis inside our application. So what we can do is go to terminal over here. And we can just run it from docker container okay.
docker run -d --name redis-cache -p 6379:6379 redis
docker run will run the container okay. That hyphenD is basically a flag which means detach mode means things will run in the background. So the image will run in the background. Then we have hyphenName which tells us what is going to be the name of the container that you want to give so we have given here redis-cache. Then we have hyphenP which means that the port of your container so we're running the container at port number 6379 which is the official port of redis server. After that, we are saying redis right, basically it is from where where I am trying to pull the image, basically it will pull the image from dockerhub and run for us right. However, in order to run this command, we need the docker engine, so make sure to have it in your laptop.
Now when redis runs, we can check it by performing a command on the redis cli like this.
redis-cli ping
And we need the redis command line interface for this. Make sure to have this in your laptop.
Now we need to tell spring boot to make use of redis. So we need some configuration like this.
spring.cache.type = redis
spring.data.redis.host = localhost
spring.data.redis.port = 6379
spring.cache.cache-names = weather
Now it's not going to run straight away like magic just with configuration. It'll cry and say that a component required a bean named 'cacheManager' that could not be found. Basically we have to add a dependency using maven file.
<dependency>
<groupId>org.springframework.boot</groupId>
‹artifactId>spring-boot-starter-data-redis/artifactId>
</dependency>
Now we can chcek the behaviour of this cache. First we'll post a request into database where @Cachable and all those annotations are used. And we know that after the post, the same value will be stored in redis as well, which will be cached the next time we use it. But we actually have to provide the name of the cache as well as the key of the cache. Suppose the key of that query parameter city is Manali. Let's check it in redis cli.
redis-cli get weather::Manali
First, it'll show null because the cache data has not been asked so it has not exposed it. Once we hit the get request with the same key Manali and then run this. It'll show the weather information we had posted in database earlier. And now no matter how many times we send the get request again and again, it'll always throw it from its cache.
We can see the ip address of redis using redis-cli command, and we have also see the number of keys using keys * command. And there may be a lot more commands that you can explore from your end.
SPRING BOOT SCHEDULING
First we'll understand scheduling and why do we need it? Then we'll enable scheduling in spring boot. Inside our spring boot, we'll see basic scheduling, we'll see fixedRate, fixedDelay, and initial delay. After that we'll jump into cron expressions. And finally, dynamic scheduling.
Scheduling in spring boot allows you to automate tasks at specific intervals or times. It helps in running background jobs without manual intervention. For example, consider a scenario, that you want to process certain orders that users are placing on your e-commerce platform. Let's say, you want to process them every 5 minute. How you're going to do it. There could be one person who is hitting your api every 5 minute. Well, that is a manual approach and may not be the right approach for this use case since we need to automate that somehow. That is when scheduling comes into picture. It'll automatically process pending orders every 5 minute right. That is something this implementation we're going to look into.
Another example could be sending email notifications right. We want to send promotional emails daily at midnight. Now, how you can send emails to thousand people at might rate you cannot keep a resource for that. You cannot have a manual approach right. In that case, again the schedulign comes into picture. So you can again do that you can also do data cleanup after certain amount of time like every 2 am. Another example could be you want to log system status at periodic interval like system health check ups. So these are basically the simple uses cases of scheduling.
So you may have understood why we need scheduling? Because without scheduling, repetitive tasks must be triggered manually. And there are so many restrictions which may not let us do it. So this is not really a feasible approach to do it manuallly. Now, we can make use of that to perform automated tasks at hand.
Now, how do we enable scheduling in spring boot? What you need to do is go to main class where @SpringBootApplication annotation is there, and below it, add the annotation @EnableScheduling. Now this will do all the configurations related to scheduling inside our application for us.
Let's add schedulers now. What we are going to do is add a package scheduler, and then a @Service named SchedulerClass. Now, I can add a method to write which is going to be called through our scheduler. Scheduler is going to call. In order to schedule this particular method, this particular task, we can make use of @Scheduled annotation. Now this annotation takes a lot of arguments. If we go inside, we could see cron(), zone(), fixedRate(), fixedRateString(), fixedDelay(), fixedDelayString(), initialDelay(), initialDelayString() and more. Let's make use of few of them.
@Service
public class SchedulerClass{
@Scheduled(fixedRate = 5000)
public void getGreetings(){
System.out.println("Hello Guys! I'm still alive.")
}
}
Now let's say the scenario where we have lots of orders to process and this function over here is running for 10 seconds. But within the execution of this particular function, another invocation will be started at 5 seconds, because this function will not wait for its own previous invocation to be completed. This function will trigger another invocation of itself before the previous invocation has been completed which may create a problem and may overlap your function execution call. That is basically the problem with fixed rate. So we don't want to do that. So if you don't want to overlap your method executions on top of each other than you can make use of fixed delay.
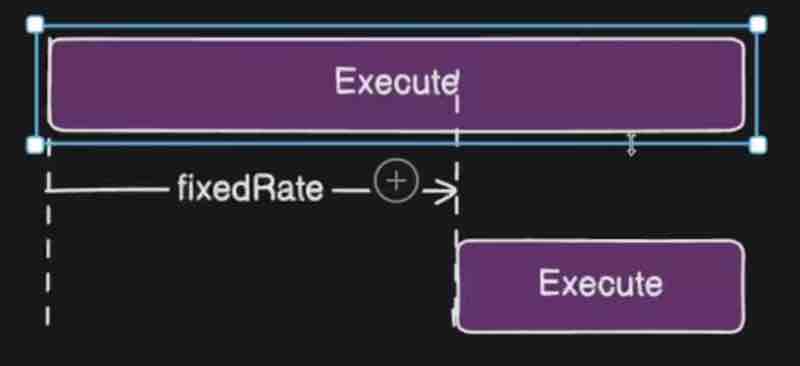
What is fixed delay? So when the previous invocation ends, then the timer starts and from that 5 seconds after, the new execution will begin. Here, regardless of the execution time the function invocation takes, they'll never overlap each other. Because the delay between two invocations of a method is fixed here. Now let's say you wanted to wait a longer initially before running the fixed delay interval time. For that purpose we can use initialDelay within the @Scheduled parameter.

Now by using cron expressiong, you can have more precise scheduling. You have the ability to schedule with a fixed interval of time using fixedRate, fixedDelay, initialDelay but you cannot make interval changes precisely on certain date, on certain time of the day right. So that is something which we can do by using crom expressions. For using cron, we have to understand the syntax precisely, where every star signifies something deep and meaningful.
@Scheduled(cron = "* * * * * *")
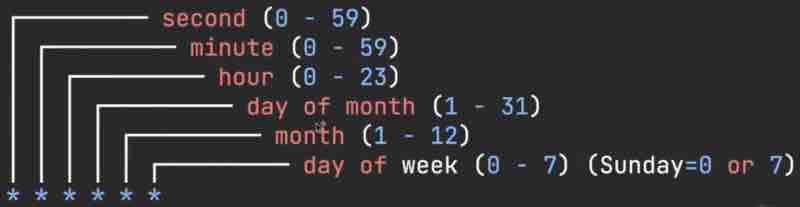
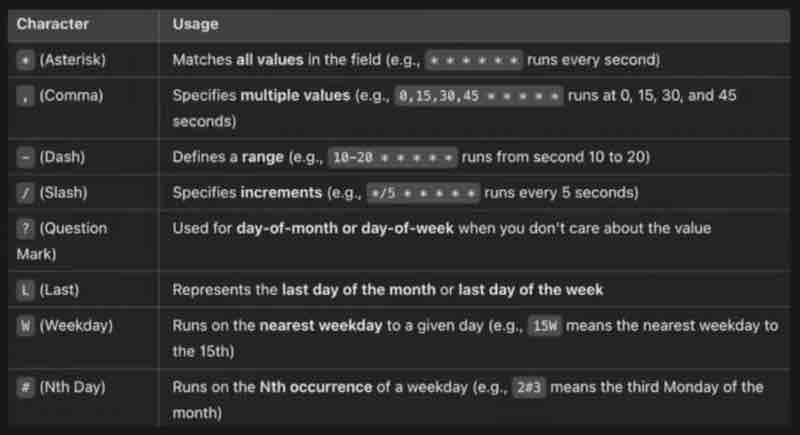
Now, let's say we deploy an e-commerce application inside production, and this is your production environment. And like you're getting orders in your application and according to some particular frequency, you're processing these orders through your scheduler. Now let's say every 5 minute, your orders are being processed. So there is a chunk of orders and this guy is processing your orders right. But let's say on certain days, there is a sale, and there is a festival coming up. Now we have lots of offers inside our e-commerce appliaction. Now, in that sale, your prices are reduced and you'll see a massive increase in orders. A lot of orders at that time. So we were expecting few orders every 5 minute. But now we're getting hell lot of orders. And we want to reduce this processing time as well. Now, I want to bring it to. I don't want to wait for 5 minutes rather I want to process orders every 1 minute. What do you think can we do now? We have scheduled this fixed delay to 5 minutes, now I want to reschedule that and make it to 1 minute, but our application is already deployed in production. Now how I'm going to change it? I don't want to redeploy my appliaction in production again and again. It's not a feasible approach. I cannot just change something small and deploy again. That's where dynamic scheduling comes into picture. A dynamic mechanism so that we can change the value of particular scheduler dynamically.
What we'll do is store the cron expression inside a particular database right and our particular application gets that data from this particular database. So now we are detaching that cron expression and saving it up inside database. And whenever I want to change this particular cron expression. I'll just have a api over here to update the value inside database and force my scheduler to use that particular new value. So this scenario is basically our dynamic scheduling.
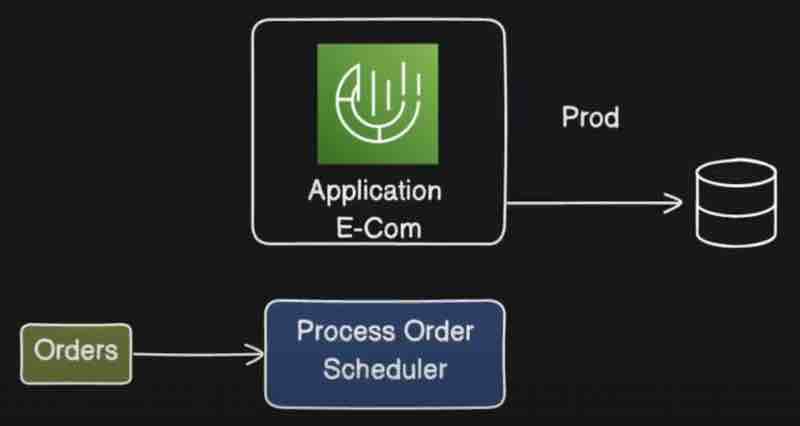
Now for implementing this, we use ThreadPoolTaskScheduler. Now we are not going to use @Scheduled annotation. Rather we are going to call this particular function dynamically by using our ThreadPoolTaskScheduler. And what is it? It is basically a class provided by spring and managed by spring which will help us to dynamically update the value of your cron expression. So this is basically multi-threaded task scheduler. By using this, we can run multiple task in parallel as well right. Like if we had used @Scheduled then it'd run in single thread but by using ThreadPoolTaskScheduler, we can run multiple tasks in parallel as well. In this case, we're going to use this guy to update the values of cron expressions dynamically.
We can have a controller class which will have an api end-point through which we can communicate and send the new cron expression. Implementating dynamic scheduler is your assignment as the code and explaination can be longer, and may better understood with hands-on experience. This is another assignment apart from the assignment given in mapping topic of spring boot transactions.
SPRING BOOT LOGGING
Let's say we have this particular application over here, which is an e-commerce application, and let's say we want to deploy it now. So we have deployed it in dev/QA/Stage environments, and we have done out testing and everything in these environments. Now let's say we're going to deploy it now on production. So once we deploy our application on production. Let's say there is certain functionality that starts failing, and here itself is not working. But that same functionality is working on dev/QA/Stage environment. Basically it works on my machine, but what exactly is happening in production, that how you are going to find it out? So that is when logging comes into picture and that is the reason we need logs for everything.
We need those logs in order to do investigation of things going wrong in your production environment once you deploy your application. Logging is something which will guide you to debug something in your production environemt when something is going wrong. So now if you have appropriate logging mechanism, then in production for the functionality which is failing you can go ahead and check what exactly is happening. So the main purpose of logging is to have better visibility of your issues and to be able to find out issues inside your production environment.
Spring documentation says that Logback is used for logging as default. Spring itself at the starting of application uses logs. And the format has came from Logback. Now there are various logging levels and each one has different meaning right. First let's understand the format of Logback message that we see at the start of spring application. First we get the date, time, and utc. Then INFO is basically nice log right. It is just providing us an information of what is happening inside your application and nice and friendly log right. So after that we have ProcessID which is basically that ID on which your application is running on and from this processID you are getting this particular log. After that we have information about the package where it came from. Then we have this particular message that you are seeing that is basically the body of your log. So that's how our typical log format looks like.
Now these logs are supposed to be configured somewhere in spring boot right. Basically these are coming from the logback. Usually we use starting dependency inside our spring boot application so that guy will bring up log back for us in order to do logging. So these logs are basically comign from there right and log4j.
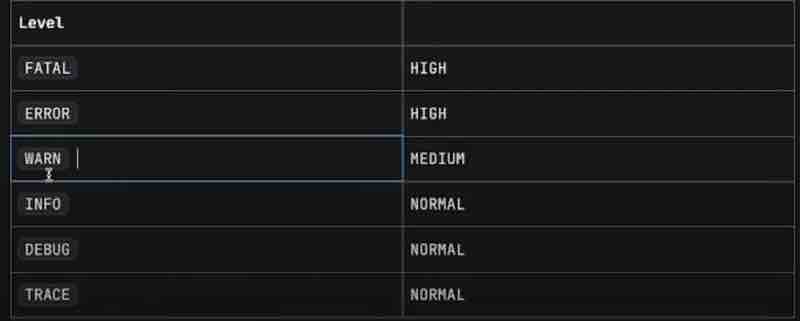
We can see clearly from the above table that we have different levels that we can use for logging. So whenever we get some errors and critical issues, it's generally of high priority right. And when there's just a warning for something, like high usage or latency or storage almost full, then that's medium issue, means you don't have any issue now but you may have issue in future right. And normal is just general logging of general purpose, like Info, debug, trace. So these are just identifiers or tags.
We use Slf4j for logging in spring boot. Now what is slf4j? Basically it is used for the implementation of your log back right. So log back is kind of abstraction right and slf4j is basically the implementation of that so the full form of this thing goes like, " simple logging facade for java ".
private static final Logger logger = LoggerFactory.getLogger(ClassName.class);
Our logger instance is global and singleton. That is stored internally. We have its referrence in our Logger static type, and we kept it private final to limit of scope to that class where we are going to use it. We can also make it static so that logger reference is not bound to that object only.
Now what we can do is use logger.info("That's cool !"); And we have methods like info(), error(), warn(), debug(), trace() and we can use accordingly.
Now the other way that spring provides us is by using annotation @Slf4j. So this particular annotation is coming externally from lombok right. So lombok is kind of a dependency that needs to be added if you want to use this annotation. So we add this annotation, then we do not need to get the logger reference and use LoggerFactory.getLogger(). Now " log " keyword is something which is provided by @Slf4j as a default reference to the heap memory for logger instnace, which can be used as log.info(), log.error() as such.
SPRING BATCH
Let's say there is this bank and the bank is reaching out to you saying that I want a software right. So as a engineer, we'll createa a software for bank and what bank wants is bank wants a bank statement generator which will generate detail account statements for the users of bank right. Now bank have millions of users. Bank will provide the daily data of the customer transactions each day right. Let's say end of the data bank closes and they will provide the data to your software right. Now you have to take that data, load it into your system and then process it and then provide the reports right. Now it is kind of a daily job and daily millions of transaction will happen right, So the job that this particular bank want us to do is. Let's say they want to pull us the transaction history right. Let's say they want to calculate the fees on various transactions. After that they want to format the specific sttements. And send it via email or by any means possible online. So that is basically the requirement of the bank.
So the main point over here is our software will need to pull the data from the bank on daily basis, and the data is huge, like literally very huge, with millions of records. Let's say that is the case we're handling on daily basis. Now when our application is pulling that data, how much time it'll take to process that data and insert that data back inside your database. Let's say can you imagine how big operation that is.
Let's suppose they gave you a csv file, and at the end of the day, we just want to do a processing and format it in a nice format and calculate various aspects like transaction history and calculate fees over here, that is basically the task they want us to do right now. What exactly we need to do inside our application . We need to take that data, we need to process all rows one by one, right. And we need to insert it inside our database so that we have a historical data as well with us right. If there are millions of records, how muhc time it will take and how much resources it will take to insert all those data inside your database right. And how much time it will take to process that particular data right. So it is kind of tedious operation. Now if it was one time then it was fine right. But we need to do it daily. Because bank will be open daily right, we need to do this job daily so that is the reason we need to think into the aspect of resource utilization as well. And doing that one by one will slow down the operation of the bank as well right. THey won't really get the outout of our application within the given time. That is again a problem right. They will look for alternate solutions and they will go away from your application. SO what is the solution right. The solution on this kind of problem is spring batch.
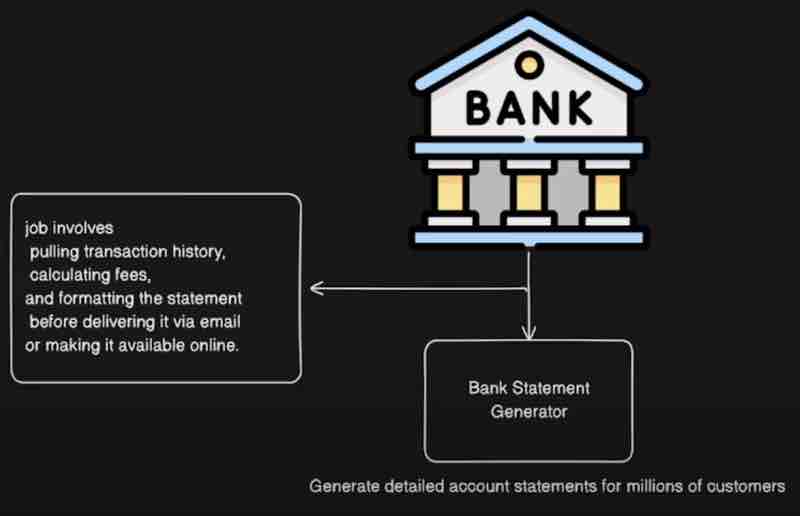
So what are the benefits of spring batch? It can read transactions for a few hundred customers at a time and process them in chunks in a parallel fashion. So it's kind of a bulk insertion operation we're doing here. We can also schedule that operation. Like suppose bank wants you to do it every evening, so we can automate and schedule it for that. Spring batch can also retry automatically if there arises some failure at some point. And hence it has restartability, which means if it has failed while it was in the process, next time the service goes live, it'll continue from there, avoiding any duplication in data. And finally, it provides us to do the monitoring of the job it has done.
Spring batch is nothing but a lightweight comprehensive batch framewoork designed to enable the development of robust batch applications, which means you have a lot of data and you want to save it in batch or process it inside a batch right. Also that are vital for daily operations of enterprise systems, that means processing large chunk of data on daily basis right. If you want to do that, go with spring batch.
Now let's look into the architecture of the spring batch. So we have various components over here. Let's go through each one of them. Job launcher means it iwll star ta job right. It's an interface that is provided by spring batch framework which will help you to launch or trigger a job right. Then we have a job component. Now what exactly is a job? The job is basically a sequence of task that you want to execute for certain purpose right. For example, once you get the data from the bank, you want to pull the transaction history for that particular data plus you want to calculate fees plus you want to format the statements plus you want ot deliver it via email. So all these sequence of steps is kind of a job for us right. So that's how we define a job. So there may be multiple jobs that you can have inside your application right. There can be many jobs which you can run right.
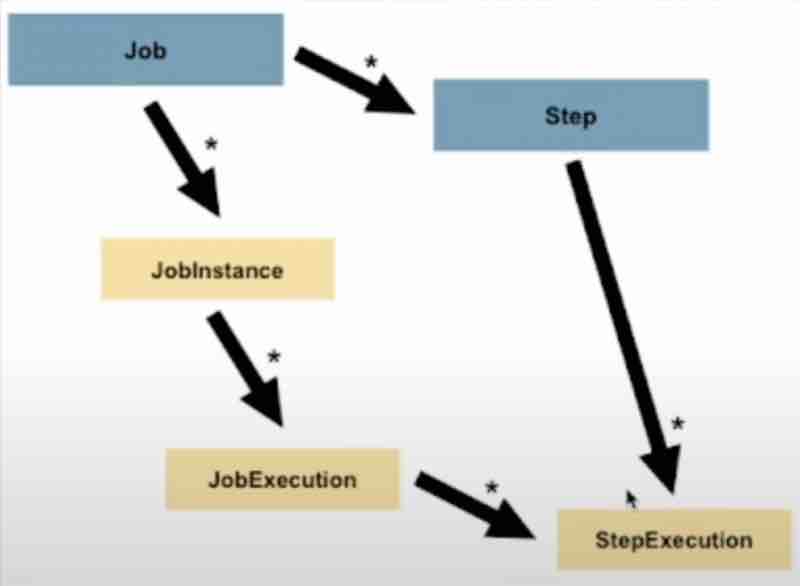
Now if we go into the documentation, it says a job will have a job instance, so there may be multiple instances of a job, you can run it in separate instances right. And then each job instance will have job execution. So when a particular instance has run once, that is job execution right. That is basically the hierarchy that we have for job. So job will have job instance then job execution right. Also, it says that a job is simply a container for step instances. Now a job can have multiple steps, as we have understood from the bank job example. So step is again a component inside a job right, which may be multiple steps and each step will have a different purpose and they will run step by step in a sequence right. Step is a domain object that means a name given to an independent sequential phase of a job. That means it is basically kind of a task inside your process, and a job is composed of one or more steps right. And each step will have its own step execution right. Because that will be executed inside your job right. So step execution represents a single attempt to execute a step so those are basically the entities that we are defining over here. So we have a job launcher which will start the job, and this job will be having multiple steps.
For example, these steps that as we have seen and each step can do these three things right. What are these three things? First we have IteamReader. It means it will read the data set right. A data set that is provided by bank in our example. As per documentation, ItemReader is again an interface that is provided by a batch framework so it'll just fetch the data from different type of inputs. For example. we have flat files. For example, XML or data source, it can be anything right. After that we have ItemProcessor, where we can perform various kind of operations right. We can perform after that we have ItemWriter which is again a similar functionality to an ItemReader interface but with inverse operations. So it's basically used for write operations.
Now the final component inside the architecture is job repository. What is job repository? So it is kind of a repository or a database where we will store the detaisl about these jobs right. If I go back over here, so job repository is persistence mechanism for all the stereotypes mentioned earlier. That means job launher, your job, and steps, all of them will be stored inside your job repository. For example, when the job was first launched, also details about your each step execution, your job execution, your job instance id, step execution ids, all data is stored over here within the job repository. And you don't have to handle it explicitly. The batch framework will take care of everything on its own right. So we don't really need to do anything explicit in order to store the details about these jobs and the execution of that particular job or the execution of that particular step right, the job repository will handle everything for us. It'll explicitly create tables for us inside the database, and it'll start storing all the details about the job and step executions once we trigger or launch our job. That is basically the use of job repository. And that is basically the overall architecture of your spring batch.
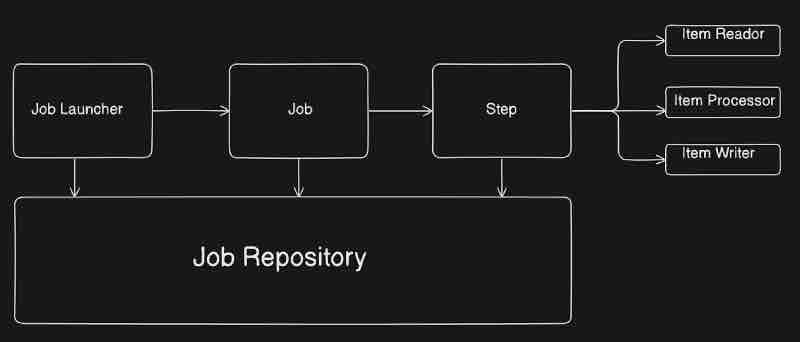
So for implementation part, we can import spring web, H2 database, spring data jpa, spring batch and we are good to go. Then we are going to assume that okay we have a csv file which has large amount of user data stored within it and we have stored that csv file in the resources folder of our spring application. Then we're going to assume that okay we have an entity in spring that is mapped to the columns of that csv file and a repository to store it to database.
Now first we have a job launcher which is going to launch the job right.
@RestController
public class JobController{
@Autowired
private JobLauncher jobLauncher;
@Autowired
private Job job;
@PostMapping("/importData")
public String jobLauncher(){
final JobParameters jobParameters = new JobParametersBuilder()
.addLong("startAt", System.currentTimeMillis()).toJobParameters();
try{
final JobExecution jobExecution = jobLauncher.run(job, jobParameters);
return jobExecution.getStatus().toString();
} catch(Exception e){}
}
}
So we have some parameters that we are going to give to the job, and then we have job launcher which is going to trigger our job. In this case, this is how we launch the job particularly from the api endpoint. Now basically whenever we start our application, waht spring boot will do is you are using spring batch and you have a job launcher inside your application, then it'll automatically start that job at startup, since we do not need that because we have a api endpoint, we have to manually configure it in application.properties and set it to false as such, spring.batch.job.enabled = false.
If we go deep into the documenatatios, we can see that earlier @EnableBatchProcessing was needed in configurations to use spring batch, but now it is discouraged and no longer needed, which is basically the spring batch migration form 3.0 to 5.0.
@Configuration
public class SpringConfigurations{
@Bean
public Job job(JobRepository, jobRepository, Step step){
return new JobBuilder("importPersons", jobRepository).start(step).build;
}
}
Basically we have Job and Step as beans in configurations, and then we're using a builder design pattern on it. Now because a job interacts with the job repository, so we needed that argument, and this particular job will return a new job right. How are we going to create a job? Using the class called JobBuilder which will create it for us. Then we'll just give the job name, and the particular job repository. And then we'll start the first step of that job. Like wise we have to define step and handle it as well. Further implementation, you can do yourself as an assignment which will help you revise everything about spring batch well.
SPRING BOOT UNIT TESTING
So what is unit testing? Unit testing is a way to test the smallest part of your code. You have a big spring boot application but you can segregate your application in small chunks and the smallest unit of your application, you can test inside unit test right. For example, it may be a single method or a single class inside your application which is doing certain task, that particular task is tested in unit test.
Let's say this is your application, and inside your application, you'll have package of controllers, you have different controllers over there. Then you have service package and inside that you'll ample amount of services. After that you have repository layer. Inside, we have multiple repositories and let's say each controller have multiple api functions right. So we'll have a rest api if you have rest controllers right. You may have a get api. You may have a post api. After that, you may have various services, in which you may have different functions. For example, get() and add() functions.
So unit testing is testing the smallest chunk of your application. So here the smallest chunk of my application are these. For example, this add() method is a smallest chunk of my application. So my unit test will revolve around the functionality that is supposed to be provided by this particular function. So I'll add a test case for this particular function. Now how do we add? Like similar to the package structure. We have test packages. And we'll see further. Like for a particular package ServiceTest, we'll have our test cases for addTest() which is the smallest test unit that is testing the functionality that is supposed to be provided by the add() method in the Services package. So a particular unit test actually tests a particular unit and doesn't care about anything else. It does not care about other controllers and repos. And it is just focusing on the functionality that is provided by this particular get method. So for each of the method, we'll have unit tests written inside our application. And how much of your code is convered in unit test is called as your code coverage. So you might have heard about tools like sonar right. What they'll do is analyze the code coverage inside your unit test. And it'll just give you a number that okay 80% of your code is covered inside unit tests. So that is when sonar analysis and everything comes into picture. There are ample amount of tools available. And sonar is one of them. So that is basically unit testing.
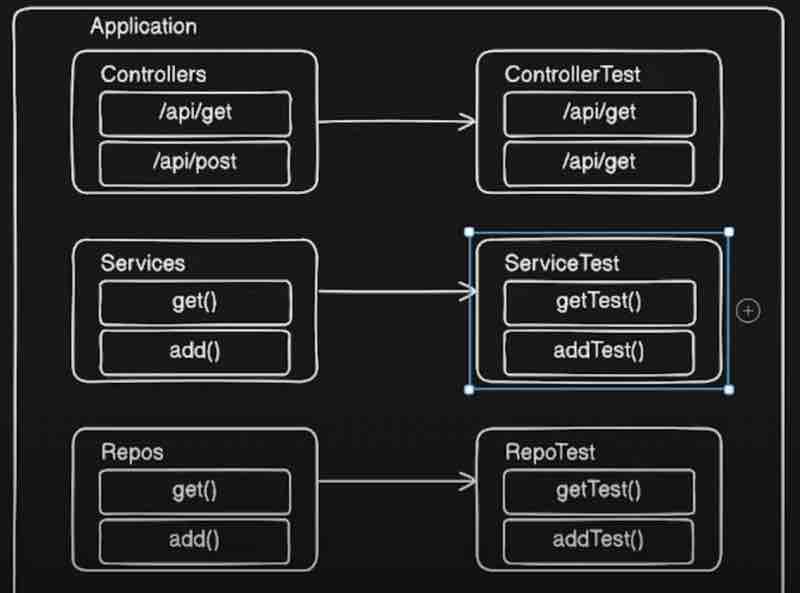
Let's say you have existing code base, and you as a new developer wants to add a feature inside that particular code base, and you are changing ample amount of functions inside your application. Now once you're done with your features, you'll ask tester inside your project, that dude please test this. Now in that particular testing, your QA will start getting issues. In other functionalities that you don't even touch. Now you are fortunate if your QA is finding that for you right. Sometimes that will go inside production directly and it will break things that you don't want to break right, and you didn't even touch them. That is when if you have unit test that is covering entire code base, what you can do is you can just run the amount fo unit test that you have already and they will tell you that the respective existing functions are working fine or not. If you are breaking some other functionality, then that particular unit test will fail. Now that issue which may lead inside your production and break stuff can be caught up front by using unit testing. So faster feedback is something that unit tests provide us right. Once you do your changes, you just run a quick unit test and that will tell you that if the existing functionality is broken or working. Unit tests are generally lightweight, faster, and easier to maintain right. And mainly helps us to debug early and better. And it gives some confidence that if my QA's are passing that means I haven't broke another functionality. So that's how you get a bit of confidence as well while you have unit testing inside your application. So next time you implement a feature, never ever skip unit testing okay.
Now, in our spring applcation, we have a test folder, with some packages and default ApplicationTests class with @SpringBootTest annotation. So we use a dependency called spring boot starter test which is automatically injected in pom xml file by spring which includes a lot of libraries for us like Junit5 and Mockito. So what we have to do is create the same kind of packages for which class you want to create tests for, suppose for ServiceClassTest we'll import service package respectively. Another quick way to create a test in intellij is to go over which ever function you want to create test case of, and use cmd + shift + t, that'll open a pop up and you've to accept the button create test for it.
SPRING BOOT AND AWS
So before starting off with aws, we'd probably be knowing java, spring, maven, git, docker basics because these we'd be using in our tutorial.
What are the core aws services which we have to learn? Now there are many services in aws which we are categorized into multiple categories. For example, we have compute. When it comes to compute, think of it as a actual computer, there is AWS EC2, Elastic Beanstalk, and Lambda. THen we have AWS S3 for storage service for storing images and videos. After that, database comes into picture. There is something called as RDS which is provided by AWS for connecting MySQL/Postgres to the cloud that we'll look into. Then we also have DynamoDB. After that, when it comes to networking, we have Virtual private cloud (VPC), Route R3, API Gateway and these things. After that, when it comes to security, we'll look into IAM, we'll see secrets manager, and cognito authentications as well. After that, when it comes to monitoring, aws provides CloudWatch and X-Ray. After that CI/CD pipelines will come into picture, we use CodePipeline and CodeDeploy provided by AWS. After that Infrastructure as a code is provided by aws as CloudFormation or we can make use of Terraform as well. Then we have containers then we have ECS, EKS and Fargate. After that aws provides some servicse for messaging, such as SQS (simple queue service), SNS (simple notification service), eventbridge for async processing. After that we'll jump into serverless that is lambda functions and spring cloud function which are lightweight services provided by aws.
Apart from this, we'll look into spring boot integration with it. For example, upload files to S3 from spring boot, connect spring boot to rds/dynamo, deploy app to ec2 and elastic beanstalk, integrate spring boot logs with cloudwatch, use sqs for background tasks, secure config with secrets manager, ci/cd pipeline using codepipeline, host frontend on s3 + backend on beanstalk.
AWS Free Tier
Now we're going to dive deep into free tier so that we don't go into unexpected bills. We'll see the step-by-step process of signup with aws. After that, we'll set up billing alerts. And then common mistakes to avoid.
Now when we go into aws.amazon.com/free we'll see that it says 100 AWS products on free tier, and three different types of offers. First, there is something called as firee trials, then 12 months free, and after that, there is something called as always free tier.
So we can see that Lambda, S3 (1GB), CloudWatch monitoring is always free. And if you go into their website and look at the always free tirs, you'll find more details.
After that, we'll sign up and create an AWS account as usually we do, sign up and stuff.
Now, because we don't want bills, we'll set up a budget notification, where even if we spend a single rupee, we'll immediately get notification. Basically whenever we exceed the free stuff limit. The options to set billing can be found on Budgets on left side bar. The billing alerts are basically free of cost and won't charge us anything at all.
AWS IAM [ Identity & Access Management ]
Now, what exactly is IAM? Let's say here we have an IT company, and we all work in the IT industry. Let's say there is a new employee who wants to join this particular company. When this company actually onboards this employee, what they do first is, they'll create a user of this particular employee. First they'll create a user so that this guy can login inside the system of this particular company. He'll have some kind of access. And in order to do all this. Like creating user, providing access to various resources in the company. For example file systems, labs, officies. And they'll need some kind of service right. They'll have something called as a security system. They'll develop some kind of security system so that they can manage all these users and manage all the access to this particular company to all the users, not only this new employee, but all other employees. Same thing is done by aws just that instead of this IT company, consider this aws enviromnet.

Now we have aws instead of it company. So this guy is able to use the aws account which means this guy is the root user. But it wants to create some other users as well. Let's say I want to give you access to my aws account so that you can login and do your job or there is a root user in the company and I'm joining as a developer in that company. Now, this root user has to give access to me to aws account so that I can go ahead and do my job. In order to do that something, there is something called as IAM. Through IAM, this new user can also access the aws account apart from the root user. Now what we can do over here is we can give some kind of password. Here we have some kind of password. So this guy will use his username and his password, put it into aws and login into the same root user's account. So this is basically your identity. So you have creatd a user so that you can login inside your aws application. Now a user can be a person or a user can also be a application as well. For example, let's say we have some kind of application, spring boot application. Now from this spring boot application we want to access few services of aws. For example, let's say we want to put the data in S3 bucket. How can we do that? We need to create the user for this particular aws account as well. Once we create the user, we will be able to access this particular resources in the aws. Again, now what is the difference between these two? This user is basically passwordbased user, and this application is basically your programmatic user. So it's a programmatic access that we are providing to this particular application because we are going to access resources but through our program right. We are going to access through our program that is through our code right.
Now suppose we have created a new user by using password and he is able to login over here, but he is not able to access the resources or apis in aws account. What it is not able to access the resourcs? Because we have not given an permission to it? So when we say oermission, you can give permissions by using policies. So each permission will have a policy document. There are some policies pre-defiend for each aws service that we have to choose from for the new user then it'll get the access accordingly.
Now let's say we have many users now to this particular aws account. Right? So we kept them as 2 groups. One group is for developers. Other group is for testers. Right? Now since I have created this user and gave him ec2 and s3 access. What I'll have to do here is give the access to all the users. But then I'll need to go to each one and provide the policies separately. It is so time-consuming when ultimately all the developers are going to have the same permissions. So doing the same thing over and over again is an overhead. What I can do is create a group, give the permissions to this particular group itself, like access to ec2 and s3. Now what that means is this particular group cna access ec2 and s3 and what I'll do now is just pick all those users and put them into this particular group of developers. And the same I'll do with testers with a separate group where suppose I just want to give ec2 access and not s3 access.
Now we have IAM Roles, right? What exactly are roles? Basically these are a set of permissions that anyone can assume temporarily to do a specific task. So this is basically a temporary permission to a user in order to do some task in aws, right? For example, let's say I am a user, and I want to see a billing, what exactly is the billing of this aws account? But I don't have permission. I don't have this particular policy.
So a user belongs to a group, and that user has been assigned policies as per the group permissions. Now suppose if a user wants special permissions separately, then it can use roles and get the access in a termporary manner. So these roles have policies attached to it, which will be used for users to give temporary permissions.
AWS S3 [Simple Storage Service]
Amazon S3 is a highly scalable, durable, and secur eobject storage service. It allows you to store any amount of data such as files, images, videos, logs, backups etc. That means we can store any kind of object here and as large as we want. So we want to do everything here right for storing files for fast retrieval.
Let's quickly see the key concepts related with it. So what exactly is a bucket? Buckets are like folders, which is kind of a top level container for your files (objects). And what exactly is an object? Any file that you want to upload (with metadata and key). Now what is this key? Key is basically the unique name each file is associated with. So key is like the name for the object in a bucket. So like in this manner, there are multiple files we can store in s3 with same names and segregate them among the folders as well, but they in fact would be having different keys. After that we have region which is basically where your bucket resides. That means it is basically geo specific region. So your buckets are actually residing in specific regions of the world. Right? So AWS regions are geological regions where you can store the files for faster access from your current location. After that, we have storage classes, it has different cost/durability options like standard, intelligent-tiering etc. After that, we have public access, which basically controls who can access the bucket or files.
Let's look at the diagram. So we have something called as aws s3 service. Inside that, you'll have different buckets. Bucket is basiaclly a container or a folder which is a root level folder. Let's say in that bucket you can have a different objects like object 1, object 2 and object 3. You can even create different folders and you can put the files in that particular folder as well within a particular bucket.
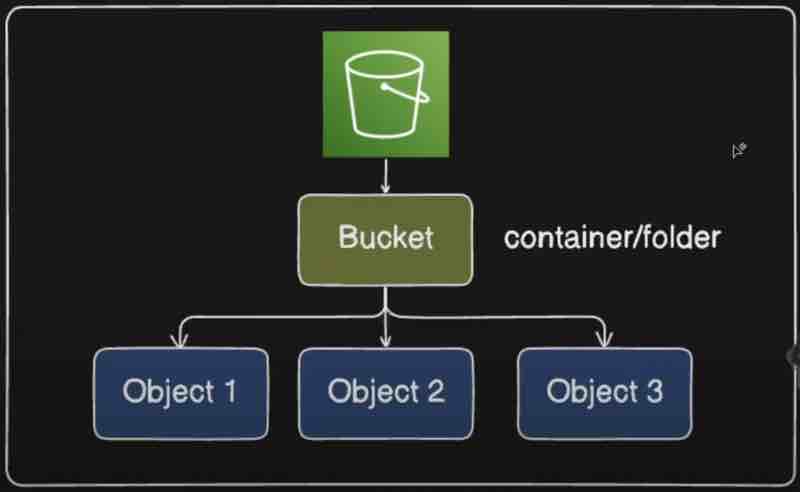
Creating a bucket is pretty much easy, and similar to windows folder structure within the bucket. The interesting thing is to understand the different types of S3 services provided by amazon and their use cases. Here is it. The cost is on GBs per month model.
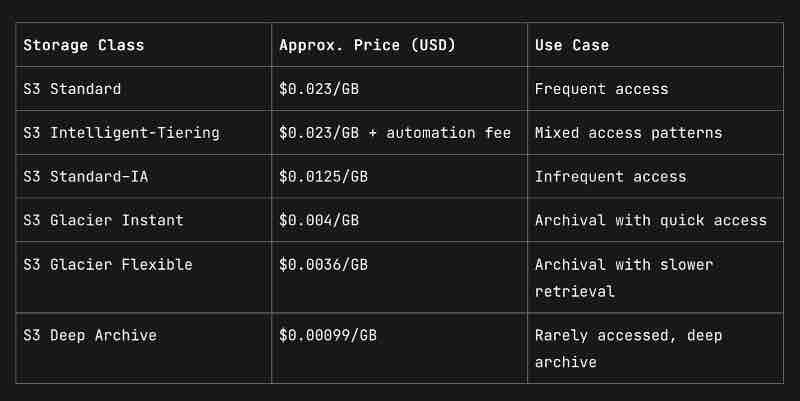
Now suppose we have our spring application here. After that, we have to connect to AWS. In order to connect to aws from your local application, what you need is a SDK. Now what is SDK? It is basically software development kit. This is provided by aws which contains various tools, libraries and various api calls in order to communicate with aws from your application. So first thing we need is aws sdk. Now what you can do is connect to different clients in order to connect to different services inside our aws. Now we want to connect to aws s3. So what we are going to do? We are going to create s3 client. It is basically a class provided by aws sdk in order to perform operations with s3 bucket. And by using s3 client you can do a lot of stuff like creating a bucket, you can even upload files and read files and update files.
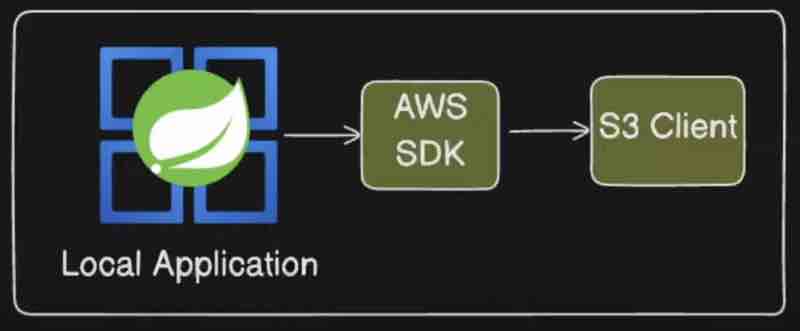
Now, lets' see the code for aws sdk to integrate s3 into spring boot.
First we need the aws sdk dependency from maven into pom file. You'll do it by yourself.
Then we'll see the configurations we need to connect to our aws account.
@Configuration
public class S3Config{
@Value("${cloud.aws.credentials.access-key}")
private String accessKey;
@Value("${cloud.aws.credentials.secret-key}")
private String secretKey;
@Value("${cloud.aws.region.static}")
private String region;
@Bean
public S3Client s3Client(){
AwsBasicCredentials awsBasicCredentials = AwsBasicCredentials.create(accessKey, secretKey);
return S3Client.builder()
.region(Region.of(region))
.credentialsProvider(StaticCredentialsProvider.create(awsBasicCredentials))
.build();
}
}
Now we need the service that will either upload or download files using the aws client and bucket in the aws account.
@Service
public class S3Service{
@Autowired
private S3Client s3Client;
@Value("${aws.bucket.name}")
private String bucketName;
public void uploadFile(MultipartFile file) throws IOException{
s3Client.putObject(PutObjectRequest.builder()
.bucket(bucketName)
.key(file.getOriginalFilename())
.build(),
RequestBody.fromBytes(file.getBytes()));
}
public byte[] downloadFile(String key){
ResponseBytes<GetObjectResponse> objectAsBytes = s3Client.getObjectAsBytes(GetObjectRequest)
.bucket(bucketName)
.key(key)
.build());
return objectAsBytes.asByteArray();
}
}
@RestController
public class S3Controller {
@Autowired
private S3Service s3Service;
@PostMapping("/upload")
public ResponseEntity<String> upload (@RequestParam("file") MultipartFile file) throws IOException
s3Service.uploadFile(file);
return ResponseEntity.ok( body: "File uploaded successfully!");
}
@GetMapping("/download/{filename)") no usages
public ResponseEntity<byte[] > download(@PathVariable String filename) {
bytell data = s3Service.downloadFile(filename) ;
return ResponseEntity.ok()
.header(HttpHeaders.CONTENT_DISPOSITION, "attachment")
.body (data);
}
}
At the end, you need some configurations which you will get when you'll create a user and give it permissions to access our app through IAM. Then you'll get the access key, secret key, and the region it is in. Also the bucket name should be known.
There is another way, you can use MinIO server in your local environment to test the functionality of your codebase in spring with aws sdk for s3 integration because it supports aws sdk and the same code can be used here to test locally. Just in the credentials, put the access and secret keys as minioadmin and you're good to go.
AWS EC2
Amazon Elastic Compute Cloud (Amazon EC2) is a web service that lets you launch and manage virtual servers-called instances-in the AWS Cloud. It delivers secure, on-demand and scalable compute capacity, so you can add or remove servers within minutes and pay only for the resources you actually use.
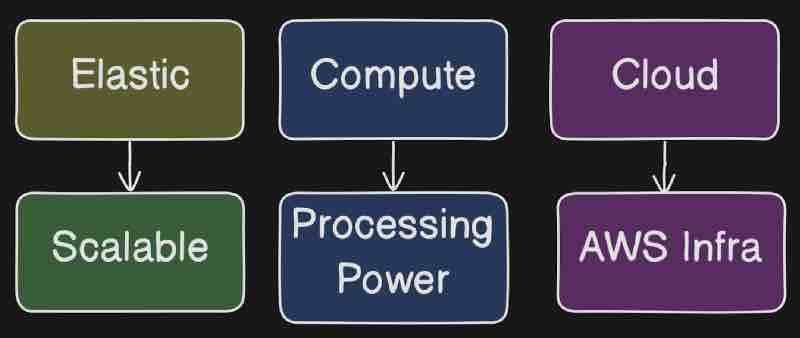
As we can see in the diagram, elastic as the name suggests, means that it is scalable, and we can scale it as much as we want. Compute means that it gives oyu a procressing power like your computer. So your computer is again a machine or some kind of server which you are using locally, Right? So think of EC2 instance as a separate computer which is running in aws. After that we have cloud that means it will be running in aws. That means aws will maintain the infrastructure,
Now let's say when we have a spring application, and we want to host it so that anyone will be able to access it from some other location. What I will do ? I will go ahead and deploy it on a server. Now this particular server is a physical server which actually have RAM, ROM, CPU and all those things and it will have OS system as well so that you can go ahead and connect to it. So what you will do? You will go ahead and put this application on this server and make it available on over the internet. Right. So that is something you can do? Now what is the problem over here? Here, we need to maintain this particular infrastructure and you need to buy all these hardware things and maintain it. That is the problem right? Basically you cannot buy entire server just because you want to host a website. Right? It's not feasible. Well, it's feasible for companies who have their own product and they are earning too much from their product and they are hosting their product on their server. So few companies will have their actual servers hosted in different cities and they will be deploying thier applications on that particular server and they will maintain the server as well, they don't have any problem, but maintaince is going to be difficult again, and there are many problems over here. What if this guy goes down? If there is any electricity failure then this will just go down, right? So what we can do is same server we can create inside aws? Now how we can do it? The answer is EC2.

Now same application you can create inside EC2 and this will guive you same virtual machine as the server. It will have operating system. It will have your RAM. It will have CPUs. It will have everything that you need that your computer actually have. It's a virtual computer hosted inside aws. Now for us it's a virtual machine but for aws, they will have actual infrastructure for it. This particular infrastructure and they will maintain it for us. And for maintaining that, they will cost us some money. So when you start your EC2 virtual machine, which they call it as instance. You will be able to deploy your application over there.
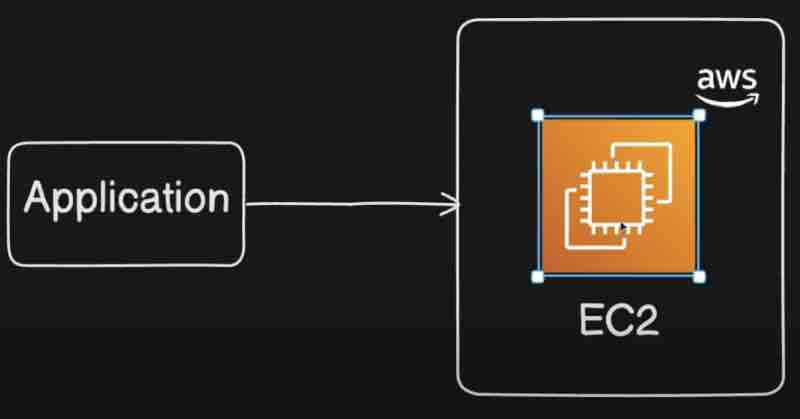
So AWS EC2 has something known as AMI [Amazon Machine Image], through that we can choose which OS we want for our instance. By default, aws chooses Amazon Linux, but there are windows, ubuntu os we can choose in free tier. Then we have something called as Instance type, through which we can choose the Cpu power and the Ram we need for our instance and accordingly the bill will be generated per hour. For example, there is nano instance with 1 cpu 0.5gb ram, then micro instance with 1 cpu 1gb ram, and then small instance with 2 cpu and 2gb ram, and likewise we can have even 48 core cpu 196gb ram instance as well. Aws truly has a lot of options available for EC2 instance. Then we have Key Pairs through which our application will be able to connect with our device using SSH keys. And then we have something called as Security Group. Let's look into it.
Let's say we have this particular house, and this particular house have many doors. This is one door then you'll have one door at the back, many doors basically. What I will do to protect my house, I will hire a security guard, and I will ask this guy to secure my house that dude, there may be lot of people who wants to enter my house, don't let them enter until I know them. So what I will do, I will go to this security guard and give him some rules. Someone who is coming if that is my friend or family or someone who I know then let them pass through front door. If someone who is coming they are servant people right who are going to do some job at my house ike cleaning or stuff then ask them to come through back door so that they can go to kitchen and do their stuff. A rael list I will provide to this security guard in order to enter my house through different doors. Similar to this example, now let's see the aws diagram.

Now here in this case, your ec2 is basically your house and your application is basically running on ec2 instance. There should be some entry point of this particular application. Like in this house we have doors, we have front door, we have back door. So in order to connect to any application, be it your spring boot application or any other application, you need to have an entry point which we call as ports. So usually we give server port on spring boot application, right? We deploy on 8080 porty inside our local host which is a port of http. Now for ssh also, we need a door that is port number 22. Now these are two doors for my ec2 instance. So I can connect to http via 8080 port, and I can connect to ssh via 22 port. Now, these two port doors, who is going to be my security guard and allow these two doors? Our security group in aws is going to be my security guard. It basically acts as a firewall. It's a firewall in front of my ec2. Security group is basically a group of rule which is acting as a firewall for your instance. Now this particular security group will have rules. So we give rules to this particular security group. Now we have have many rules, suppose if someone is coming from port 8080 or port 22 then allow him otherwise not.
SPRING SECURITY
First, we'll understand what exactly is spring security, and what exactly is the architecture. Then we'll see what is authentication and authorisation.
Spring security is basically a framework designed inside spring in order to secure your application right. Now how it will secure? It will protect our apis, or web applications, or microservicse from unauthorized access or attacks or security threats. We are writing our applications and managing everything, and we are storing data inside database as well, but what if our application is not secure. What if the user data that we are storing inside databases is not secure? That is the problem right. Anyone could attack your application, a group of people called hackers would attack your application and get whatever data they want right. They have many ways to do that. To prevent that point something called as spring security comes into picture. It is very important for our application.
Now what is authentication? Authentication is basically identity verification, and a process of verifying who you are. When we say authentication, a user will be authenticated by who the user is, and it ensures that the user is legitimate before granting access. So basically we will check if the user is valid or not. After that, what is authorization? Authorization is basically access control. And this is a next step once your authentication is successful. Once the user is authenticated, after that, the authorization comes into picture which defines what you can do inside your application. So there may be thousand features inside your application, but which feature you can access, that is something which will be defined by your authorization. And it ensures user only accesses what they are allowed to. For example, if the user is admin, he will be allowed to access everything or if the user is basically a normal user then they have access to limited features. So that is basically your authorization.
So when we add spring security dependency, we get passwords, and when we try to access any rest endpoint, it'll basically ask for username and password to developer. So this is what happens by adding spring security dependency and my application is magically secured. So now we can only access our application by using this password that this spring printed inside our console. And it is saying the generated password is for development purpose only. And your security configurations must be updated before running your application in production. The default user is basically just the word user. But what is happening behind htis magic? We'll look into that.
Let's understand the architecture of spring security. As we have undertood spring filters, which execute before the request reaches your application controller, we have something known as spring filter chain which is added with the spring security dependency in the already existing filters we have. In this filter chain, we do have multiple other filters as well, but spring security adds more filters to your list of filters, so this happens when you add support for spring security. Now, if you go to this particular architecture, that is spring documentation then you will find many parts over here so first it is saying a review of filters right. What exactly are filter chain? This is something which we have already seen and this is part of separate api right.
Now there is something called as delegating filter proxy, so basically we have a servlet api, which is basically a separate life cycle from your spring application. So you have spring application and you have servlet api, both are different things right. We are integrating those now and filter is a part of this guy. Servlet api have its own life cycle and your spring beanas have its own life cycle. Your filters will not have access to any of the beans so these two are separate things. What we want is we want a bridge between these two. We want something that will connect our servlet api life cycle to our spring application. So that is where something called as delegation filter proxy comes into picture.
In official documentation, it says spring provides a filter implementation named DelegatingFilterProxy that allows bridging between the Servlet container's lifecycle and Spring's ApplicationContext. So basically servlet container allows registering filter instances by using its own standards. So we need something which will bridge the gap between these two so they provide a solution for that which is delegating filter proxy which will get added to your standard servlet container so this guy delegatinf filter proxy will get added to your servlet api container. What it'll do is delegate all the work to spring bean that implements filter.
So to simply understand what the documentation is trying to say, it says in order to connect your servlet api to your spring application context, we have something called as delegation filter proxy, and when look deep into it, it has something called as filter chain proxy inside your delegating filter proxy, which again will have your security filter chain and if you look closely, it'll have security filters within it. so there will be multiple security filters.
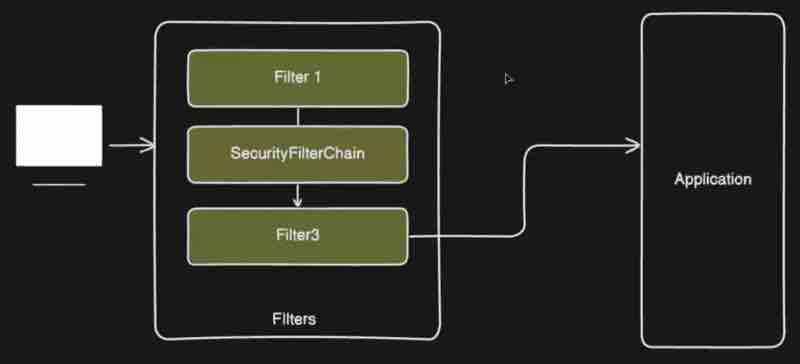
In development, spring has generated username and password and telling you to use it, but in production you may be using database or in-memory storage of your application, that is basically one method of doing it, or you can make use of something called as OAuth2, or you can also use JWT authentication or LDAP authentication, so we have multiple ways.

Now since spring is providing all of these ways of authentication and each way of authentication would be having its own filter mechanism, then do you think spring should add all of these filters for every authentication way all at one place, that won't be feasible right. Now since the default filter of spring security filter is actually username and password authentication filter, then it would be tedious process in order to handle that auth filter for each of this particular type of authentication. For this reason, spring provides its own authentication provider. So if you are making use of username and password, then spring provides authentication provider which will do that kind of authentication which is dao authentication provider. If you are using OAuth2 login then spring will provide authentication provider for that only. So spring segregates this authentication provider from your filter and each method or each tech of filtering will have its own authentication provider.
Let's say you have username and authentication filter, your request is coming over here then what this guy will do it will delegate your request to respective authentication provider which will authenticate the request for you right. The actual authentication part is in hands of your authentication provider depending on which method of authentication you're using right. Now in this case, username and password this guy will give the authentication task to this particular dao aithentication provider and this guy will do the task for you. But here we have multiple filters right, and we have multiple authentication providers. Now how spring would know that which authentication provider to use for each filter right. There will be multiple filters right. So how spring would know which particular authentication provider to to pick among these? In order to solve this problem, spring has introduced something called as authentication manager, which bridges the gap between your authentication provider and your filters. Now this particular filter will delegate the task to authentication manager that dude, I don't know which provider to use, this is basically the information that I have, you choose whatever authentication provider you want to choose and authenticate the request. Now this authentication manager is basically abstraction, and this has an implementation which is called as provider manager, which basically iterates through each of these authentication provider and check which one supports the incoming request right. So this guy authentication provider actually have one supports() method which returns if this particular authentication provider which we are looking into currently supports this particular request or not. If it supports then it will delegate the task to that particular authentication provider so that is basically your authentication manager and that is basically your provider manager right.
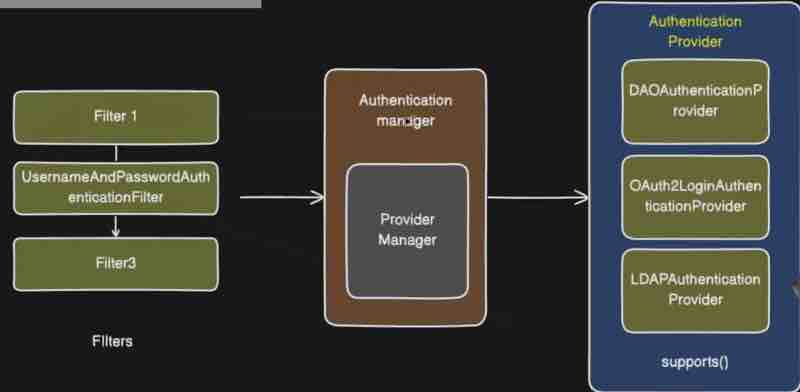
Now we know that spring security has provided us with a password, and it says that this auto generated password is for development purposes only, but in your production application, you need to have your own mechanism in order to do your username password validation and I am not responsible for that. Now that particular username and password needs to be validated and that particular username and password will be different in each environment that is local or production. And it may be stored inside your database. Now, how your authentication provider is going to retrive this particular user information from database. That is a question in front of this authentication provider? Because we are not going to write much code just to do that right. Now in order to solve this problem, we have a solution. Spring has something called as UserDetailsService provided by spring security. Now this authentication provider will connect to your user details service and this will have interfaces, for example, if you're storing inside memory, then you'll have InMemoryUserDetailsManager or otherwise it'll handle JDBC UserDetailsManager which will actually connect to your database and fetch the user information and return it to your user interface, and with that this user details service guy will return the user information to your authentication provider. Now another problemm arises here. If you're aware, we don't directly put password values inside your database, and instead we encode the password values and save it. Now suppose the password is encoded, then how will authentication provider know the actual value of password. Because from your user, you'll get actual values, and you've to validate according to that. So that is when something called as PasswordEncoder comes into picture. So this password encoder is part of authentication provider which will encode and decode your passwords which are stored inside your database and after that, decoding it will evaluate the password from your incoming request and return whatever is the result. So that is when something called as PasswordEncoder is used inside your spring security. Now once your authenication provider authenticates request, what it'll do? It will return something to your authentication manager right. it'll return the object of authentication to authentication manager and from authentication manager, it'll be returned to your filters. So this authentication object needs to be stored somewhere so that other part of your spring application will be able to access it to check all the details of your authentication. So that all other beans can access it inside your application to check the the authentication object. Now spring has a solution for that as well, which they call it as a SecurityContext right. So this particular authentication object will be stored inside your security context. So this security context will store your authentication object right. Your authentication object or also called as principal object right. And to access that, our spring application has provided some kind of abstraction which they call it as security context holder, which has its own methods such as get context, which will return you the authentication or principal object. That is when security context comes into picture, which will hold your principal object which can be used inside other parts of your application.
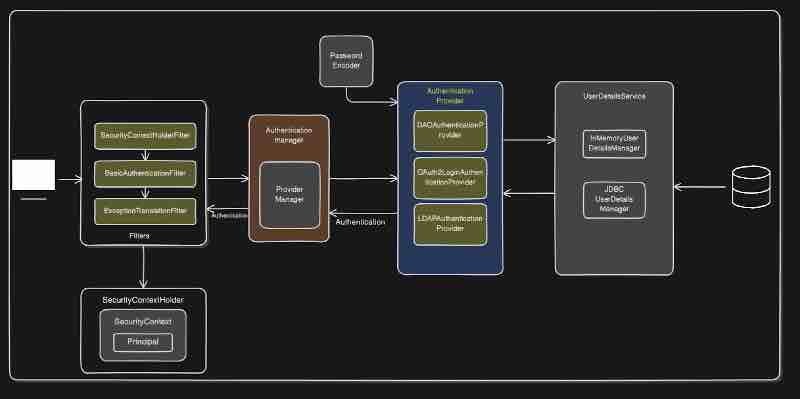
As we can see in this diagram, there are two more additional filters apart from the username and password authentication filter, which is security context holder filter which basically remembers that you have already been authenticated and does not reauthenticates again and again, and the other which is exception translation filter, whose job is to catch all the exception or authentication failures inside our filter and throw the respective error to client.
Since the default authentication behaviour is form based auth which we do not want because our application is purely backend oriented. So we'll look into spring security basic authentication for authentication without forms. In our official documentation, we can see the diagrams how they are explaining the flow.
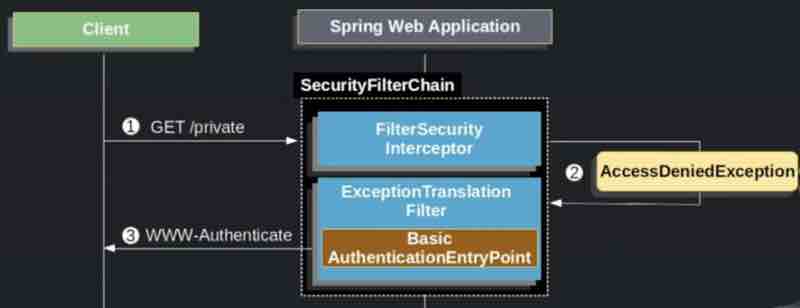
This diagram explains what'll happen if user makes an unauthenticated request. So when the GET request is being read by this security filter, since you've no access it'll throw AccessDeniedException which will be recorded by ExceptionTranslationFilter, which'll send the response back.
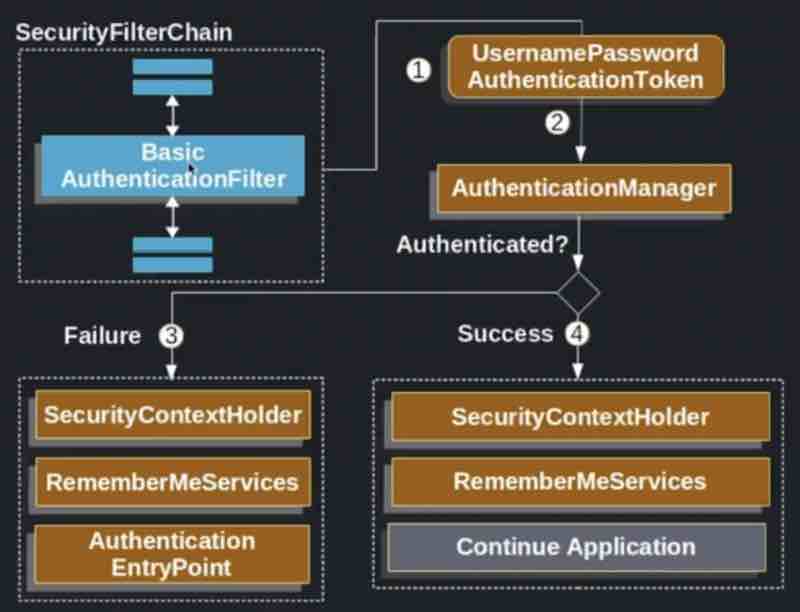
Now this diagram explains what'll happen if user is making an authenticated request through basic authentication filter. So what it'll do is it'll generate some username password authentication token, then it'll pass that token to authentication manager, and once the request is authenticated, if it is success then we'll store inside security context holder and we'll allow application to continue, but if it is a failure then we'll again make use of security context holder to store the respective failure details, and we'll not let the application to continue.
Now when we add this dependency inside our spring application. By default, spring enables form based authentication.
<dependency>
<groupId>org.springframework.boot</groupId>
<artifactId>spring-boot-starter-security</artifactId>
</dependency>
Now we have to tell spring security here that dude, I want basic authentication through http itself. I don't want form based authentication. So for everything that has been running in default inside spring security architecture. We can modify that at every level to ensure that we are using basic authentication right now.
@Configuration
@EnableWebSecurity
public class SecurityConfig {
@Bean
public SecurityFilterChain filterChain(HttpSecurity http) throws Exception {
http
.authorizeHttpRequests (auth->
auth.anyRequest) .authenticated)
. httpBasic(withDefaults());
return http.build();
}
}
Now configuring basic authentication filter requires you to implement the UserDetails interface while creating user entity, UserDetailsService interface while creating service, and requires yout to use Authentication Manager, And Authentication Provider classse. Now what you have to do is try to find out how to do all this by yourself. This is a single assignment for spring seccurity that'll help you revise everything related to security.
JWT Authentication
Now let's say there is one employee and this employee visits his office on daily basis, probably 3 days a week because people are lazy now a days. Now when this guy is going to office, he needs to authenticate himself, by saying that I'm the employee of this office right. Any random people cannot just go inside this office right. They need to be authenticated. Now what office can do? They can put a security guard over here. Now what this security guy will do? This guy will validate this particular employee. Now how this guy is goign to validate? This guy don't know this employee or let's say even if this guy is knowing this employee and even if this security guy changes tomorrow, this new security guard will not know this employee right. So this security guard needs something so this guy can validate this particular employee right. Now this employee can go to this particular security guard, he can show his ID and this guy can validate that ID right. Let's say there is soem register over here, in which they have entries of all the employees, and what this security guy will do? He will ask the ID of this guy and validate that ID against this particular register right? If that register contains the name and the details of this particular employee, if that is present then this guy will be allowed this particular employee to go to office. Right? Now, every time this guy is going to office, he needs to validate and go through all these entire process. Now this will happen for each day, right? Because this security guard cannot just let anyone pass through so he needs to validate as well.
Now this scenario is very similar to basic authentication. Security guard is basically spring security, and his register is basically your database where your username and password is stored. Now in order to access this office, we are giving this username and password to this security, and this security is validating us based on data inside the database. So because your database stores username and password, this situation is stateful. Because you are actually storing the details inside the database, and each time user is trying to access you are validating that particular request inside your database.

Now one of the problems with basic authentication is each time thsi guy is going to office, he needs ot validate right. Each time your client is sending request to your application, that client needs to send username and password, each time, so that is basically the problem with basic authentication. And let's say this employee is traveling right. Now let's say this is bangalore office. Now this compnay opens office in delhi as well. But this guy used to go only to bangalore and this security guard validates it against this register and allows this guy to go to bangalore office. Now this guy went to this delhi office. Now there will be some security guard and some other register. Now this guy will give its username and password, and the security guard of delhi office will try to find it in its register, but guess what? It's not there. Rather, it is present only inside your particular register. So that is again a problem. Now even if this employee belongs to this office. He cannot go inside because his details are missing inside this register. That is the problem with scalability.
So inside production, you scale your application right. You create multiple instances of your application. So that is basically another problem. Now what we to do is maintain these registers on a centralized database and all these instances can accese the same database. So that is basically one solution to this problem. So basically point overe here is that your basic authentication will not suit when it comes to microservices architecture or your stateless architecture. Now one more problem is this guy entered bangalore office right. Bangalore office may have multiple things right. Now how do we know this guy can access what department? His access again needs to be validated inside your office as well. So handling your roles and permissions is again a difficult thing when it comes to username and password authentication. Now what is the solution over here? What can be done? Now what if this guy is the employee of this office. He goes to the security guard and authenticates himself first, that hey I am the new employee of the company and here is my id. Now this security guard will check inside database, and if this is authenticated employee then what security guard will do is it'll issue access card to this particular employee. That dude this is your access card and this card will now contain all the details about this particular employee. Like what part of the office he can access. Now next time he visists the office, he doesn't need to go to the securiy gaurd right. What this employee needs to do is just carry this access card with him. So he can go to this office and just swiple his access card in the office door. And if that is authorized, he can go inside that office flawlessly. Now suppose he's going to delhi then he can just swiple the same access card inside the delhi office. So if this guy is authorized to access that department then the door will open automatically right. Now suppose somebody else gets the card that we issued to that guy, now we cannot just let anyone have access to office just because they got the card right. So we need to validate something inside the office when this guy is swiping at the door. So that is when your particular access card will be validated inside your office by using something called as a signature. So, in this case, this particular access card will be considered as, let's say some kind of token right? And when your client is sending the request to your application, they will just send this token along with it. Now there are multiple approaches to send this particular token right. Now we can do this with either XML or JSON. XMLs are very bulky right, so they are not preferred. Since json are easily compressable, and it is very easy to flow inside your web requests, and it's lightweight as well, and it's flowing through web so they call it as json web tokens. So that is basically the full form of JWT, that is Json Web Token. And that is how we use Json web tokens. And this token is not stored inside your database. Now this Jwt token will be shared to your client right. And your client should store it somewhere so that it's not accessible to anyone right, otherwise if other person finds the same access card and try to access, then they will be able to access right. Even then, people are using jwt widely, and this JWT token also have an expiry time. So after some amount of time, this token will be expired and your client will need to reissue the token right. So that is basically JWT.
So, how does the JWT Token looks like? It looks something like this. You may be able to see three colors over here separated by dot. These are actually three parts. Each part of this token has a significance. And here they are highlighting what is the significance. So first part over here is basically your decoded header. This means they will use some kind of algorithm. In this case, they're using HS256 which is pretty famous algorithm for encryption to encrypt this particular JWT token. And those encryption details are stored inside this first part. So first part will contain the type of your algorithm so your server could decode it. Now the second part will have actual information about your client. What is the subscriber id and name like that stuff. We can define issue at and expire at ids as well here. And third part over here is basically the signature verification, so I was talking about the signature over here right. That the signature will be validated when your jwt token is coming to your client. The signature will be validated, right? This is basically that signature and this signature will be validated when your request comes to your application. And this can be anything right? I can add any stuff over here, just that I need to verify it with my application so that is basically the signature.
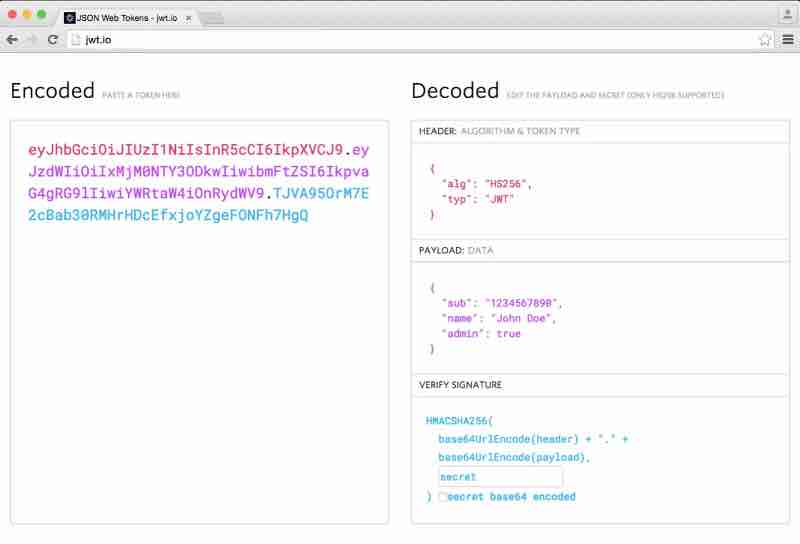
Now let's look into how JWT comes into the flow of authentication. Now when your client is sending the request to the server. In basic authentication, you need to send username and password with each request. So first you need to login, and each request you need to send username and password. But that is not needed because we are already authenticated. So here in this case what we need to do, user needs to be authenticated only once and needs to send this post request, let's say /login only once, then it'll do the authentication, and once the user is authenticated, then for that particular user, what we do is we create a JWT token, and we send it back to the client. Now your client has the JWT token because this guy has been authenticated once right, and need not to be authenticated again and again. So this guy have token your client can store this tokne somewhere in the memoy, and whenever your client is sending subsequent requests, then this guy will send the JWT authorization token that client has, as Authorization Bearer token, this request will not come to your application right. And how they can pass it. For example, if you go inside your postman then here in the authorization, you'll have multiple type of authentication right. You can see post selects basic auth type as default. But there is a option of bearer token as well, that we need here. And that token will be received by your application end. Once your application gets that token for any request, this applicaiton will first extract the jwt token from your authorization header. Once the token is extracted, that particular token will be decoded, through header.payload.signature. After that this particular signature needs to be verified, if the verification fails, we will send failure request which is 403 unauthorized error. If the veriifcation is successful we need to check the expiry of this particular token. And once all this process is completed, then finally your request will be processed to this particular controller, and that controller will send the response back. Now suppsoe if the token is expired, then we'll send the message to client that your token is expired, please login again. Now what this guy has to do is again send the authenticate request and issue a new jwt token, which can be used again in the same manner.
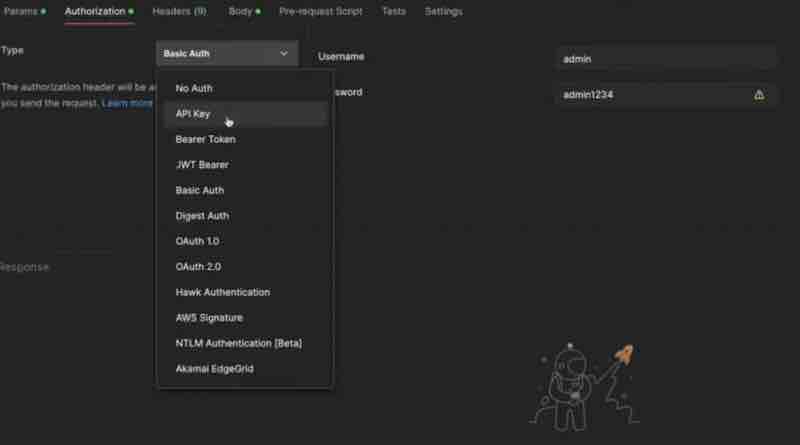
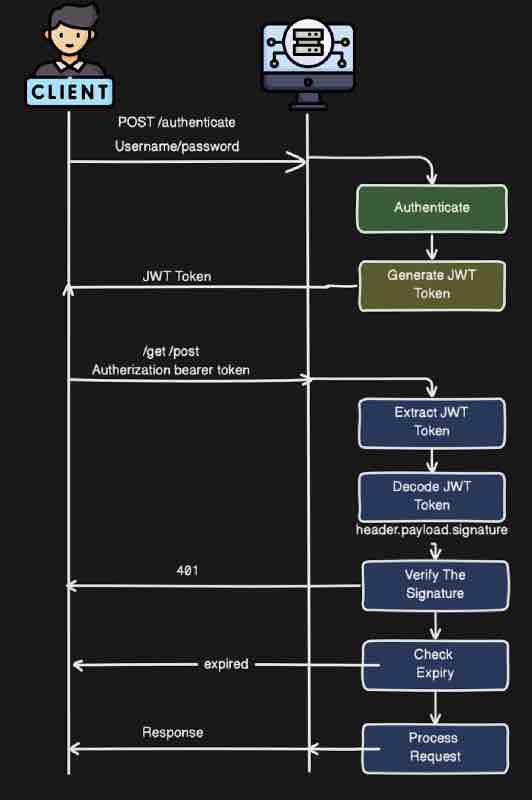
Now with jwt tokens what we want to do is we only want to authenticate once right. We don't want to authenticate again and again that also by using login or authenticate api right. How can we achieve that if we send the authenticate request to get the token and if the filter comes into picture, that filter will try to authenticate that particular request and for each request, that filter will keep on doing that, but what we want is we don't want this basic authentication filter provided by spring right. We want to directly call the authenticate api without any authentication. So what will we do is directly call the authenticate api and directly call the controller of authenticate api right. And we'll skip this particular basic auth filter for now. Because we are implementating jwt over here and we don't need basic auth filter. What we need is JWT authentication filter. But that will not come into picture while implementing your authenticate or login api. Your login api's purpose is to return the jwt authentication token right. Once user gets token and user sends the subsequent request then the jwt authentication filter will come into picture.
So we'll make changes to our spring security diagram. And here we got the authenticate flow for jwt authentication. Now when client sends the request to your application, we will skip the filter for only authenticate api. For only authenticate api we will skip this filter, and we will send the request directly to our AuthController. Now what is the job of AuthController? AuthController will create JWT token for our user, so that this user can send that particular token in other apis right. Now, this client will send the request to AuthController with username and password right. So here in this case, we are skipping the filter, but we still need to authenticate this particular request. This username and password we need to authenticate. Because how do we know that this particular username and password is correct? Once we authenticate that after that only we can generate jwt tokens right. We cannot generate jwt token and send to any user right irrespective of their username and password. We need to first authenticate them. But now here if you see in the AuthController, our request already came to the AuthController. Now how we are going to validate or how we are going to authenticate the user. Because in the request we'll have username and password. But we need somone to validate that right. Now what happens in the normal case is filter delegates the task to Authentication Manager. What we can do here is do the same thing, since filter is not there, we can directly tell authentication manager that dude, I have this username and password, please authenticate it. So we'll delegate the request to this authentication manager with the username and password and this guy will authenticate by using this same flow. This guy will call the dao authentication provider and fetch the data from our database, and then password encoder will decode it, and authentication will be completed, and the output of authentication will be sent back to our controller. And once that process is done, and user is authenticated. After that only, what we'll do we'll just create a JWT token right. Now this JWT Utility and libraries are just used for creating the jwt token. That is the simple flow of your jwt authentication.
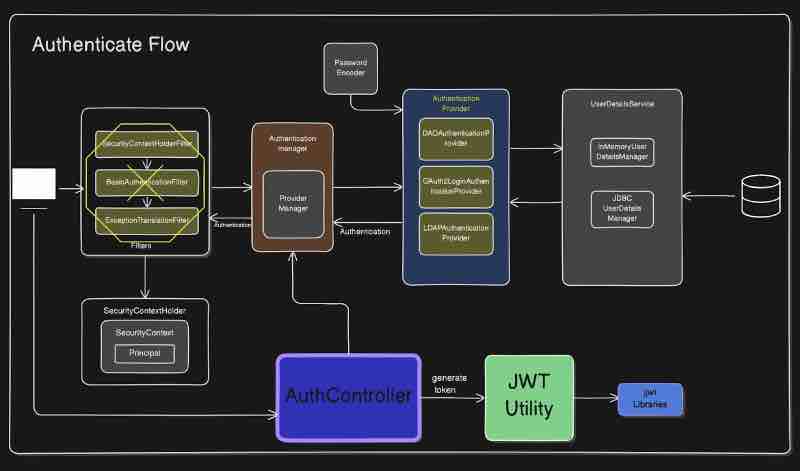
Now suppose you have the token, we don't want to authenticate the user as long as he has a valid token, so all these things from authentication manager to authentication provider will not come into picture now. Now request is already authenticated, and we need to just check the token that we are getting from the user right. That will be done by Jwt Auth Filter. Now what this Jwt Auth Filter will do is, it'll talk to our Jwt Utility, which is our custom implementation that will talk to the jjwt library inside our application. So this filter will directly talk to Jwt Utility, and this utility will again have other methods related to validating your jwt auth token. Once this token is validated, then this jwt auth filter will directly call the security context holder, and add this particular principal object, that dude this particular user is verified and I'm adding this to security context. Now when next filter comes into picture that is the default username and password filter, it'll see that dude the principal object is already added into security context. So I don't need to validate it again. So it'll just skip that. And your call will directly go to your controller. So that is basically the flow of your subsequent requests.
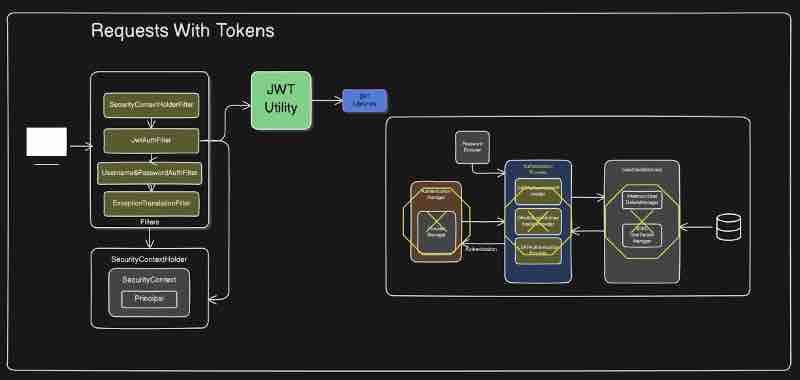
JWT Authentication And Authorization is your final assessment. You need to have a hands-on experience in order to understand it.
After that, you can go with KeyCloak or OAuth2 Implementation to better understand enterprise ready security implementation.
SPRING BOOT ADVANCED TOPICS
[To Read After This Course]
- Kafka / RabbitMQ
- Eureka Service Discovery
- API Gateway Using Spring Cloud
- Authentication Using Keycloak
- Microservice Communication Using FeignClient
- Centralized Configurations With Spring Cloud Config
AWS
- Deploy MySQL Into AWS RDS
- AWS ECR & ECS For Docker Images
- AWS VPC And Configurations
ASSIGNMENT
Create A Microservices Multi-Brand E-Commerce Platform In Spring Boot Where Buyers Can Purchase, Sellers Can Add Products, And Admin Can Manage Both Buyers And Sellers. Store Data In Mysql. Dockerize And Deploy To AWS. Implement Kafka, Eureka, Api Gateway, Authentication.
💬 Comments will load when you scroll here